Modern Redux
Intro
The Redux patterns that I have previously described on this site are now considered to be outdated with modern React and hooks. Even if you are still using mostly class components the Redux workflow can be greatly simplified using the Redux toolkit which automatically writes the actions for us, as well as automatically converting mutating logic in reducers into immutable logic using a library called Immer.
There is a lot of really good documentation here that goes over setting up the store, reducers and (now automatically) actions. So I won't just repeat what the documentation says. However there are a lot of different ways to organize all of this new syntax, so what I will do is below have some examples of my preferred organization for all of this. What makes sense for me. Your mileage may vary.
Connecting Props
React-Redux: Extracting Data with mapStateToProps
Triggering State Change
store.dispatch is the only way to trigger a state change.
React-Redux: Dispatching Actions with mapDispatchToProps
However if we create a map dispatch object and pass that into connect we do not need to call dispatch directly. See examples below.
Class Component Examples
Let us now put all this together. I have organized my application a little bit differently from how they have described in the documentation. This is what makes sense to me. Here let us look at a simple application that toggles the state of a menu to be collapsed or not. The simplest possible implementation.
Example 1
Creating a Slice
Redux is now organized by feature and not by actions/dispatch anymore. Each feature is called a slice. Here we have a slice for controlling the sidebar menu collapse.
import { createSlice } from "@reduxjs/toolkit"

export const guiSlice = createSlice({
  name: "gui",
  initialState: {
    collapseSidebarMenu: false,
  },
  reducers: {
    toggleSidebarMenu: state => {
      // flipping the boolean
      state.collapseSidebarMenu = !state.collapseSidebarMenu
    },
  },
})

export const { toggleSidebarMenu } = guiSlice.actions

export default guiSlice.reducer
Everything regarding this piece of state is now contained in this one slice. Our reducer does not need to receive a payload in this case, we are simply returning the opposite of the current state.
Adding Slice to Store
The store needs to be aware of this slice so we add it to the store configuration file. This is where we combine our reducers.
import { configureStore } from "@reduxjs/toolkit"
import authReducer from "./redux/authSlice"
import guiReducer from "./redux/guiSlice" // highlight-line

export default configureStore({
  reducer: {
    auth: authReducer,
    gui: guiReducer, // highlight-line
  },
})
We can see another slice in the store. That will be Example Two later.
Provide Store to Application
The entire application gets wrapped in the store provider.
import React from "react"
import ReactDOM from "react-dom"

// Redux
import store from "./store"
import { Provider } from "react-redux"

// Components
import App from "./components/App"

ReactDOM.render(
  <Provider store={store}>
    {" "}
    // highlight-line
    <App />
  </Provider>, // highlight-line
  document.querySelector("#root")
)
Now we are ready to use the Redux Store inside of our components.
Retrieve Store State in Components
The first step is to be able to retrieve the state from the store inside our components. Next we will change the state. But first let us just get it so that it can be used.
Here we have a component that creates an item in the menu. Depending on the state of the menu this item will show an icon and a title, or just the icon.
import React, { Component } from "react"
import { NavLink } from "react-router-dom"

// Redux
import { connect } from "react-redux" // highlight-line

class ContentMenuItem extends Component {
  // menu changes based on collapse redux state
  renderMenuItem() {
    // if menu is not collapsed include title
    let title
    if (this.props.collapseSidebarMenu === false) {
      title = <div className="content-menu-item-text">{this.props.Title}</div>
    }

    let menuItem = (
      <NavLink
        to={this.props.Link}
        exact
        className="content-menu-item"
        activeClassName="active-content-menu-item"
      >
        <div className="content-menu-item-icon">{this.props.Icon}</div>
        {title}
      </NavLink>
    )
    return menuItem
  }

  render() {
    return <>{this.renderMenuItem()}</>
  }
}

// map state to props
function mapState(state) {
  return {
    collapseSidebarMenu: state.gui.collapseSidebarMenu,
  }
}

// connect store
export default connect(mapState)(ContentMenuItem) // highlight-line
Change Store State in Components
Now let us look at a component where we retrieve the state and have the ability to change it by calling one of our actions. In this component we have a button that toggles the collapse state of the sidebar menu. Clicking on the button will trigger the action to flip the state of the menu, as well as consume the state to change the icon we are clicking.
import React, { Component } from "react";

// Redux
import { connect } from "react-redux";
import { toggleSidebarMenu } from "../redux/guiSlice";

/* Icons */
import ChevronLeft from "./icons/ChevronLeft";
import ChevronRight from "./icons/ChevronRight";

class ContentMenuCollapse extends Component {
  onCollapseClick() {
    // action(state)
    return () => this.props.toggleSidebarMenu(this.props.collapseSidebarMenu);
  }

  // change icon depending on menu state
  renderCollapseIcon() {
    // full menu
    if (this.props.collapseSidebarMenu === false) {
      return <ChevronLeft Color={this.props.Color} />;
    }
    // collapsed menu
    return <ChevronRight Color={this.props.Color} />;
  }

  render() {
    return (
      <div className="content-menu-collapse" onClick={this.onCollapseClick()}>
        {this.renderCollapseIcon()}
      </div>
    );
  }
}

// map state to props
function mapState(state) {
  return {
    collapseSidebarMenu: state.gui.collapseSidebarMenu,
  };
}
// map actions to props
const mapDispatch = {
  toggleSidebarMenu,
};

// connect store
export default connect(mapState, mapDispatch)(ContentMenuCollapse);
We can see that we have added a mapDispatch object to our connect function, which will now feed our actions into our component as props, and then above we used that action to update the state of the menu.
If you are confused about why we fed this.props.collapseSidebarMenu into this action as an argument, we can look again at the slice for this item.
import { createSlice } from "@reduxjs/toolkit"

export const guiSlice = createSlice({
  name: "gui",
  initialState: {
    collapseSidebarMenu: false,
  },
  reducers: {
    toggleSidebarMenu: state => {
      // flipping the boolean
      state.collapseSidebarMenu = !state.collapseSidebarMenu
    },
  },
})

export const { toggleSidebarMenu } = guiSlice.actions

export default guiSlice.reducer
The reducer simply takes the current state (boolean) as an argument and then flips it.
But what if we have a more complicated example? Something where we are sending data to the store with an actual payload, like a username or email? Let's go now to Example Two which introduces a bit more complexity.
Example 2
In this example we are including an actual payload of data that we need to save in the store for authentication purposes.
// documentation: https://redux.js.org/tutorials/fundamentals/part-3-state-actions-reducers#what-youve-learned
import { createSlice } from "@reduxjs/toolkit";

export const authSlice = createSlice({
  name: "auth",
  initialState: {
    userIsAuthenticated: false,
    newAuthCode: null,
    iDTokenInvalid: null,
    refreshTokenInvalid: null,
    auth_code: null,
    id_token: null,
    access_token: null,
    refresh_token: null,
    verified_id_token: null,
    user_id: null,
    username: null,
    email: null,
  },
  reducers: {
    setUserAuthStatus: (state, action) => {
      state.userIsAuthenticated = action.payload;
    },
    setIDTokenInvalid: (state) => {
      state.iDTokenInvalid = true;
      state.userIsAuthenticated = false;
    },
    setRefreshTokenInvalid: (state) => {
      state.refreshTokenInvalid = true;
      state.userIsAuthenticated = false;
    },
    setAuthCode: (state, action) => {
      state.newAuthCode = action.payload.auth_code.new;
      if (action.payload.auth_code.new === true) {
        state.auth_code = action.payload.auth_code.code;
        // clear user data before we retrieve new
        state.userIsAuthenticated = false;
        state.id_token = null;
        state.access_token = null;
        state.refresh_token = null;
        state.verified_id_token = null;
        state.user_id = null;
        state.username = null;
        state.email = null;
      }
    },
    clearUserData: (state) => {
      state.userIsAuthenticated = false;
      state.auth_code = null;
      state.id_token = null;
      state.access_token = null;
      state.refresh_token = null;
      state.verified_id_token = null;
      state.user_id = null;
      state.username = null;
      state.email = null;
    },
    storeAuthCodeResponse: (state, action) => {
      state.userIsAuthenticated = true;
      state.id_token = action.payload.tokens.id_token;
      state.access_token = action.payload.tokens.access_token;
      state.refresh_token = action.payload.tokens.refresh_token;
      state.verified_id_token = action.payload.verified_id_token;
      state.user_id = action.payload.verified_id_token.sub;
      state.username = action.payload.verified_id_token["cognito:username"];
      state.email = action.payload.verified_id_token.email;
    },
    storeRefreshTokenResponse: (state, action) => {
      // refresh token does not return another refresh token
      state.userIsAuthenticated = true;
      state.id_token = action.payload.tokens.id_token;
      state.access_token = action.payload.tokens.access_token;
      state.verified_id_token = action.payload.verified_id_token;
      state.user_id = action.payload.verified_id_token.sub;
      state.username = action.payload.verified_id_token["cognito:username"];
      state.email = action.payload.verified_id_token.email;
    },
  },
});

// Action creators are generated for each case reducer function
export const {
  setUserAuthStatus,
  setIDTokenInvalid,
  setRefreshTokenInvalid,
  setAuthCode,
  clearUserData,
  storeAuthCodeResponse,
  storeRefreshTokenResponse,
} = authSlice.actions;

export default authSlice.reducer;
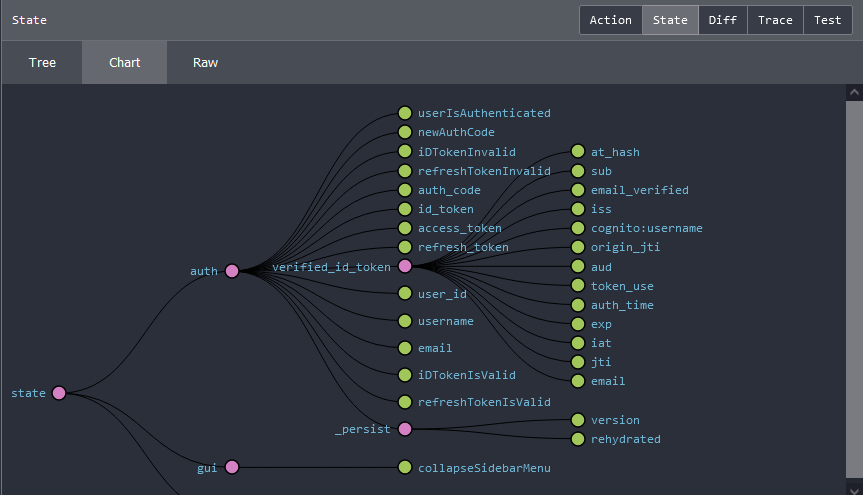
and that auth slice is going to manage a whole bunch of useful user authentication data for us.
Functional Component Examples
Here is a much simpler example with a simple select component. The slice and store would be set up similarly.
import React from "react";

// redux
import { connect } from "react-redux";
import { setSelectedDateRange } from "../redux/dataGridSlice";

// components
import Select from "react-select";

const DateRange = (props) => {

  return (
    <div className="date-range-container">
      <Select
        options={props.date_range_array}
        defaultValue={props.date_range_array[1]}
        onChange={(value)=> props.setSelectedDateRange(value)}
        className="default-range-selector"
      />
    </div>
  );
};

// map state to props
function mapState(state) {
  return {
    selected_date_range: state.data_grid.selected_date_range,
    date_range_array: state.data_grid.date_range_array,
  };
}

// map actions to props
const mapDispatch = {
  setSelectedDateRange
};

// connect store
export default connect(mapState, mapDispatch)(DateRange);
Persisting State
State persistence is a vital element in a modern application as it allows your website to serialize and then rehydrate your users data when the app is refreshed or the browser is re-loaded. There are some ways to do this manually, however there is an excellent library that handles this for us brilliantly called Redux-Persist.
So for example we can save our users authentication refresh token in local storage and then when they come back to the website several days later we can immediately retrieve a fresh id token for them without making them login again. Remember all of those checkboxes you see on website logins asking if you want the site to "remember you", yeah, that's what this is.
Here is what our store configuration file looks like once we have integrated redux-persist.
import { configureStore } from "@reduxjs/toolkit";
import { combineReducers } from "redux";
import { persistReducer } from "redux-persist";
import storage from "redux-persist/lib/storage";
import thunk from "redux-thunk";

// reducers
import authReducer from "./redux/authSlice";
import guiReducer from "./redux/guiSlice";

const rootPersistConfig = {
  key: "root",
  storage,
  blacklist: ["auth"],
};

const authPersistConfig = {
  key: "auth",
  storage: storage,
  blacklist: ["userIsAuthenticated", "newAuthCode", "iDTokenInvalid", "refreshTokenInvalid"],
};

// combine reducers
const rootReducer = combineReducers({
  auth: persistReducer(authPersistConfig, authReducer),
  gui: guiReducer,
});

const persistedReducer = persistReducer(rootPersistConfig, rootReducer);

const store = configureStore({
  reducer: persistedReducer,
  devTools: process.env.NODE_ENV !== "production",
  middleware: [thunk],
});

export default store;
We can see that we have needed to combine our reducers into a root reducer as our reducers now run through persistReducer.
In addition there we can see that we have a couple of "Persist Config" items. Those exist so that we can define specific pieces of state to either Whitelist or Blacklist. Here is a guide that is very helpful in explaining how to implement this while also using Redux-Toolkit.
Edvins Antonovs: How to use Redux-Persist with Redux-Toolkit
This is useful for example if we look at the piece of state userIsAuthenticated which is a boolean that we use to track whether the user is currently authenticated in the application. However this should only be true if we have just validated the users id token. If the user leaves and then comes back a day later, the id token is definitely expired. So we don't want to re-hydrate their old authentication status.
Here is a version of an authentication component i've written that takes advantage of all of these systems.
import React, { Component } from "react";

// Redux
import { connect } from "react-redux";
import {
  setUserAuthStatus,
  setIDTokenInvalid,
  setRefreshTokenInvalid,
  setAuthCode,
  clearUserData,
  storeAuthCodeResponse,
  storeRefreshTokenResponse,
} from "../redux/authSlice";

// Utility Functions
import {
  verifyIdToken,
  exchangeAuthCode,
  exchangeRefreshToken,
  clearAuthCodeFromURL,
  redirectToAuthentication,
} from "./utilities/authentication.js";

// redux payload
let payload = {
  auth_code: { new: null, code: null },
  tokens: null,
  verified_id_token: null,
};
class Authentication extends Component {
  componentDidMount() {
    console.log("MOUNT");
    const handleAuthCode = async () => {
      // check for auth code in URL
      const queryString = window.location.search;
      const params = new URLSearchParams(queryString);
      const authCode = params.get("code");
      // clear url
      if (authCode) {
        clearAuthCodeFromURL();
      }
      // configure payload
      payload.auth_code.new = authCode ? true : false;
      payload.auth_code.code = authCode;
      // set auth code state
      await this.props.setAuthCode(payload);
    };
    handleAuthCode();
  }

  componentDidUpdate() {
    console.log("UPDATE");
    const authenticationFlow = async () => {
      // 1: exchange auth code
      if (
        this.props.userIsAuthenticated === false &&
        this.props.newAuthCode === true
      ) {
        try {
          // get tokens
          payload.tokens = await exchangeAuthCode(this.props.auth_code);
          // verify id token
          payload.verified_id_token = verifyIdToken(payload.tokens.id_token);
          // store auth data
          await this.props.storeAuthCodeResponse(payload);
        } catch (error) {
          console.log("error exchanging auth code");
          console.log(error);
        }
      }
      // 2: check stored id token
      if (this.props.userIsAuthenticated === false && this.props.id_token) {
        console.log("attempting stored id token");
        try {
          // verify id_token from state
          verifyIdToken(this.props.id_token);
          // authenticated
          await this.props.setUserAuthStatus(true);
        } catch (err) {
          console.log("failure validating stored id token");
          console.log(err);
          // status
          await this.props.setIDTokenInvalid();
        }
      }

      // 3: exchange refresh token
      if (
        this.props.userIsAuthenticated === false &&
        this.props.iDTokenInvalid === true
      ) {
        console.log("attempting stored refresh token");
        try {
          payload.tokens = await exchangeRefreshToken(this.props.refresh_token);
          // verify id token
          payload.verified_id_token = verifyIdToken(payload.tokens.id_token);
          // store auth data
          await this.props.storeRefreshTokenResponse(payload);
        } catch (error) {
          console.log("failure exchanging refresh token");
          console.log(error);
          // status
          await this.props.setRefreshTokenInvalid();
        }
      }

      // 4: revert to auth page
      if (
        this.props.userIsAuthenticated === false &&
        this.props.iDTokenInvalid === true &&
        this.props.refreshTokenInvalid === true
      ) {
        this.props.clearUserData();
        redirectToAuthentication();
      }
    };
    authenticationFlow();
  }

  render() {
    return <></>;
  }
}

// map state to props
function mapState(state) {
  return {
    userIsAuthenticated: state.auth.userIsAuthenticated,
    newAuthCode: state.auth.newAuthCode,
    iDTokenInvalid: state.auth.iDTokenInvalid,
    refreshTokenInvalid: state.auth.refreshTokenInvalid,
    auth_code: state.auth.auth_code,
    id_token: state.auth.id_token,
    access_token: state.auth.access_token,
    refresh_token: state.auth.refresh_token,
    verified_id_token: state.auth.verified_id_token,
    user_id: state.auth.user_id,
    username: state.auth.username,
    email: state.auth.email,
  };
}
// map actions to props
const mapDispatch = {
  setUserAuthStatus,
  setIDTokenInvalid,
  setRefreshTokenInvalid,
  setAuthCode,
  clearUserData,
  storeAuthCodeResponse,
  storeRefreshTokenResponse,
};

// connect store
export default connect(mapState, mapDispatch)(Authentication);
This component does a lot of things. First it looks to see if there is an auth code in the header, which is an indicator that the user just logged in from the authentication screen. If there is an auth code it handles that. If there isn't it attempts to validate the user by using our stored id and refresh tokens. Lastly if none of those work the user is re-directed back to the authentication screen so that we can get a new authentication code.
The real beauty of this system though is that all the Authentication work is contained within this one component. In other places in the application we will be making various API calls, and before each API call we will quickly verify the current id token in storage to make sure that it has not expired (which would cause our API call to fail). If it has expired it will trigger the iDTokenInvalid piece of state, which will cause the Authentication component to re-render. This will retrieve a new id token for the user, which will allow us to successfully make our API calls.
Automated Amazon Reports
Automatically download Amazon Seller and Advertising reports to a private database. View beautiful, on demand, exportable performance reports.
