AWS CodePipeline for React App to S3 Bucket
Intro
🐳 Docker Users Take Note: If your application has been Dockerized you will want to follow up with this article:
📘 ncoughlin: AWS CodePipeline for Dockerized React App to S3 Bucket
In a previous post we created a CI/CD pipeline for a React application using AWS CodePipeline which listened for changes on a Github branch, built the static site files and then deployed them to an EC2 instance.
Ncoughlin:AWS CodePipeline for React App
However an EC2 instance is total overkill for this application, because React generates completely static site files, which means that everything outside of the /build folder is completely irrelevant when it comes time to serve the files to users. Therefore let us vastly simplify the process of creating a CI/CD pipeline for a React application by instead serving the /build files to an AWS Simple Storage Service bucket (S3), and use that bucket as the server for the website.
Notably with this change to the pipeline we no longer need the appspec.yml file or any of the shell scripts that we wrote previously to instruct the EC2 instance. Instead we need only make some changes to our buildspec file.
The pipeline consists of three portions:
- Code Commit: The source of our site files. The pipeline will monitor a repository of our choice for changes and trigger the pipeline when it detects them.
- CodeBuild: This is where we configure the container that will build our site files. We configure the container with a buildspec file.
- CodeDeploy: This is where we define where we want the built files to go. In this case it is the S3 bucket that we will configure to host the files publicly.
CodeCommit
This is the simplest portion of the pipeline so we are going to skip over this, there is little room for confusion while configuring this section.
CodeBuild
In CodeBuild we tell the pipeline that we want to use a buildspec.yml file, which we place in the root of our project. We have to specify that we are using node, and then we have some more specific instructions because we are using yarn in our application. We use yarn to install all of the dependencies for our application. Then we build the application. Lastly we define which files we want to include in the artifact.
version: 0.2

phases:
  install:
    runtime-versions:
      nodejs: 12

    commands:
      # install yarn
      - npm install yarn
      # install dependencies
      - yarn
      # so that build commands work
      - yarn add eslint-config-react-app

  build:
    commands:
      # run build script
      - yarn build

artifacts:
  # include all files required to run application
  # we include only the static build files
  files:
    - '**/*'
  base-directory: 'build'
The artifact is the bundle of files that the build will deploy to your chosen location. So in our case we just want it to be the build files because that is all we care about. So we instruct the container to output all of the files from the build folder.
CodeDeploy
This is where we previously deployed the app files to an EC2 instance and had all sorts of complicated instructions on how to start and stop that EC2 instance... we are now going to do this a much simpler way. We go into S3, make a bucket, and then in deploy we select the artifact that was created in our previous step and tell it to move it to the S3 bucket we created.
Configuring the S3 bucket to be a publicly available website is all handled outside of the Pipeline, over in the S3 bucket itself. The job of the pipeline is just to get the files there.
Configuring the S3 Bucket
By default S3 buckets are not publicly available, nor are they configured automatically to be static website hosts. However it is very easy to change that. Go into your S3 bucket and then go to properties. You will have an option here to enable Static website hosting, enable that and then tell it which file is your index (for React apps it is index.html).
Fantastic, but now we need to adjust the permissions so that it is actually visible (or not) to the public.
S3 Bucket Security
Previously when we needed to control access to our application when it was hosted on an EC2 instance we accomplished that with a security group. With S3 buckets we cannot apply security groups, but we can accomplish essentially the same thing using "Bucket Policies".
Navigate to the Permissions tab inside the bucket and turn off the option to block all public access.
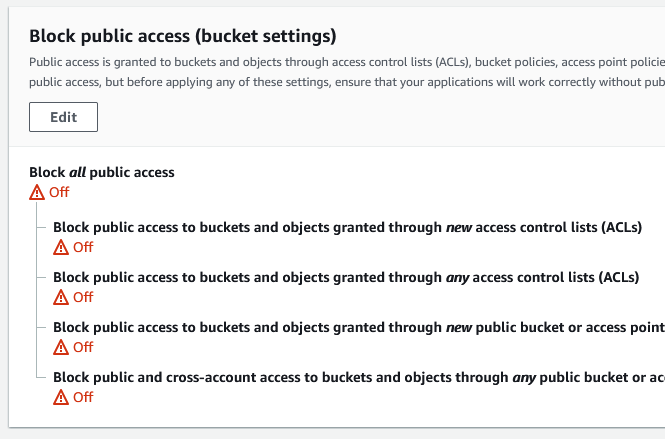
Don't worry, this will not make everything in the bucket immediately publicly available. It gives you the possibility to make it publicly available if you specifically state that in your bucket policy, which is where we define who has access to the bucket.
There are essentially two types of permissions that you are going to be changing here. You are going to be changing the permissions for which IAM users (that's you!) are allowed to change things on this bucket, and whether or not anonymous public users are allowed to read/write to this bucket.
One of the easy things to do when messing with bucket policies is to mistakenly lock yourself out. You can do that very easily by submitting a bucket policy that does not explicitly grant permission to yourself to view or modify the bucket, thereby preventing yourself from updating the bucket policy to fix this!
If you find yourself in this predicament, you will need the root user for the AWS account to go into the bucket policy delete it so that you can start over again.
Giving Yourself Access
Because we don't want to get locked out, let us start by giving ourself blanket access to our bucket.
{
    "Version": "2012-10-17",
    "Id": "supercoolapp-s3-bucket-policy",
    "Statement": [
        {
            "Sid": "giveIAMUsersAccess",
            "Effect": "Allow",
            "Principal": {
                "AWS": "arn:aws:iam::YOUR_IAM"
            },
            "Action": "s3:*",
            "Resource": "arn:aws:s3:::YOUR_BUCKET/*"
        }
    ]
}
Note the variables in caps that you must replace, and in addition the /* at the end of the bucket id to indicate that we are giving ourselves permission to access all the files therein. You will get an error if you miss that. We have given ourselves total blanket permission here with the * under action. If we were trying to set up a more specific policy with another user that only let them do certain things we would have been more specific here.
Allowing Public Access
Next let us allow public access to this bucket so that users can actually... visit the website.
{
    "Version": "2012-10-17",
    "Id": "supercoolapp-s3-bucket-policy",
    "Statement": [
        {
            "Sid": "giveIAMUsersAccess",
            "Effect": "Allow",
            "Principal": {
                "AWS": "arn:aws:iam::YOUR_IAM"
            },
            "Action": "s3:*",
            "Resource": "arn:aws:s3:::YOUR_BUCKET/*"
        },
        {
            "Sid": "allowPublicAccess",
            "Effect": "Allow",
            "Principal": "*",
            "Action": [
                "s3:GetObject"
            ],
            "Resource": "arn:aws:s3:::YOUR_BUCKET/*"
        }
    ]
}
Here we have allowed anyone the ability to read the bucket. The website would now be publicly available.
Whitelist IP Addresses
What if we want to make sure the website is available on the internet, but we want to have an IP whitelist so that we can test it ourselves first before the website is ready to be publicly available? Let's replace that blanket public permission with an IP whitelist.
{
    "Version": "2012-10-17",
    "Id": "supercoolapp-s3-bucket-policy",
    "Statement": [
        {
            "Sid": "giveIAMUsersAccess",
            "Effect": "Allow",
            "Principal": {
                "AWS": "arn:aws:iam::YOUR_IAM"
            },
            "Action": "s3:*",
            "Resource": "arn:aws:s3:::YOUR_BUCKET/*"
        },
        {
            "Sid": "IPAllow",
            "Effect": "Allow",
            "Principal": "*",
            "Action": "s3:GetObject",
            "Resource": "arn:aws:s3:::YOUR_BUCKET/*",
            "Condition": {
                "IpAddress": {
                    "aws:SourceIp": "YOUR_IP"
                }
            }
        }
    ]
}
Note that the whitelist and the public access statements should not be used together. The public access statement will override the whitelist. Replace the whitelist with the public access statement when it is time for the site to go live.
Additional Steps
For real sites/applications the next steps would be to put CloudFront in front of this bucket and then alias your real URL IP to CloudFront.
You will need to put Cloudfront in front of this bucket if you want the website to use HTTPS.
Cloudfront IP Whitelist
Once you have implemented Cloudfront you will need to create a WAF ACL with an IP Set to prevent public access to the site until you are ready.
One hole in this strategy is that the S3 bucket endpoint is still visible if you go there directly. There are some instructions on how to prevent this by requiring a custom header in all requests in your application, and then having Cloudfront include those headers in all requests.
AWS: Restricting access to files on custom origins
This is not actually a secure method, because of course someone could simply review your code in the client to see what header the client is checking for. So it would not stop someone who was purposely trying to circumvent your URL and was intentionally trying to use the insecure version of your site. It would however protect a casual user from accidentally stumbling into the HTTP bucket and using it.
However in my particular instance, because of the way that the authentication is setup, as soon as someone tried to login they would be redirected to the secure website. Even if someone was given an intentionally malicious sign in URL, the authentication would invalidate because the redirect URL was incorrect (i've tried). My actual application is completely disconnected from my marketing homepage, and application redirects to authentication immediately if the user is not authenticated. Therefore there is really no security danger in my particular application. A user could browse the marketing page on the wrong URL sure... but that is not really a security risk.
Automated Amazon Reports
Automatically download Amazon Seller and Advertising reports to a private database. View beautiful, on demand, exportable performance reports.