React-Redux: Asynchronous Actions (Redux-Thunk)
Intro
This post will cover how to fetch data from an API inside of a React app using Redux and Redux-Thunk. In this example we are going to be creating a simple app that displays a list of blog posts that have been fetched from an API.
General Data Loading With Redux
General Process
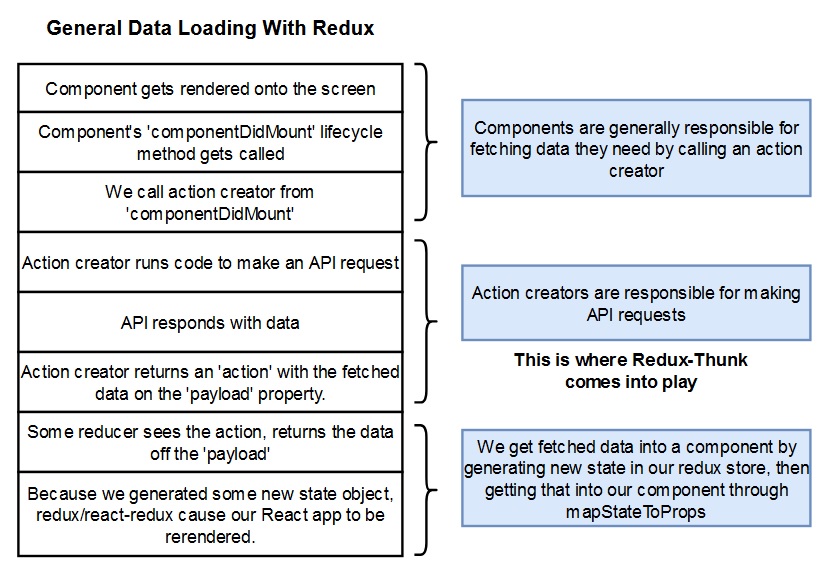
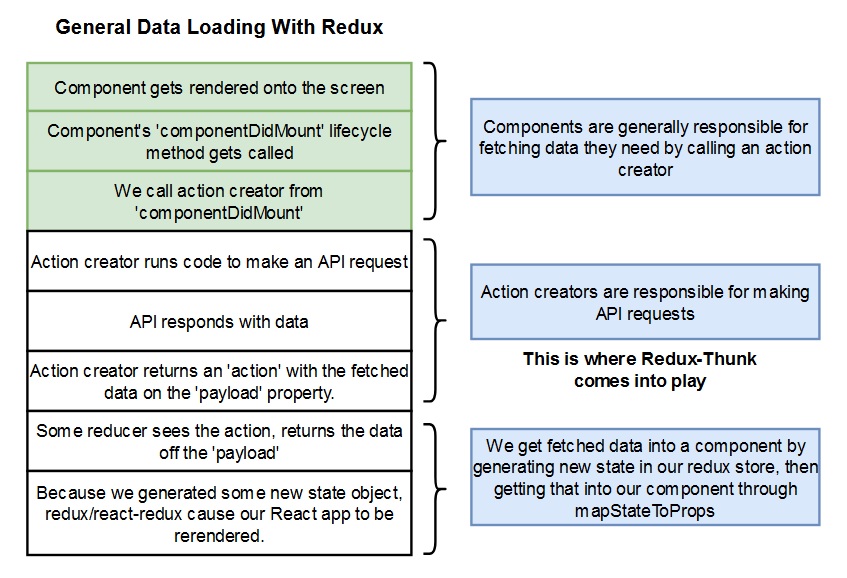
This is the process that we will be following.
- Component gets rendered onto the screen
- Component’s ‘componentDidMount’ lifecycle method gets called
- We call action creator from ‘componentDidMount’
- Action creator runs code to make an API request
- API responds with data
- Action creator returns an ‘action’ with the fetched data on the ‘payload’ property.
- Some reducer sees the action, returns the data off the ‘payload’
- Because we generated some new state object, redux/react-redux cause our React app to be re-rendered.
Separation of Concerns
App Scaffolding
In this section we are just going to cover the scaffolding of the app. You can skip this if you want to go straight to the thunk. First we generate a new app with actions and reducers folders and indexes. First we need an action.
Creating Actions
First we can scaffold out a basic action that doesn’t even have a payload at this point, we just need to get this wired up.
export const fetchPosts = () => {
    return {
        type: 'FETCH_POSTS'
    };
};
Connect Component to Action
Here is our basic PostList component. We make sure to import connect and the fetchPosts action. We create a class component. Then at the bottom we wire up connect. We don’t have a mapStateToProps function yet, so we just put null for that. For the second argument we pass in our action that we created, fetchPosts. And lastly we pass the component into the second function as always.
This connect function is telling our Provider that this component is going to use this action. Once our reducers are complete we can come back and add the mapStateToProps function.
import React from 'react';
import { connect } from 'react-redux';
import { fetchPosts } from '../actions';

class PostList extends React.Component {
    render() {
        return <div>Post List</div>;
    }
}
export default connect(null, {fetchPosts})(PostList);
Component Mounts and Calls Action
At this point we can add the componentDidMount function (which is a default React method that fires as soon as the component has rendered) and inside of that we run our fetchPosts action that is now being passed down as a prop from the store.
import React from 'react';
import { connect } from 'react-redux';
import { fetchPosts } from '../actions';

class PostList extends React.Component {
    componentDidMount() {
        this.props.fetchPosts();
    }

    render() {
        return <div>Post List</div>;
    }
}
export default connect(null, {fetchPosts})(PostList);
So at this point we have an action (which does nothing) that fires as soon as the PostList component renders.
API Request Scaffolding
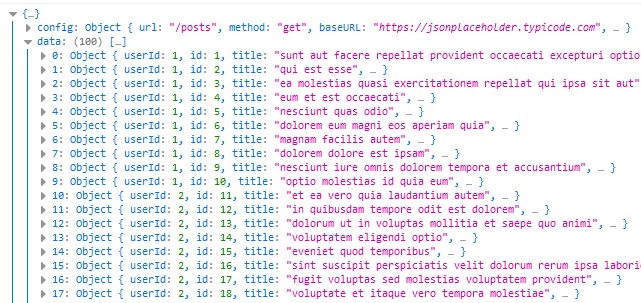
We will be using Axios to facilitate our API requests. A bit of file structure, we make a new folder in src called “apis” and then inside that we make a file called jsonPlaceholder.js. Thus named because we are going to be using the jsonplaceholder.typicode.com to get dummy data for this application. Then following our typical axios workflow we place the following in our api config file.
import axios from 'axios';

export default axios.create({
    baseURL:'https://jsonplaceholder.typicode.com'
});
Typically we would also place an API key into this file, but this service does not require one.
API Request In Action Creator
Let’s start by looking at a bad approach to this problem.
import jsonPlaceholder from '../apis/jsonPlaceholder';

export const fetchPosts = async () => {
    // Bad Approach!!!
    const response = await jsonPlaceholder.get('/posts');

    return {
        type: 'FETCH_POSTS',
        payload: response
    };
};
This is a bad approach because it breaks one of the rules of Redux Actions.
![]()
As the error message implies, we cannot use async function for Redux Actions. This is where the Thunk Middleware comes into play.
Understanding Async Action Creators
Why are Async function in action creators verboten? The answer is not intuitive.
Problem 1
It is because Redux is expecting a plain object to be returned, and it LOOKS like that is what is happening. But in reality, once the code has been transpiled through Babel it initially returns a request object, and not a plain object, which is what causes the error.
Problem 2
The second problem is common with API requests across platforms. It takes time. If we cannot make the action dispatch wait until we have gotten the API request back with an asynchronous function, then the reducers on the action will run before the data they are supposed to be working with has arrived.
All of this could be avoided if React did not take care to be compatible with a wide range of browsers by transpiling everything with Babel. But we don’t live in that world. We live in a world where Internet Explorer ruins everything.
Middleware In Redux
Synchronous Action Creator – Instantly returns an action with data ready to go
Asynchronous Action Creator – Takes some amount of time to it to get its data ready to go
We are working towards creating an Asynchronous Action Creator. To do this we need to use a middleware like redux-thunk. In redux a middleware exists between dispatch and the reducers. What exactly is middleware (in this context)?
- A function that gets called with every action we dispatch
- Has the ability to STOP, MODIFY, or otherwise mess around with actions
- Tons of open source middleware exists
- Most popular use of middleware is for dealing with async actions
- We are going to use a middleware called ‘Redux-Thunk’ to solve our async issues
Normal Action Creators vs Thunk
Normal action creators have the following properties.
- Action Creators must return action objects
- Actions must have a type property
- Actions can optionally have a ‘payload’
Action creators with Redux-Thunk have the following properties.
- Action Creators can return objects or functions
- If an action object gets returned, it must have a type
- If an action object get returned, it can optionally have a ‘payload’
Redux-Thunk Cycle
When Redux-Thunk encounters an action object it simply tells it to “move along” and passes it to the Reducer where it would normally go. If the action is a function Thunk kicks in.

Action Creators With Thunk
Here is a look at what our action creator looks like with thunk. We can see that we are returning an Async function that takes dispatch and getState as its arguments, and then we manually fire dispatch with our action as an argument.
import jsonPlaceholder from "../apis/jsonPlaceholder";

export const fetchPosts = () => {
  return async function (dispatch, getState) {
    const response = await jsonPlaceholder.get("/posts");

    dispatch({ type: 'FETCH_POSTS', payload: response})
  };
};
Note that it is totally ok to have standard action objects in our action index also, this is just the syntax that is used anytime we need to use a function because we require async. Also, thanks to modern ES2015 syntax we can refactor this to be a bit shorter.
import jsonPlaceholder from "../apis/jsonPlaceholder";

export const fetchPosts = () => async (dispatch) => {
  const response = await jsonPlaceholder.get("/posts");

  dispatch({ type: "FETCH_POSTS", payload: response });
};
Because we aren’t actually using getState on this action we can remove that as a second argument. We can convert the inner function to an arrow function. Also because there is only one possible item to return, we can strip out return and move the inner function call up to the same line as the first. This is completely valid and equivalent.
Applying Middleware To A Redux Store
We do of course need to import Thunk, and we do that at our primary index level, because that is where the provider lives. Here is our src/index.js file. We have imported thunk, and we have also added the applyMiddleware method from redux.
import React from "react";
import ReactDOM from "react-dom";
import { Provider } from "react-redux";
import { createStore, applyMiddleware } from "redux";
import thunk from 'redux-thunk';

import App from "./components/App";
import reducers from "./reducers";

ReactDOM.render(
  <Provider store={createStore(reducers)}>
    <App />
  </Provider>,
  document.querySelector("#root")
);
and then once we have properly imported these items let’s break our store prop out of the provider into a helper constant and modify it.
import React from "react";
import ReactDOM from "react-dom";
import { Provider } from "react-redux";
import { createStore, applyMiddleware } from "redux";
import thunk from 'redux-thunk';

import App from "./components/App";
import reducers from "./reducers";

const store = createStore(reducers, applyMiddleware(thunk));

ReactDOM.render(
  <Provider store={store}>
    <App />
  </Provider>,
  document.querySelector("#root")
);
And we can see that we have simply added applyMiddleware as a second argument and passed in thunk!
Reducers
At this point we are almost done with the thunk cycle. We just need to work on our reducers and we will be done!

Reducer Organization
This is a bit off topic but let’s just briefly look at a new way to organize our reducers. Like components, as the application grows we want to break our reducers out into separate files. Here is a quick example. We can start by making a new reducer in the reducer index called postsReducer.
export default () => {
    return 123;
};
and then in our reducers/index file we simply add that into our combine reducers function.
import { combineReducers } from 'redux';
import postsReducer from './postsReducer';

export default combineReducers({
    posts: postsReducer
});
It’s easy to see why this would be useful as the application grows!
Rules of Reducers
- Must return any value besides ‘undefined’
- Produces ‘state’, or data to be used inside of your app using only previous state and the action (reducers are pure)
- Must not return reach ‘out of itself’ to decide what value to return
- Must not mutate its input ‘state’ argument
The last rule is a bit tricky. The reason that thunk does not want you to mutate the state input, is that if it detects the same state on memory (because it was modified and not created anew) then it will assume that no changes were made and the component will not update. That’s the short version.
Safely Updating State In Reducers

Switch Statements In Reducers
Up until now we have been using IF statements in our reducers to determine if the action type matches, and if not return the previous state.
export default (state = [], action) => {
    if (action.type='FETCH_POSTS') {
        return action.payload;
    }
    return state;
};
This is fine but there is another way that we can accomplish this. Switch Statements.
export default (state = [], action) => {
  switch (action.type) {
    case "FETCH_POSTS":
      return action.payload;
    default:
      return state;
  }
};
Dispatching Correct Values
Switching back to our PostList component, it’s finally time to pass our fetched information into the component as a prop. We currently have the information stored in our Redux store. Now we need to pass it in as a prop. It’s time to mapStateToProps().
import React from 'react';
import { connect } from 'react-redux';
import { fetchPosts } from '../actions';

class PostList extends React.Component {
    componentDidMount() {
        this.props.fetchPosts();
    }

    render() {
        return <div>Post List</div>;
    }
}

const mapStateToProps = (state) => {
    return { posts: state.posts };
}

export default connect(mapStateToProps, {fetchPosts})(PostList);
Props to posts is now available to us as an array. We will need to map out the array to iterate over the posts and display them, but they are available!
console.log(this.props.posts);
Rendering The List
This is all review at this point, but we are going to render the post array in the PostList component now.
We can start by making a helper function called renderList where we will map out the array. Then we simply insert that method into the render method.
import React from "react";
import { connect } from "react-redux";
import { fetchPosts } from "../actions";

class PostList extends React.Component {
  componentDidMount() {
    this.props.fetchPosts();
  }

  renderList() {
    return this.props.posts.map((post) => {
      return (
        <div className="item" key={post.id}>
          <i className="large middle aligned icon user" />
          <div className="content">
            <div className="description">
              <h2>{post.title}</h2>
              <p>{post.body}</p>
            </div>
          </div>
        </div>
      );
    });
  }

  render() {
    console.log(this.props.posts);
    return <div className="ui relaxed divided list">{this.renderList()}</div>;
  }
}

const mapStateToProps = (state) => {
  return { posts: state.posts };
};

export default connect(mapStateToProps, { fetchPosts })(PostList);
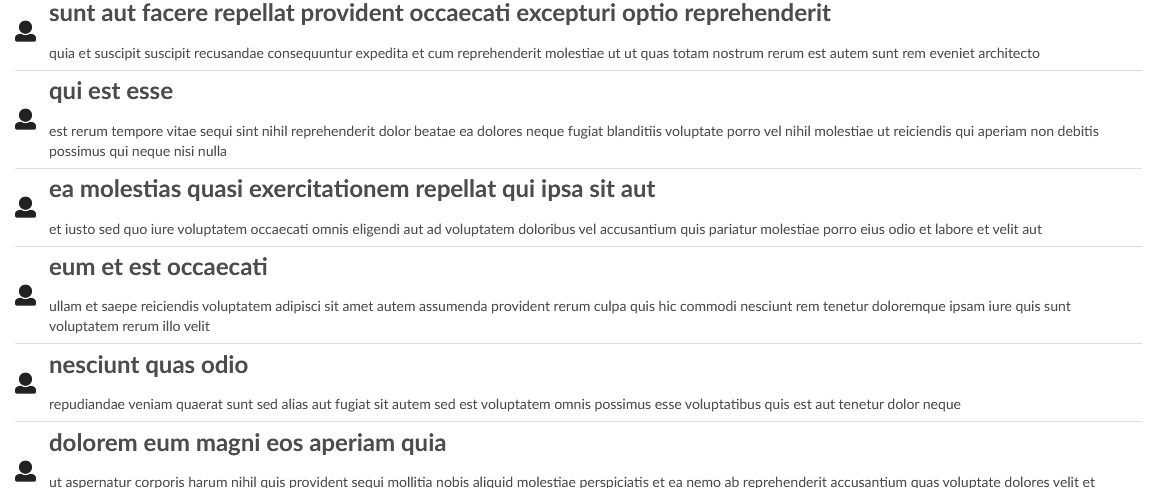
And voila.
Next Steps: Fetching and Displaying Post Author
This little application has another step. We want to fetch and display all of the authors of these posts. The trick is that the API only returns an author ID, and the author data is stored in another location. This will require another set of API requests. We are going to go ahead and move this to the next post because we are getting pretty long on this one.
GitHub Repo
Comments
Recent Work
Basalt
basalt.softwareFree desktop AI Chat client, designed for developers and businesses. Unlocks advanced model settings only available in the API. Includes quality of life features like custom syntax highlighting.
BidBear
bidbear.ioBidbear is a report automation tool. It downloads Amazon Seller and Advertising reports, daily, to a private database. It then merges and formats the data into beautiful, on demand, exportable performance reports.