Intro to React-Redux
Intro
In this post we will create a simple React application to explore the integration of Redux into React using react-redux. Get started by creating a new React app and then install the packages redux and react-redux. If you are not familiar with Redux check out my article on it here to get yourself acquainted.
In this application we are going to be making just a couple components. One is going to be a list of songs and the second is going to be a song detail panel. When we click on one of the songs it will display the song details in the detail panel. We are going to be using Redux to manage the state of the song list and the selected song.
Overview

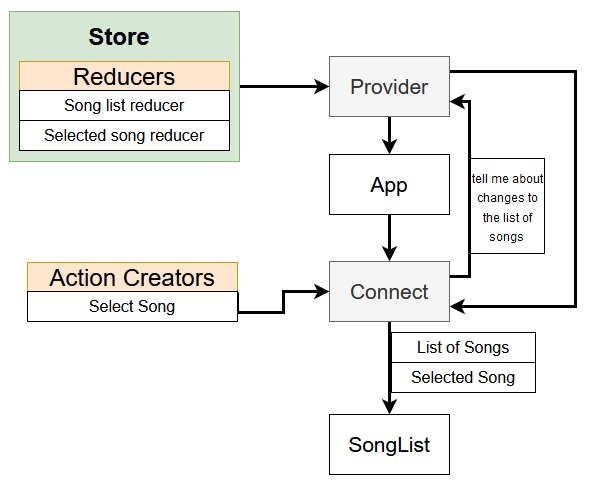
React-redux adds the gray sections to our workflow. The provider is now the top level element in our application, and it is going to be feed the information from the redux store into the application. You can read more about the provider in the react-redux docs:
React-Redux Documentation: Provider
React-Redux Documentation: Connect
File Structure
Inside of our src folder in addition to our components folder we are also going to create an actions and reducers folder.
And then inside each of those folders we are going to create another index.js file.

Action Creator
In the actions/index.js file we can start by creating our first action. This will just let us know what song has been selected.
// Action Creator
export const selectSong = (song)=>{
    // Return an action
    return {
        type: 'SONG_SELECTED';
        payload: song
    };
};
Note that the payload is the variable song which is the single argument that the function takes.
Also note that instead of using export default we have created a named export by calling export in front of the constant. To import that named export we would use the following syntax.
import {selectSong} from '../actions';
Reducers
This covers the process of creating array based reducers. If you are looking object based reducers see here: Ncoughlin: React-Redux: Objected Based Reducers
Next we can create our reducers in our reducers/index.js file.
// Reducers
import { combineReducers } from 'redux';

// static list of songs reducer
// no arguments required because it is a static list
const songsReducer = ()=> {
    return [
        { title: 'No Scrubs', duration: '4:05' },
        { title : 'Macarena', duration: '2:30' },
        { title: 'All Star', duration: '3:15' },
        { title: 'I Want It That Way', duration: '2:20' }
    ];
};

// select song

const selectedSongReducer = (selectedSong=null, action)=> {
    if (action.type === 'SONG_SELECTED') {
        return action.payload;
    }

    return selectedSong;
};

export default combineReducers({
    songs: songsReducer,
    selectedSong: selectedSongReducer
});
Our first reducer is just a static array of songs, so that does not require any arguments. Using redux is overkill for this, but we are just working on a simple example here so let’s go with it.
The second reducer exists to change the state of the currently selected song. It takes two arguments, the first is the currently selected song from the store, and the second is the action that will modify the currently selected song.
The first argument is defaulted to null in case there is no currently selected song. Then we verify the action type (we only have one action type in this application, but organization!) and if the action type is SONG_SELECTED then we return the payload of the current action, which is a song. The song that was selected by the user.
Combine Reducers
At the end we combine the reducers.
export default combineReducers({
    songs: songsReducer,
    selectedSong: selectedSongReducer
});
So now the return of the songs reducer is called songs (aptly named because it is returning a list of songs), and the return of selectedSongReducer is selectedSong.
Provider
We are at the point now where we have wrapped up the redux basics. Now we start to implement react-redux to tie this in to our application. We can start by connecting the provider to the application. The provider is a component from the react-redux library that we will wrap around all other components in the app. It allows us to pass information from the redux store into our components.
Start by importing the provider into your primary index.js file.
import { Provider } from 'react-redux';
We can note that Provider is capitalized, because it is a component, and by convention components are capitalized. We use the curly braces because it is a named component, and because that is the way the documentation tells us to use it. The difference depends on whether the component was exported as default or if it was exported as a named function. Just trust the documentation unless you want to dig into the package.
We also want to import createStore at this point.
import { createStore } from 'redux';
and our reducers from
import reducers from './reducers/index';
and then we can wrap our App component inside of the provider.
ReactDOM.render(
  <Provider store={createStore(reducers)}>
    <App />
  </Provider>,
  document.querySelector("#root")
);
Note that we have passed a single prop into the Provider component called store. This prop is equal to the createStore function from redux which has taken our reducers as an argument.
So altogether that looks like this.
import React from "react";
import ReactDOM from "react-dom";
import { Provider } from "react-redux";
import { createStore } from "redux";

import App from "./components/App";
import reducers from "./reducers/index";

ReactDOM.render(
  <Provider store={createStore(reducers)}>
    <App />
  </Provider>,
  document.querySelector("#root")
);
And that concludes wiring up our Provider.

At this point any component inside of our hierarchy can make use of Connect. The purpose of Connect is to communicate with our Provider, and thus any information inside of our store.
Redux Connect
Now we can use Connect to communicate with the provider and push our song list into the SongList component as a prop. Let’s take a look at our SongList component.
import React from 'react';
import { connect } from 'react-redux';

class SongList extends React.Component {
    render() {
        return <div>SongList</div>
    }
}

export default connect()(SongList);
We have imported connect at the top and then look at the export. We have added connect() in front of our component name and also wrapped the component name in parentheses? What is going on here?
The connect function contains another anonymous function inside of it, and to execute that anonymous function it must be called with a second set of parentheses, and that child function is taking SongList as an argument. Thus the double ().
Configuring Connect
What we are about to do is something that we will do over and over and over again. Connecting a component to the redux store. So be prepared, this is something that you will do a lot.
To configure connect in a component we must create a constant which is conventionally called mapStateToProps although you can call it whatever you want. That constant is a function which takes state as an argument, returns state, and then we pass the whole function into connect.
import React from "react";
import { connect } from "react-redux";

class SongList extends React.Component {
  render() {
    return <div>SongList</div>;
  }
}

const mapStateToProps = (state) => {
    console.log(state);
    return state;
}

export default connect(mapStateToProps)(SongList);
and if we go to our console we can see that we have successfully pulled all of the data from the store into our console.

but we want to pass this information into our component as a prop, so instead of returning state by itself we do the following
const mapStateToProps = (state) => {
  return { songs: state.songs };
};
and then we can console log the props inside the component
import React from "react";
import { connect } from "react-redux";

class SongList extends React.Component {
  render() {
    console.log(this.props);
    return <div>SongList</div>;
  }
}

const mapStateToProps = (state) => {
  return { songs: state.songs };
};

export default connect(mapStateToProps)(SongList);
and we see that now we have the song list as a prop, and we don’t have the selectedSong state because we did not map that to props.
To me this is where the whole process gets really confusing. Aren’t props only supposed to be passed down from parent component to child components? Remember that our provider is wrapping all of our other components, it is the master parent element. So when our connect function is communicating to the provider, we are telling the provider what information/props we need down the line for this component, and the provider … provides that for us.

Build Song List With Redux Data
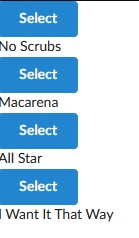
Now let’s use our newfound react-redux powers to actually populate our song list with with content. Below is the beginning of a list. If the classNames are confusing it’s because i’m using Semantic UI in this example.
So what we are doing here is making a helper function that is going to map the this.props.songs array (yes, our songs are now magically here is a prop).
Then down in our render method we simply reference the helper function.
import React from "react";
import { connect } from "react-redux";

class SongList extends React.Component {
  renderList() {
    return this.props.songs.map((song) => {
      return (
        <div className="item" key={song.title}>
          <div className="right floated content">
            <button className="ui button primary">Select</button>
          </div>
          <div className="content">{song.title}</div>
        </div>
      );
    });
  }

  render() {
  return <div>{this.renderList()}</div>;
  }
}

const mapStateToProps = (state) => {
  return { songs: state.songs };
};

export default connect(mapStateToProps)(SongList);
This does not have any event listeners wired up yet, purely visual.

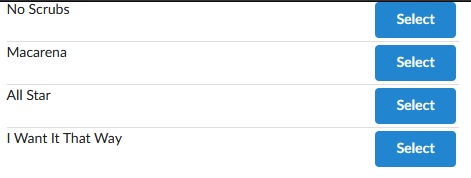
And let’s add some more Semantic UI classes and wrapping divs to our app component and…

Update State With Action Creator
Now we are to the point where we need to wire up our event listener on these buttons. Previously we would have done something like onClick set state, but now that we are using redux we need to call an action!

Import Action
Connect not only communicates with the Provider, but it also wires in your actions. To start using our Select Song action we first import it into our Song List component.
import { selectSong } from '../actions/index';
Wire Action to Connect
And then we add our selectSong action to the connect function as a second argument.
export default connect(mapStateToProps, {selectSong: selectSong,})(SongList);
And because our key value pair are named identically (selectSong) we can use ES2015 syntax to shorten this to.
export default connect(mapStateToProps, { selectSong })(SongList);
Event Listener
Now we can add our event listener to the button.
onClick={()=> this.props.selectSong(song)}
And now when we click the button we are setting the state of selectSong to the song that has been selected. We don’t have the song detail component made yet, but we can test this by putting a console log in the mapStateToProps function.
const mapStateToProps = (state) => {
  console.log(state);
  return { songs: state.songs };
};
And if we click on a button now.

Why does this work? Because the mapStateToProps function is being called every time the state is updated. And the state is being updated every time the selectSong prop changes, which is what happens every time we click a button now.
Now we can create a song detail component and update it based on this changing state.
Final SongList Component
import React from "react";
import { connect } from "react-redux";
import { selectSong } from "../actions/index";

class SongList extends React.Component {
  renderList() {
    return this.props.songs.map((song) => {
      return (
        <div className="item" key={song.title}>
          <div className="right floated content">
            <button
              className="ui button primary"
              onClick={()=> this.props.selectSong(song)}
            >Select</button>
          </div>
          <div className="content">{song.title}</div>
        </div>
      );
    });
  }

  render() {
    return <div className="ui divided list">{this.renderList()}</div>;
  }
}

const mapStateToProps = (state) => {
  return { songs: state.songs };
};

export default connect(mapStateToProps, { selectSong })(SongList);
What The F Is Happening Here
A lot of this doesn’t make sense on it’s face. For example, why didn’t we just call the selectSong function directly, but instead fed it into the connect. Some things to keep in mind.
- Redux is not magic
- Redux does not automatically detect action creators being called.
- Redux does not automatically detect a function returning an object that is an ‘action’.
The important thing to understand is that when we write our action creator function like this.
// Action Creator
export const selectSong = (song)=>{
    // Return an action
    return {
        type: 'SONG_SELECTED',
        payload: song
    };
};
We know that this is an action, but as far as our application is concerned this is just a regular old function. If we call this in our component it will drop in an object, and that is it. Redux does not automagically detect this object. And we need to send this action to Redux for it to go through it’s reducers and end up in the store.
Our actions must be sent to redux to go through dispatch and reducers to get to the store.
This is what the connect function does for us. When we pass our action creators into the connect function, connect handles sending them to dispatch!
Song detail Component
Now we can create our song detail component. Because there is no interactivity on the song detail component we can make it a functional component. We will not need to hook up any actions. It will need to be wrapped in the connect component however, because we need to feed it information that is in our redux store.
import React from "react";
import { connect } from "react-redux";

// functional component
const SongDetail = () => {
    return <div> Song Detail </div>
};

const mapStateToProps = (state) => {
    return { song: state.selectedSong }
};

export default SongDetail;
Here we can see our mapStateToProps function that we are going to be using over and over again. Inside of it using the key song we are going to return state.selectedSong which is a reference to our reducer with that name.
export default combineReducers({
    songs: songsReducer,
    selectedSong: selectedSongReducer
});
Connect
Then we move to our export and we call connect and pass in mapStateToProps.
import React from "react";
import { connect } from "react-redux";

// functional component
const SongDetail = (props) => {
    console.log(props);
    return <div> Song Detail </div>
};

const mapStateToProps = (state) => {
    return { song: state.selectedSong }
};

export default connect(mapStateToProps)(SongDetail);
Above you can see that we also put props as an argument on our SongDetail component, as now that we have mapped the state to props, we should be getting the selected song passed down as a prop. And we have added a console log so we can check that.
Conditional Rendering
Below we have just done a few more things to get the final effect that we want. First we have de structured the props so that we are just receiving song. That way we don’t have to reference props.song.title, props.song.duration etc. We can just reference song.title etc. Then we have display the song and title, and just above that we did a quick condition check.
The default song is undefined, which will throw an error, so we just say that if no song exists yet we show a message telling people to pick a song.
import React from "react";
import { connect } from "react-redux";

// functional component
const SongDetail = ({ song }) => {
  if (!song) {
    return <div>Select song for detail.</div>;
  }
  return (
    <div>
      <h1>Title: {song.title}</h1>
      <h2>Duration: {song.duration}</h2>
    </div>
  );
};

const mapStateToProps = (state) => {
  return { song: state.selectedSong };
};

export default connect(mapStateToProps)(SongDetail);
This all would have been SO much easier with vanilla JavaScript. But that’s not really the point here. What is happening behind the scenes is a powerful extensible scaffolding that is suitable for real, big, applications.
GitHub Repo
[Ncoughlin: React-Redux Songs](https://github.com/ncoughlin/react-songs
Comments
Recent Work
Basalt
basalt.softwareFree desktop AI Chat client, designed for developers and businesses. Unlocks advanced model settings only available in the API. Includes quality of life features like custom syntax highlighting.
BidBear
bidbear.ioBidbear is a report automation tool. It downloads Amazon Seller and Advertising reports, daily, to a private database. It then merges and formats the data into beautiful, on demand, exportable performance reports.