AWS API Authorization
Additional Resources
📘 AWS Docs: Use API Gateway Lambda Authorizers
📘 AWS Docs: Input to an Amazon API Gateway Lambda Authorizer
📘 AWS Compute Blog: Introducing IAM and Lambda authorizers for Amazon API Gateway HTTP APIs
���📘 AWS Docs: Output From Amazon API Gateway Lambda Authorizer
Intro
So far the API that we have created is totally open to the public, but if we want to make it so that only authorized users can query the API we need to add authorization. Here is a basic diagram from the AWS docs that shows the flow of adding a Lambda Auth function to an API

One of my key takeaways from this is that there are two methods of Lambda Auth functions.
- Token Based (JWT Tokens from Cognito)
- Request Parameter Based (Custom)
Eventually we are going to use Cognito and Lambda to authenticate users with JWT tokens. But let us start with a simple custom authentication example using Lambda so that we can make sure we understand the principles behind what we are doing.
Here is where we start the process of including auth in the API Gateway

Request Parameter Authentication
Simply put, we are going to allow or deny an HTTP request access to our API based on the parameters of the request, such as the data in the headers, or query string. We will evaluate that information with a Lambda function.
The goal of the Lambda function we are going to create will be to return an IAM policy which will give our request access to the API.
{
    "Effect": "Allow",
    "Action": "execute-api"
}
We will generate the policy dynamically, and the policy will then expire after a certain amount of time. In addition to returning the IAM policy, we also need to return the User ID, as well as the context.
Let's start by making a new custom Lambda function called cyCustomAuth. Leave it blank for now. We just need this to create the authorizer.
Create Authorizer in API Gateway
Then inside of API Gateway we create an authorizer with the following options
- Type: Lambda
- Lambda Function: cyCustomAuth
- Lambda Event Payload: Request
- Identity Sources: taken from documentation example
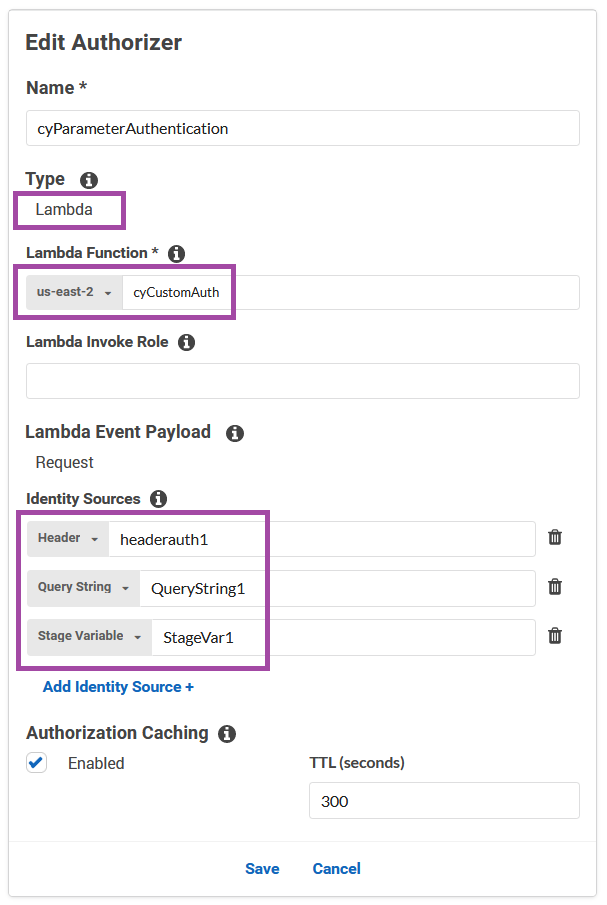
The identity sources portion is a bit confusing, but that is taken straight from the documentation and is just an example of the different types of data that we will be evaluating with our Lambda function. We will have expected values in the function, and we are just going to make sure that the values sent through match. Very simple.
Much like our data integration models in API Gateway, we are going to check that the information coming in the request matches our expected input.
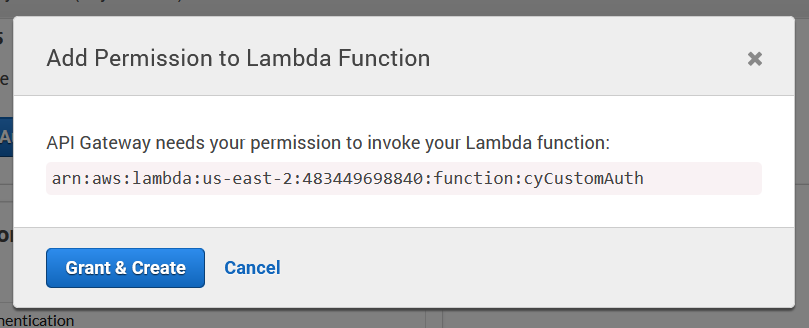
And because we did not attach an IAM policy earlier we are getting one auto-generated here by API Gateway to access our Lambda function.
And then we are given the option to test our authorizer, but let's not do that yet, because we don't actually have any code in the Lambda function. Let's go do that now.
Create Lambda Authorizer Function
Once again let us take the code from the documentation.
exports.handler = function(event, context, callback) {
    console.log('Received event:', JSON.stringify(event, null, 2));

    // A simple request-based authorizer example to demonstrate how to use request
    // parameters to allow or deny a request. In this example, a request is
    // authorized if the client-supplied headerauth1 header, QueryString1
    // query parameter, and stage variable of StageVar1 all match
    // specified values of 'headerValue1', 'queryValue1', and 'stageValue1',
    // respectively.

    // Retrieve request parameters from the Lambda function input:
    var headers = event.headers;
    var queryStringParameters = event.queryStringParameters;
    var pathParameters = event.pathParameters;
    var stageVariables = event.stageVariables;

    // Parse the input for the parameter values
    var tmp = event.methodArn.split(':');
    var apiGatewayArnTmp = tmp[5].split('/');
    var awsAccountId = tmp[4];
    var region = tmp[3];
    var restApiId = apiGatewayArnTmp[0];
    var stage = apiGatewayArnTmp[1];
    var method = apiGatewayArnTmp[2];
    var resource = '/'; // root resource
    if (apiGatewayArnTmp[3]) {
        resource += apiGatewayArnTmp[3];
    }

    // Perform authorization to return the Allow policy for correct parameters and
    // the 'Unauthorized' error, otherwise.
    var authResponse = {};
    var condition = {};
    condition.IpAddress = {};

    if (headers.headerauth1 === "headerValue1"
        && queryStringParameters.QueryString1 === "queryValue1"
        && stageVariables.StageVar1 === "stageValue1") {
        callback(null, generateAllow('me', event.methodArn));
    }  else {
        callback("Unauthorized");
    }
}

// Help function to generate an IAM policy
var generatePolicy = function(principalId, effect, resource) {
    // Required output:
    var authResponse = {};
    authResponse.principalId = principalId;
    if (effect && resource) {
        var policyDocument = {};
        policyDocument.Version = '2012-10-17'; // default version
        policyDocument.Statement = [];
        var statementOne = {};
        statementOne.Action = 'execute-api:Invoke'; // default action
        statementOne.Effect = effect;
        statementOne.Resource = resource;
        policyDocument.Statement[0] = statementOne;
        authResponse.policyDocument = policyDocument;
    }
    // Optional output with custom properties of the String, Number or Boolean type.
    authResponse.context = {
        "stringKey": "stringval",
        "numberKey": 123,
        "booleanKey": true
    };
    return authResponse;
}

var generateAllow = function(principalId, resource) {
    return generatePolicy(principalId, 'Allow', resource);
}

var generateDeny = function(principalId, resource) {
    return generatePolicy(principalId, 'Deny', resource);
}
and we can then test that

And we have successfully gotten back a temporary policy that allows us to query the API. Now in this case spoofing the parameters to get authorization would be trivial, as long as we know what those acceptable variables are. However we can quickly see how this could get more complicated. For example if we had a database of users with different tiers (free/premium/enterprise) we could check the status in the database of the user ID that gets sent in the request etc etc. The user ID would not change but the status of the user would change over time. A bad actor would then be required to get a new userID in the proper tier to get access to the API.
Output From Amazon API Gateway Lambda Authorizer
Referring back to our authorization diagram
We are now at the point where our Lambda Auth function is returning the "Principal + Policy" to API Gateway. We saw just above in our test the policy that we received. However that is not all that the auth function returns. We actually receive back the following object:
{
  "principalId": "yyyyyyyy", // The principal user identification associated with the token sent by the client.
  "policyDocument": {
    "Version": "2012-10-17",
    "Statement": [
      {
        "Action": "execute-api:Invoke",
        "Effect": "Allow|Deny",
        "Resource": "arn:aws:execute-api:{regionId}:{accountId}:{apiId}/{stage}/{httpVerb}/[{resource}/[{child-resources}]]"
      }
    ]
  },
  "context": {
    "stringKey": "value",
    "numberKey": "1",
    "booleanKey": "true"
  },
  "usageIdentifierKey": "{api-key}"
}
This object is explained fully in this documentation.
📘 AWS Docs: Output From Amazon API Gateway Lambda Authorizer
One of the key things that we want to pay attention to now is the principalId. This is essentially the User ID which is extremely important to us. This is what we are going to use to retrieve user specific data with our Lambda functions.
In our previous post where we retrieved a single users data we would now replace the userid (which was previously just hardcoded in the request body) with the principalId. And once we use Cognito JWT tokens to provide that principal ID, our ID's will be handled dynamically entirely by Cognito, which is our goal here.
So in summary, once the Lambda Auth function is complete, it returns a set of meta data which is then attached to the original request data, and forwarded on in the process through API Gateway and then to Lambda. The new set of meta data includes the principal and policy, and optionally context.
In order to use the principal as the user ID in our Lambda functions, we need to map that item out of the meta data in the request integration phase of our API Gateway.
Let's now review how to map the principalId from the auth function to the userid in our Lambda function.
Mapping principalId to userid
Here is a look at our current mapping template for request integration on the POST route.
#set($inputRoot = $input.path('$'))
{
  "userid" : "$inputRoot.userid", // highlight-line
  "age" : "$inputRoot.age",
  "height" : "$inputRoot.height",
  "income" : "$inputRoot.income"
}
we can see that the userid is simply mapped from the request body like the rest of the information. We are going to update that. The documentation that shows us what the context variables are is available here:
And it looks like we are looking for $context.authorizer.principalId which is:
"The principal user identification associated with the token sent by the client and returned from an API Gateway Lambda authorizer (formerly known as a custom authorizer)."
Let's plug that into our request integration mapping template
#set($inputRoot = $input.path('$'))
{
  "userid" : "$context.authorizer.principalId", // highlight-line
  "age" : "$inputRoot.age",
  "height" : "$inputRoot.height",
  "income" : "$inputRoot.income"
}
and if we now send the following request
{
    "age": "1001",
    "height": "300",
    "income": "200"
}
We can see that we have successfully added this user to the database with the userid me, which is the default principalId of a Lambda authorizer.

Token Authentication
The token authentication flow is a little bit different. The simplified version is this. If we imagine that we are starting from the frontend application, we would start by submitting a set of user data (email and password) to Cognito using the Cognito package. Cognito then handles the authentication process and returns to us a set of three tokens.
- Access Token
- ID Token
- Refresh Token
Then we would send these tokens to API Gateway when we are making an API request, and we would then use token authentication to exchange those tokens for a temporary IAM policy that allows us to access our Lambda functions. In this way if the user does not have the proper tokens, as provided by Cognito, they will never gain access to the Lambda functions that allow them to query the database or other services.
More advanced notes on this fall into the realm of Cognito, so I will put those in the Cognito notes.
Comments
Recent Work
Basalt
basalt.softwareFree desktop AI Chat client, designed for developers and businesses. Unlocks advanced model settings only available in the API. Includes quality of life features like custom syntax highlighting.
BidBear
bidbear.ioBidbear is a report automation tool. It downloads Amazon Seller and Advertising reports, daily, to a private database. It then merges and formats the data into beautiful, on demand, exportable performance reports.