Photoshop: Don't Use Clipping Paths for Product Photos
EDIT: 4/14/17 The methods for photoshopping product photos that I describe in this post are now outdated. Instead of using a feathered brush I now recommend using a polygon lasso with a 1-2 pixel feathered edge. I still believe that clipping masks are an inferior method. At some point I’m going to get around to making a completely updated tutorial.
When making cut-outs in Photoshop, a lot of people use the lasso or wand tool to make clipping paths. I’m going to explain why this isn’t the best method to make a cut-out of your product (or whatever it is you’re working on).
There is one primary reason why this method is not preferred.
Parts of your subject will naturally be more in focus than others. By cutting an out of focus edge with the lasso tool you create an unnatural looking edge.
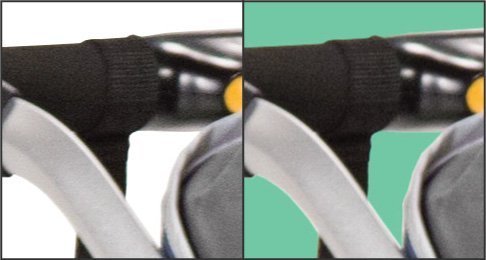
Let’s start with a sample of a closeup on a product. Keep in mind the focus of this photo is supposed to be the yellow button in the middle:

You’ll notice that the button is in focus, but since there is a lot of depth to this photo, other visible portions of the product are out of focus to varying degrees. Let’s see what a clipping path cutout of this would look like.

Ouch, not pretty, the portions of photo that are clearly out of focus are cut with a crisp line, and it’s REALLY obvious that this photo has been shopped. Now let’s see what it looks like if we do a layer cutout with a feathered edge at the blurry portions.

Much better! Clearing the background out of images that are this blurry is REALLY tough, but this method gets us somewhere close to natural looking. If you are having problems where an extremely out of focus line is meeting a line that is only moderately out of focus, you’ll want to select the area surrounding the intersection, make a copy and paste in place on a new layer. Then duplicate that layer. Go over the edge in the foreground with an appropriate eraser, then switch to the duplicate and go over that edge with an appropriate eraser. Then you can stack the foreground object on top and merge them.
That was a pretty extreme example. Let’s take a look at one that’s a little more subtle.

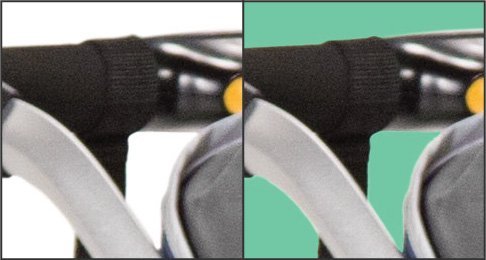
The sample below has been cut-out with the typical hard edge method; using a lasso tool. The edges look unnaturally crisp compared to the blurry details inside. Any subject with depth will naturally have parts of the photo that are blurry like this.

Now let’s look at an example that is cut out with a soft edge. It is much less obvious that this object has been manipulated, which is the goal.

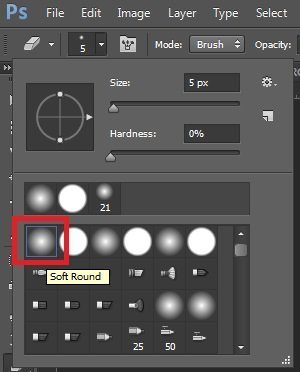
To achieve this effect you’ll want to use a soft round eraser instead of the lasso tool.

Don’t try to freehand the eraser tool, but instead walk it along by holding ctrl (or mac equivalent) while you click point to point. This will let you make straight lines like you do with the lasso tool. Adjust the brush size larger as objects get more out of focus and vice versa to maintain the look.
You could create a feathered edge with the lasso or wand tool by refining the edge, but this makes it very difficult to adjust as things become more or less focused. The refined edge will stay consistent for the whole selection, while the eraser can be easily adjusted by adjusting the brush size as you go.
You will need to follow up with the lasso tool to clean up the rest of the background, but this extra step can make all the difference if you are dealing with blurry objects.
Comments
Recent Work
Basalt
basalt.softwareFree desktop AI Chat client, designed for developers and businesses. Unlocks advanced model settings only available in the API. Includes quality of life features like custom syntax highlighting.
BidBear
bidbear.ioBidbear is a report automation tool. It downloads Amazon Seller and Advertising reports, daily, to a private database. It then merges and formats the data into beautiful, on demand, exportable performance reports.