Intro To React-Router
Intro
Our next big project is going to be building a simplified Twitch clone to bring together all of our React concepts so far, as well as many new ones. The goal is to have a portfolio quality piece at the end.
This application will introduce the following important new concepts.
- Navigation with React-Router.
- User Authentication with Google OAuth
- Form Handling
- CRUD Operations
- Error Handling
I'll be naming this project Glitch!

Of course I made a logo. I always make a logo.
Scaffolding the App
We will start by scaffolding out the basic structure of the app. We create a new React application with create-react-app and we call it client. And of course we delete all of the default files in the src folder.
The reason we call this project "client" is that in the end this will actually be several React application working together. The one we are starting with is the "client" portion of the whole application.
We create a bare-bones index file.
import React from "react"
import ReactDOM from "react-dom"

import App from "./components/App"

ReactDOM.render(<App />, document.querySelector("#root"))
and then a components directory inside of src and we create the App component that we referenced in the index.
import React, { Component } from "react"

class App extends Component {
  render() {
    return <div>This is the Client Application</div>
  }
}

export default App
And that's the whole setup. We have the simplest application we possibly can have at this point. One sentence on the screen.
React Router DOM
Just like Express, React has native functions for routes which are built into the react-router module, which comes with all React installations. However we still need to install an additional module based on what type of application we are building, DOM or Native (Web or Mobile Device). Because we are building a web app here we will install React-Router-DOM.
Once we have that installed we can import a few of this modules components.
import React, { Component } from "react"
import { BrowserRouter, Route } from "react-router-dom"

class App extends Component {
  render() {
    return <div>This is the Client Application</div>
  }
}

export default App
and then we can use those components to create routes/pages like so.
import React, { Component } from "react"
import { BrowserRouter, Route } from "react-router-dom"

const PageOne = () => {
  return <div>Page One</div>
}

const PageTwo = () => {
  return <div>Page Two</div>
}

class App extends Component {
  render() {
    return (
      <div>
        <BrowserRouter>
          <Route path="/" exact component={PageOne} />
          <Route path="/pagetwo" component={PageTwo} />
        </BrowserRouter>
      </div>
    )
  }
}

export default App
The index page will now show the content from the PageOne function and /pagetwo will show the content from the PageTwo function.
So what exactly is happening here?
History and BrowserRouter
There is a component inside of React-Router called history which listens for changes in the URL after the root domain. If it detects a change it alerts the BrowserRouter component.
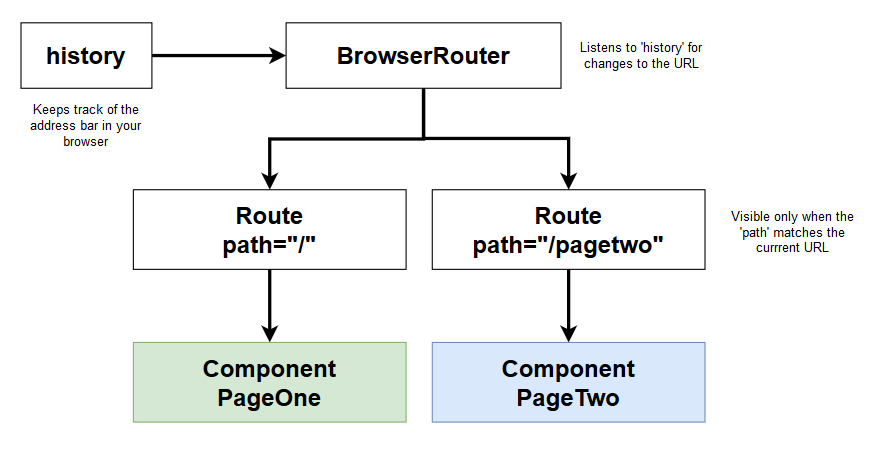
The BrowserRouter component then decides which components should be visible on that page. This does not necessarily behave the way that you would expect though. Unlike in Express, we can match multiple routes with the same URL. For example if we add another component that matches to the index.
import React, { Component } from "react"
import { BrowserRouter, Route } from "react-router-dom"

const PageOne = () => {
  return <div>Page One</div>
}

const AlsoPageOne = () => {
  return <div>Also Page One!</div>
}

const PageTwo = () => {
  return <div>Page Two</div>
}

class App extends Component {
  render() {
    return (
      <div>
        <BrowserRouter>
          <Route path="/" exact component={AlsoPageOne} />
          <Route path="/" exact component={PageOne} />
          <Route path="/pagetwo" component={PageTwo} />
        </BrowserRouter>
      </div>
    )
  }
}

export default App

We can see that both components would render to the index, and in the order that they were matched in our router.
Exact vs Partial Path Match
So what is the exact property doing for us? Well if we removed it and had the following.
<BrowserRouter>
  <Route path="/" component={PageOne} />
  <Route path="/pagetwo" component={PageTwo} />
</BrowserRouter>
We would actually get the following on /pagetwo

Both components are rendering on the page. This is because we are looking at exact match vs partial match issue. Anyone who has done a lot of keyword based advertising will be very familiar with this concept. The router is matching the / in the url and also the /pagetwo portion of the URL because both are present in the string. If you specify exact the router will ignore partial matches for that route.
Navigating Between Routes (Linking)
Incorrect Way
It is possible to create standard <a href> style links, however these are very bad for navigation inside of a React App because it forces the browser to dump all of our state data and completely reload the application. Here is a timeline of what happens in a React app if you use standard links.
- You add an
<a />tag to your application withhref="/pagetwo"and click it - Your browser makes a request to localhost:3000
- Development server responds with index.html file
- Browser receives index.html file, dumps old HTML file it was showing (including all React/Redux state data)
- index.html file lists our JS files in script tags. Browser downloads and executes these scripts
- App starts
Correct Way
The syntax to create links correctly is actually the exact same syntax we use in Gatsby! Gatsby Link Which makes sense, because Gatsby is built on top of React, although Gatsby handles links differently, by pre-fetching internal links. We do still need to import the Link component, except this time we import it from react-router-dom
import React, { Component } from "react";
import { BrowserRouter, Route, Link } from "react-router-dom";

const PageOne = () => {
  return (
    <div>
      <h1>Index</h1>
      <p>
        <Link to="/">Home</Link>
      </p>
      <p>
        <Link to="/pagetwo">Page Two</Link>
      </p>
    </div>
  );
};

const PageTwo = () => {
  return (
    <div>
      <h1>Page Two</h1>
      <p>
        <Link to="/">Home</Link>
      </p>
      <p>
        <Link to="/pagetwo">Page Two</Link>
      </p>
    </div>
  );
};

class App extends Component {
  render() {
    return (
      <div>
        <BrowserRouter>
          <Route path="/" exact component={PageOne} />
          <Route path="/pagetwo" exact component={PageTwo} />
        </BrowserRouter>
      </div>
    );
  }
}

export default App;
And the above gives us two links that load new pages without dumping the store and completely reloading the DOM!
It's pretty shocking to me that a website actually has the ability to decouple the url from the page data and manually update each. It just goes to show, we don't always understand the things that seem so basic to us.
This is also where the term Single Page Application comes from. The browser is only loading one page on initial application load, and then the application is changing the content and the URL, without ever reloading the entire DOM, even when the URL changes. Very cool!
After sitting on this for a couple days i've come to the conclusion that this is less a Router, and really more of a component visibility filter.
Hash and Memory Router
While the BrowserRouter is the most commonly used react-router, there are actually two other additional routers available.
HashRouter
The HashRouter takes everything after a # sign in the url as a path. For example localhost:3000/#pagetwo
Why would you ever want this? First you need to understand the difference between a react server and a traditional server. On a traditional server if you request a url that doesn't exist you will receive a 404. On a React server if you request a URL that doesn't exist you will get rerouted to the index. However that is a setting that needs to be configured with your server.
Some hosts like GitHub pages don't let you configure your server like that. So what you can do is use the hashrouter. The GitHub pages server will not look at anything after a hash, so it would treat a link like mywebsite.com/#/pagetwo as simply mywebsite.com and load the index, where the hashrouter could then render the correct content.
MemoryRouter
The memory router doesn't use URL's to navigate at all. The process of writing the routes is essentially the same, you will select targets with to="target" and define components to show on that target, but the URL will not reflect your current "location".
Additional Twitch Clone Scaffolding
Now that we understand the basics of React-Router, let us scaffold out some new components that we will use in our application and create some routes for those components.
import React, { Component } from "react";
import { BrowserRouter, Route } from "react-router-dom";

import Header from "./Header";
import StreamList from "./streams/StreamList";
import StreamCreate from "./streams/StreamCreate";
import StreamDelete from "./streams/StreamDelete";
import StreamEdit from "./streams/StreamEdit";
import StreamShow from "./streams/StreamShow";

class App extends Component {
  render() {
    return (
      <div className="ui container">
        <BrowserRouter>
          <Header /> // highlight-line
          <Route path="/" exact component={StreamList} />
          <Route path="/streams/new" exact component={StreamCreate} />
          <Route path="/streams/delete" exact component={StreamDelete} />
          <Route path="/streams/edit" exact component={StreamEdit} />
          <Route path="/streams/show" exact component={StreamShow} />
        </BrowserRouter>
      </div>
    );
  }
}

export default App;
Note that the Header component is inside of the BrowserRouter. This is because inside our Header component we make use of Link and anytime you are using a Link component it must be nested inside of a Router component. However we can still make our header be visible at all times by not defining it with a Route.
import React from "react";
import { Link } from "react-router-dom";
import Logo from '../images/glitch-logo.png'

const Header = () => {
  return (
    <div className="ui secondary pointing menu">
      <Link to="/" className="item">
        <img src={Logo}  className="ui mini" />
      </Link>
      <div className="right menu">
        <Link to="/" className="item">
          All Streams
        </Link>
      </div>
    </div>
  );
};

export default Header;
We are also using Semantic UI framework for this project, so if you are wondering where all these CSS classes are coming from you can reference that documentation.
That concludes the basic scaffolding and Router introduction for this project. Next we will be looking at authentication using Google OAuth.
GitHub Repo
Ncoughlin: React-Streams-Client
Comments
Recent Work
Basalt
basalt.softwareFree desktop AI Chat client, designed for developers and businesses. Unlocks advanced model settings only available in the API. Includes quality of life features like custom syntax highlighting.
BidBear
bidbear.ioBidbear is a report automation tool. It downloads Amazon Seller and Advertising reports, daily, to a private database. It then merges and formats the data into beautiful, on demand, exportable performance reports.