GIT Guide
Beginners Concepts and Commands
What is GIT
What is Git?
GIT is version control software that will help you keep track of the changes you have made in your projects, and let multiple people work on a project together and then integrate their changes without conflicts. Although GIT can work alone on your system, and the GIT data can be shared manually by zipping and sending it to someone, most people use an online repository for their version control files. There are several sites that do this, but the most popular is the official repository called GitHub
Setting up GIT
Start by installing GIT, this guide it going to use GIT through the command line instead of the GUI. Once GIT has been installed you will want to configure git by using the command :
git config
You will enter in your personal information that will connect Git on your computer to your repository on Github.
To start tracking files, first navigate to your project using the command line. When you are inside the directory for you product, you will create a Git repository in your project by using the command:
git init
there will now be a hidden folder in the project called .git, that will keep track of all your version control files. But it won’t actually track anything until you tell it to. Just for some reference, here are the files we will be working with on this demo.

File Status
To get the status of the files in this project you use the command:
git status
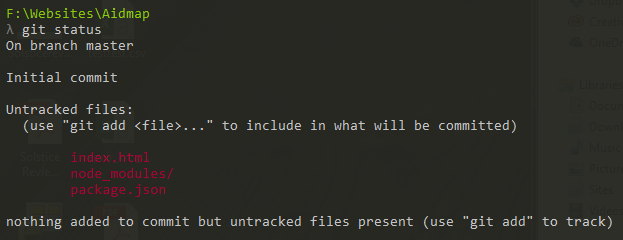
So Git is showing us 3 items that it could potentially track here, but none of them have been tracked yet. Two files (index.html and package.json) and 1 folder (node_modules). You may be wondering why it’s not showing the css or images folders. That’s because those folders are currently empty, this project is basically blank at the moment.
When tracking files with Git the files will basically move between 3 different states. MODIFIED > STAGED > COMMITTED.
Modified files are files that are being tracked, and that you have made changes to, but those changes have not yet been saved. When you save the changes you have made to the file with Git, they will then be in the
Staged zone. When files are staged they are saved, but have not yet been committed to the community repository (repo) where other people working on the project would be able to see them.
Committed files are sent to the repository and added to all the other files.
Before you can count a file as being modified though, you have to tell Git that you want to actually track that file, by adding it.
To start tracking the files you have to use the command:
git add <filename>
So here we can add our first file which will be index.html.
![]()
and that will give us this:

We have now STAGED our first file, which means that it is basically in a queue to be committed to the repository, but has not been committed yet. Think of the repository as the shared pool of files between all of the people working on the project. You don’t want to send your files into the shared pool until you know that they are ready. But you also want to be able to save your changes locally as you are working. When you stage the index.html file by “adding” it, you have saved a copy of that file as it was when it was added. Now if I go into that file and make some changes and check the status again, what is going to happen?
The index.html file is currently blank, lets add some basic html boilerplate just so we have something to look at.
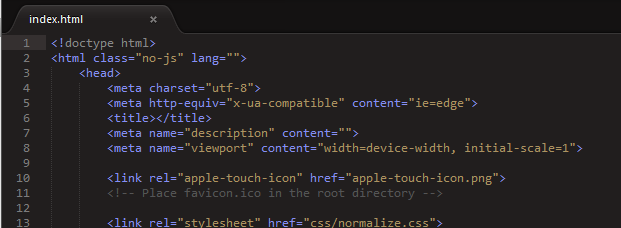
So we have now modified the index.html file and saved it. So lets go back to the console and check our git status again:

We can now see two copies of the index.html file. The green version is the first version of the file we staged already (the blank index.html file) and the red version is our new index.html with the boilerplate. Git has recognized that the file has changed, and is telling us that it needs to be re-staged again, or those changes will be wiped out when the files are actually committed. You will have to “add” the file again to save the changes to the staging area.
When you are done adding the file again, we can make our first Commit ever! Use the command:
git commit
That will open a vim style terminal where you will input the notes on the commit.
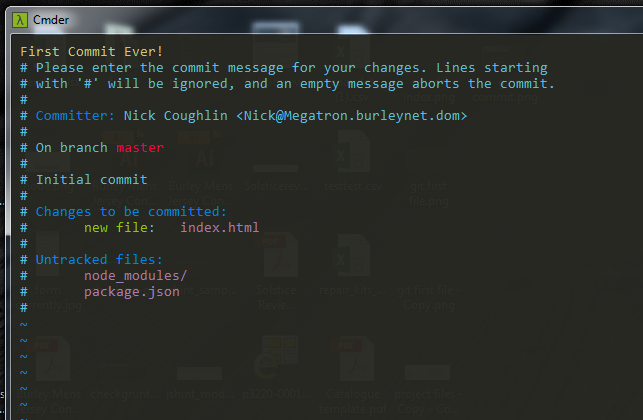
You will need to press “i” to get into insert mode and then type the name of your commit. In this case, “First Commit Ever!” To save and get out of this vim terminal you will press esc to exit insert mode and then type:
:wq
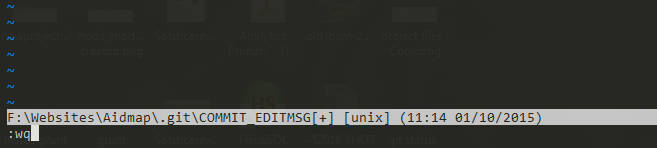
which is a vim command and something you just have to know.
Note 7/14/2020 This VIM terminal stuff must be an oddity of the cmdr terminal, because I do all my git commands in the VS Code Bash terminal these days and I don't have to do any of that. Just FYI for anyone who isn't me reading this.
You should get a message showing you that the changes have been successfully committed. Now you can check the commit history by using the “log” command.
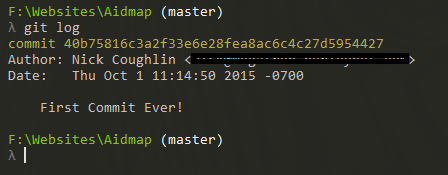
We can see that our commit has been given an id number, and it logged the author and time of the commit. We can also see that our console is now handily telling us what version of the project we are working on. We can see that we are working on the “master” branch right now (as opposed to a fork, more on that later).
Commit Commands
There are a couple of shortcuts for adding files to the staging area. If you want to add ALL of the available files you can use a period like so:
git commit .
or if you want to use a wildcard to select all files of a certain type you can do that also. The following would grab all the Javascript files:
git commit *.js
.gitignore
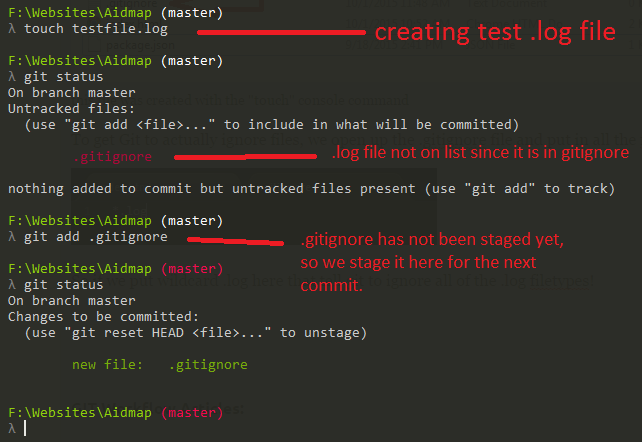
But what do you do if there are specific files that you want to GIT to ignore, like log files? or resource files that will never be modified. This brings us to the .gitignore file, which is file that specifically tell Git what it should be ignoring when looking for files to track. You can make this file yourself, or you can choose from tons of premade .gitignore files that are available online.
You can generate one of these files using the console by type touch .gitignore


This file was created with the “touch” console command. To get Git to actually ignore files, we open up the .gitignore file and put in all the filetypes we want Git to ignore.

So if we put wildcard .log here that tell git to ignore all of the .log filetypes!
Branching

Branching is when you make of a copy of your project, and work on that copy, and then eventually merge the changes you made in the copy back into the master file that is being shared by the other developers. You would make a branch to work on something like a bug fix, or adding a new feature. Then you would eventually integrate those changes into the master file. But with Git, you can multiple people all working an different aspects of the project, and then you can merge them together seamlessly into the final project. To create a new branch you use the command:
git branch <branch name>
So lets go ahead and make our first branch, and call it branch1

That didn’t really appear to do much, but the branch has now been created. But we are still looking at the master. To switch to the new branch you use the checkout command:
git checkout <branch name>

Now we are in branch1. Let’s try adding a file to this branch, and then switching back to the master branch and see if the change is there!
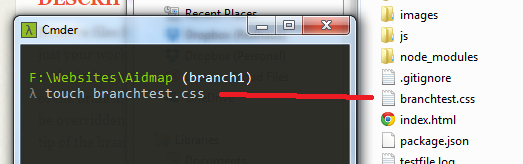
So here we have added a css file named branchtest.css. Now we need to stage and commit that change to this branch. Committing this change will only commit the change TO THIS BRANCH, not to the master branch. To do that we will have to merge the branch to the master, which we will do later.
Once those changes are committed, we can jump back and forth between the two branches, and we will see that the new file only exists in branch1 and not in the master.
Our branchtest.css file is appearing or dissapearing depending on which branch we are in. Perfect!
Removing Files
Now for a side-note, what do you do when you want to delete a file from a branch with Git? You have to use the rm (remove) command:
git rm <filename>
Then stage and commit the changes.
Merging Branches
To merge one branch to another you have to currently be located on the destination branch, which in this case would be the master. Then you use the command “merge” to merge the branches.
git merge <source branch name>
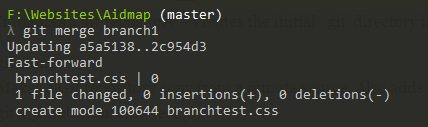
If you can’t remember the name of your branches you can list them all with the command “branch”.

Merge Conflicts
So what happens if two people make changes to the same file. For example I copy the index.html file to a branch and start to make changes, and then while I am doing that, someone else merges their changes to the master index.html file. Now when I merge my changes to the index in the master branch, Git is going to see my changes, and also the changes the other person made and not know which ones it should keep. This is a merge conflict.
Lets go ahead and make a situation where a merge conflict exists so we can see what this looks like. I added a line of text to the branchtest.css file in the master, and committed it. Then I added a different line of text to the same file in branch1 and committed that. Now let’s see what happens when we merge.

What does the modified file look like?

So Git shows us what the changes in question are, and which branch each of the changes was made to. Now we have to resolve this merge conflict. Remove all of the tags that Git inserted into your document, and combine the changes however you see fit. Once you have made the changes, Stage and Commit the file. Then try merging again.

Merge Tools
This can get really messy with more complicated changes, so there are tools you can use to resolve merge errors like Tower or SourceTree. I will get into those later.
Stashing
If you are working on a branch and have made changes, but you want to go to a different branch and come back later; you can “stash” your changes without fully committing them. You can stack multiple stashes . The official Git stashing article is located here.

Stash List
You can get a list of all the stashes you have made on this branch with the stash list command.

Stash Apply
If you want to re-apply the changes that you put into the stash you input “git stash apply” and it will apply the most recent stash you have made to the branch.

If you have multiple stashes and you don’t want to apply the most recent one, you would input git stash apply <stash name> so for example:
git stash apply stash@{2}
There is more info on stashing on the github website.
Remote Repositories
List current remote repositories with "git remote", which should be blank at this point.
![]()
To clone and download a repository from Github, go to Github.com and get the link for it. Then use the command Git clone <repository link>
git clone https://github.com/mbostock/d3.git

and as we can see that created a new d3 folder for us in our location.

This has downloaded not only all the files, but also all of the commit changes. If you cd into the d3 file and and then input git info you will see the full commit history for this repository.
Remote
To list all of the remote repositories use the remote command.
git remote

Normally this would be blank at first, but I went ahead and added one remote repository (showing how to do that is coming up next) so we can see what should be visible here. We have one repository named origin. So what does that mean? Stackoverflow has a good explanation for this:
Git has the concept of “remotes”, which are simply URLs to other copies of your repository. When you clone another repository, git automatically creates a remote named “origin” and points to it. origin is not the remote repository name. It is an alias given to the URL pointing to the default remote repository. -StackOverflow
So origin is simply the name of this remote link. We can list the actual links and their aliases by using the command remote -v
git remote -v

What if we want to change the name of the alias to something more memorable? We use the commands remote rename <original alias> <new alias> so for example:
git remote rename origin aidmap

So we can see there that we renamed the remote alias to aidmap and then checked the remote directory again, and the remote connection is now named aidmap.
Fetch vs Pull
Fetching and Pulling are two similar but different commands. If I want to download the data from the remote connection, but I don’t want to merge the data with my own, then I would fetch the data. You use the command git fetch <remote alias>. Normally this would be origin, but since we just changed our remote alias to aidmap, we would type:
git fetch aidmap

And we are prompted for our login data since this repository is private.
If we wanted to download the data and merge it with our current branch right away, we would use the pull command.
git pull aidmap

So that pulled the files from our github repository and merged them with our local repository in one command. The note on the bottom indicates that it added a file name README.md. I had added that file to the github repository, but now that they have been pulled (fetch+merge) the README file is now in my local project as well:

Push
When you are finished with your changes on your local directory and you are ready to push them to the online directory, you use the push command.
git push
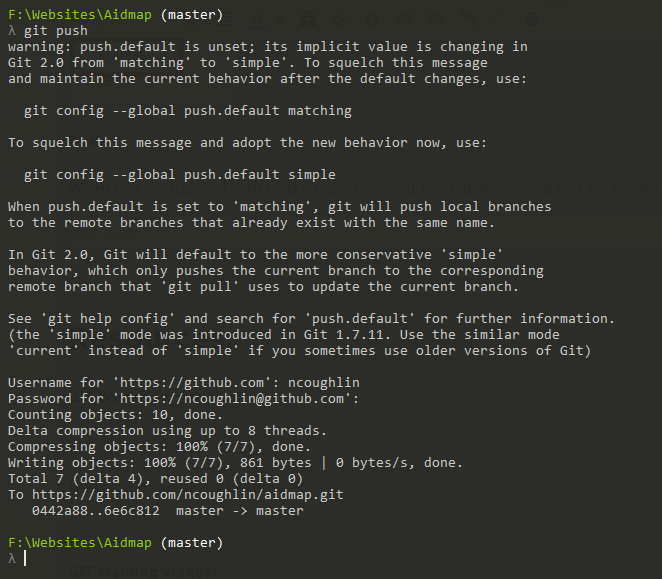
And we are getting a long message back there telling us that the default push value has been changed from “matching” to “simple” in the new version of git. The matching push will push all local files to the github directory from all branches that have matching branch names. The simple push method will only push files from your current branch. Despite this warning, we input our login information, and the push is successful. We have just merged the local master branch with the github branch.
Let’s do one last push test to make sure our files are getting on github like they should be. I just added a test file “pushtest.php” to our directory, staged the file and committed it.
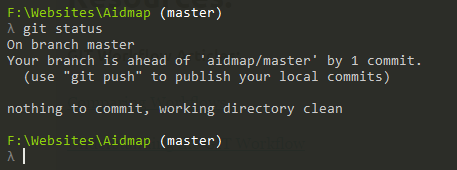
when we check the status now we can see that we are ahead of our github repository by 1 commit! It’s super convenient that git tells us this. Now lets go ahead and push the local repo to github and check the status again, and check to see if our “pushtest.php” file is showing up online…
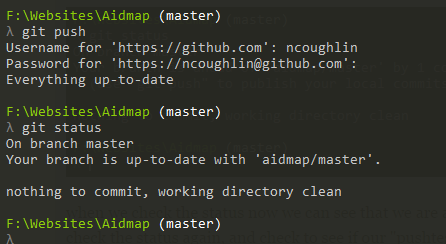
We’ve pushed the repo to github, and checked the status and it says we are up to date…
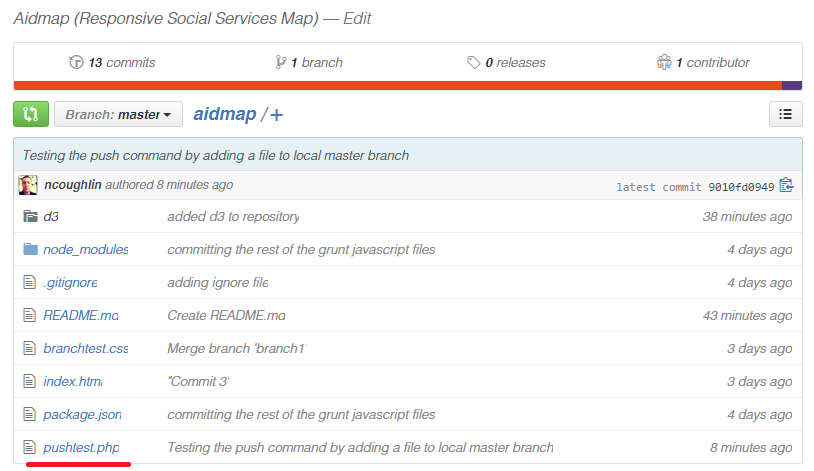
and we can see that the file we just added in the last commit “pushtest.php” is now in the github repo. Successful push!
Resources
GIT Workflow Articles
Atlassian: Comparing Workflows
Sandofsky: Understanding the GIT Workflow
GIT training videos
GIT Commands
git config - Sets configuration values for your user name, email, gpg key, preferred diff algorithm, file formats and more. Example: git config –global user.name “My Name” git config –global user.email “user@domain.com” cat ~/.gitconfig [user] name = My Name email = user@domain.com
git init - Initializes a git repository – creates the initial ‘.git’ directory in a new or in an existing project. Example: cd /home/user/my_new_git_folder/ git init
git clone - Makes a Git repository copy from a remote source. Also adds the original location as a remote so you can fetch from it again and push to it if you have permissions. Example: git clone git@github.com:user/test.git
git add - Adds files changes in your working directory to your index. Example: git add .
git rm - Removes files from your index and your working directory so they will not be tracked. Example: git rm filename
git commit - Takes all of the changes written in the index, creates a new commit object pointing to it and sets the branch to point to that new commit. Examples: git commit -m ‘committing added changes’ git commit -a -m ‘committing all changes, equals to git add and git commit’
git status - Shows you the status of files in the index versus the working directory. It will list out files that are untracked (only in your working directory), modified (tracked but not yet updated in your index), and staged (added to your index and ready for committing). Example: git status # On branch master # # Initial commit # # Untracked files: # (use “git add …” to include in what will be committed) # # README nothing added to commit but untracked files present (use “git add” to track)
git branch - Lists existing branches, including remote branches if ‘-a’ is provided. Creates a new branch if a branch name is provided. Example: git branch -a * master remotes/origin/master
git checkout - Checks out a different branch – switches branches by updating the index, working tree, and HEAD to reflect the chosen branch. Example: git checkout newbranch
git merge - Merges one or more branches into your current branch and automatically creates a new commit if there are no conflicts. Example: git merge newbranchversion
git reset - Resets your index and working directory to the state of your last commit. Example: git reset –hard HEAD
git stash - Temporarily saves changes that you don’t want to commit immediately. You can apply the changes later. Example: git stash Saved working directory and index state “WIP on master: 84f241e first commit” HEAD is now at 84f241e first commit (To restore them type “git stash apply”)
git tag - Tags a specific commit with a simple, human readable handle that never moves. Example: git tag -a v1.0 -m ‘this is version 1.0 tag’
git fetch - Fetches all the objects from the remote repository that are not present in the local one. Example: git fetch origin
git pull - Fetches the files from the remote repository and merges it with your local one. This command is equal to the git fetch and the git merge sequence. Example: git pull origin
git push - Pushes all the modified local objects to the remote repository and advances its branches. Example: git push origin master
git remote - Shows all the remote versions of your repository. Example: git remote origin
git log - Shows a listing of commits on a branch including the corresponding details. Example: git log commit 84f241e8a0d768fb37ff7ad40e294b61a99a0abe Author: User <user@domain.com> Date: Mon May 3 09:24:05 2010 +0300 first commit
git show - Shows information about a git object. Example: git show commit 84f241e8a0d768fb37ff7ad40e294b61a99a0abe Author: User <user@domain.com> Date: Mon May 3 09:24:05 2010 +0300 first commit diff –git a/README b/README new file mode 100644 index 0000000..e69de29
git ls-tree - Shows a tree object, including the mode and the name of each item and the SHA-1 value of the blob or the tree that it points to. Example: git ls-tree master^{tree} 100644 blob e69de29bb2d1d6434b8b29ae775ad8c2e48c5391 README
git cat-file - Used to view the type of an object through the SHA-1 value. Example: git cat-file -t e69de29bb2d1d6434b8b29ae775ad8c2e48c5391 blob
git grep - Lets you search through your trees of content for words and phrases. Example: git grep “www.siteground.com” — *.php
git diff - Generates patch files or statistics of differences between paths or files in your git repository, or your index or your working directory. Example: git diff
gitk - Graphical Tcl/Tk based interface to a local Git repository. Example: gitk
git instaweb - Runs a web server with an interface into your local repository and automatically directs a web browser to it. Example: git instaweb –httpd=webrick git instaweb –stop
git archive - Creates a tar or zip file including the contents of a single tree from your repository. Example: git archive –format=zip master^ README >file.zip
git gc - Garbage collector for your repository. Optimizes your repository. Should be run occasionally. Example: git gc Counting objects: 7, done. Delta compression using up to 2 threads. Compressing objects: 100% (5/5), done. Writing objects: 100% (7/7), done. Total 7 (delta 1), reused 0 (delta 0)
git fsck - Does an integrity check of the Git file system, identifying corrupted objects. Example: git fsck
git prune - Removes objects that are no longer pointed to by any object in any reachable branch. Example: git prune
GIT Vocabulary
Upstream/Downstream:
"In terms of source control, you’re “downstream” when you copy (clone, checkout, etc) from a repository.Information flowed “downstream” to you.
When you make changes, you usually want to send them back “upstream” so they make it into that repository so that everyone pulling from the same source is working with all the same changes. This is mostly a social issue of how everyone can coordinate their work rather than a technical requirement of source control. You want to get your changes into the main project so you’re not tracking divergent lines of development.
Sometimes you’ll read about package or release managers (the people, not the tool) talking about submitting changes to “upstream”. That usually means they had to adjust the original sources so they could create a package for their system. They don’t want to keep making those changes, so if they send them “upstream” to the original source, they shouldn’t have to deal with the same issue in the next release."
-stackoverflow
Automated Amazon Reports
Automatically download Amazon Seller and Advertising reports to a private database. View beautiful, on demand, exportable performance reports.