Gatsby: Connecting to Contentful CMS
Intro
Oh boy this is the fun part. This is the part where we start bringing in content from an outside CMS. There are many options for this. Strapi is very popular as well as Contentful. There is a whole website dedicated to listing them.
For this example we are going to be using Contentful, but I have a feeling that for my final website rework I am going to end up using Strapi.
Setting up the CMS
Our first step is to go to the website for Contentful and register as a free user. Then we get access to the dashboard and the first thing we need to do is create a data model.
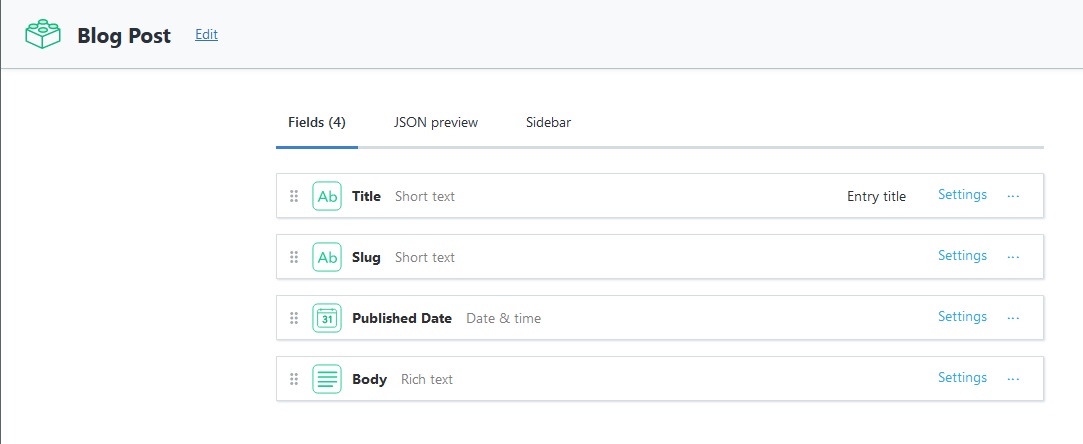
We will start with a data model for a blog post, since that is the only dynamic information we have right now.

Eventually another item that we implement a data model for could be our pages, if we thought that we would be changing the content on them regularly. And once this is done we can create a couple blog posts with filler content using their WYSYWIG editor.

Connecting CMS To Gatsby
To start the process of connecting our CMS and content to our application we need to find the appropriate plugin for our CMS. In this case the plugin is called gatsby-source-contentful. Once we have that installed we of course add it to our gatsby-config file and configure it with our spaceId and accessToken which is provided in the settings section of the Contentful website.

{
    resolve: `gatsby-source-contentful`,
    options: {
    spaceId: process.env.CONTENTFUL_SPACE_ID,
    // Learn about environment variables: https://gatsby.dev/env-vars
    accessToken: process.env.CONTENTFUL_ACCESS_TOKEN,
    },
},
And we put the actual tokens in our .env.development file so that they aren’t publicly exposed. Standard security stuff.
Exploring New Endpoints in GraphQL Playground
Once we restart our Gatsby instance we can now get access to our Contentful content using GraphQL.


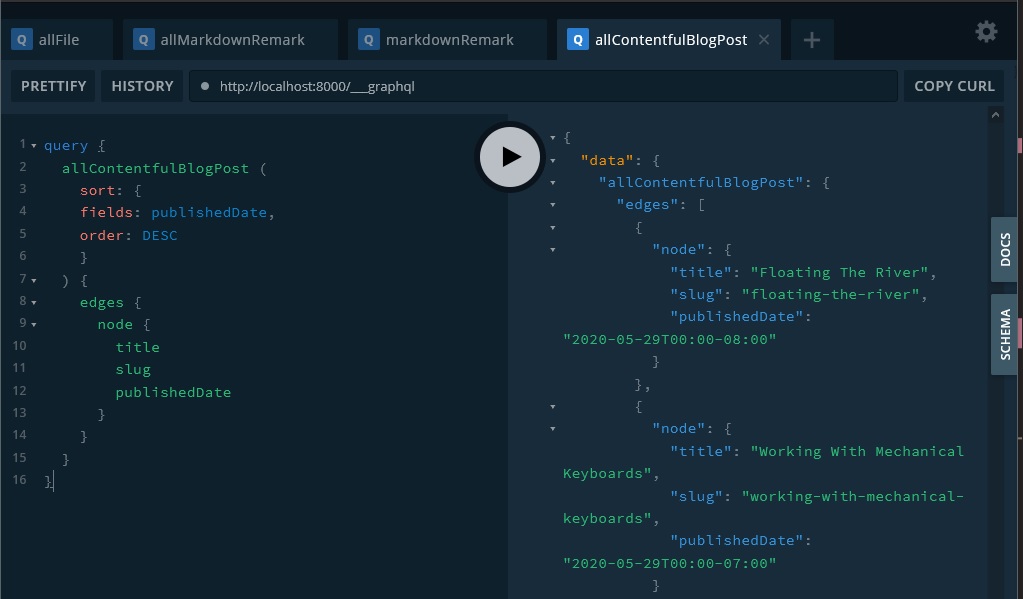
Sorting Posts By Date
GraphQL gives us several arguments that we can use to sort or filter our data.

Skip and limit are useful for things like pagination. Filter is useful for filtering by category. The one we are going to use now is sort, and we are going to sort by publishedDate which is one of the fields that created in our Contentful data structure.
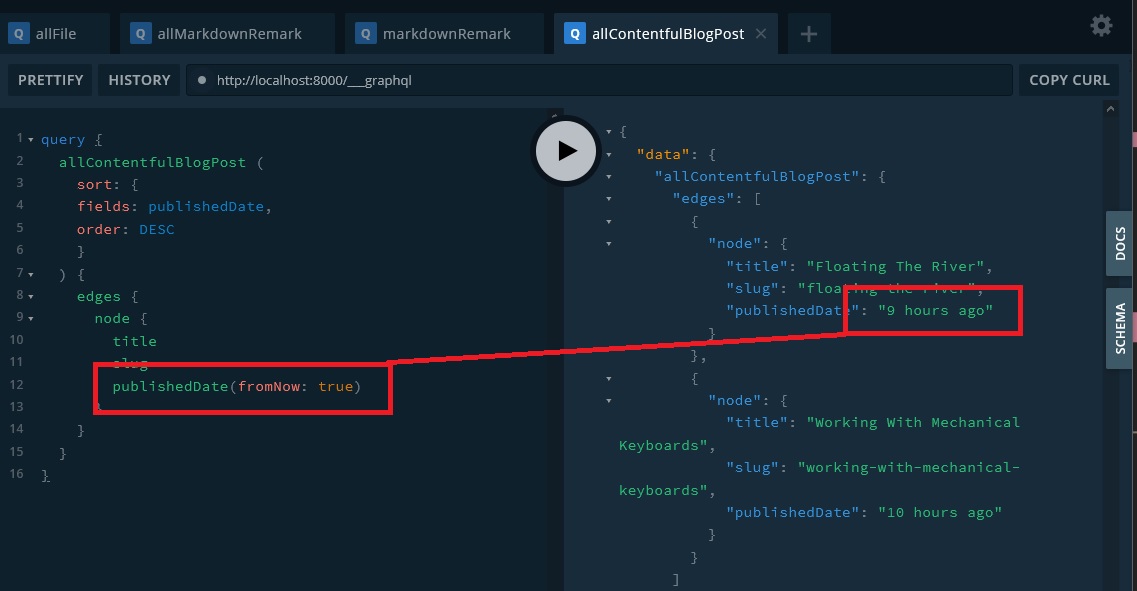
Customize Date Format
The date that we get by default is the unformatted and illegible standard date string. We can change this by simply adding an argument to the publishedDate request. This uses moment.js to format the date, so we use moment.js syntax.

We can also use the fromNow argument to get a relative time.
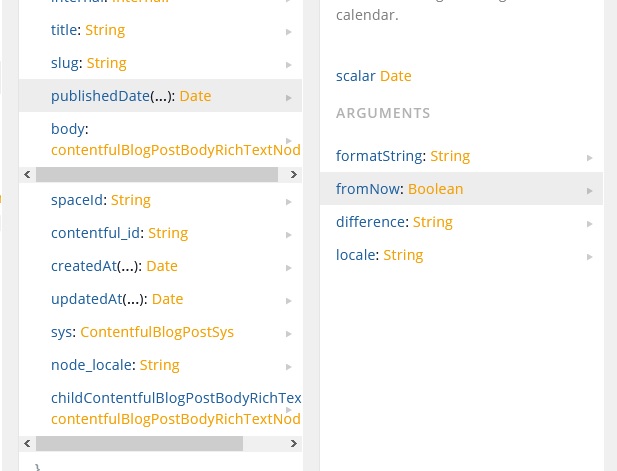
All of the potential arguments are available in GraphQL Playground self documentation.
Pulling CMS Data Into Template
You can probably guess what the next step is. We need to use our freshly available API content and render it into our templates.
Blog Index
The blog index page is the easier of the two. We simply replace the GraphQL query that we have for markdown content with a query for allContentfulBlogPost and then change the references to that data in the component.
import React from "react"
import { Link, graphql, useStaticQuery } from "gatsby"

import Layout from "../components/layout"
import blogStyle from "./blog.module.scss"

const BlogPage = () => {
  const data = useStaticQuery(graphql`
    query {
      allContentfulBlogPost(sort: { fields: publishedDate, order: DESC }) {
        edges {
          node {
            title
            slug
            publishedDate(fromNow: true)
          }
        }
      }
    }
  `)

  return (
    <Layout>
      <h1> Blog </h1>
      <ul className={blogStyle.posts}>
        {data.allContentfulBlogPost.edges.map(edge => {
          return (
            <li className={blogStyle.post}>
              <Link to={`/blog/${edge.node.slug}/`}>
                <h2>{edge.node.title}</h2>
                <p>{edge.node.publishedDate}</p>
              </Link>
            </li>
          )
        })}
      </ul>
    </Layout>
  )
}

export default BlogPage
Single Blog Pages
We covered how to create single blog post pages for each markdown file in a previous post: Gatsby: Automatically Creating A Page For Each Blog Post.
The process was basically this.
- Create a slug for each post based on the filename
- Use Gatsby Node API to create a page for each Markdown file
- Render the content of the Blog into each page by querying based on the slug.
Our process here is actually going to be a bit easier, because we don’t need to create the slug, we have already done that inside of Contentful. So we skip step one and go straight to step 2.
Creating the Pages
We can go to our gatsby-node.js file which currently looks like this.
const path = require("path")

// create blog post slugs
module.exports.onCreateNode = ({ node, actions }) => {
  const { createNodeField } = actions

  if (node.internal.type === "MarkdownRemark") {
    const slug = path.basename(node.fileAbsolutePath, ".md")
    createNodeField({
      node,
      name: "slug",
      value: slug,
    })
  }
}

// create individual blog post pages
module.exports.createPages = async ({ graphql, actions }) => {
  const { createPage } = actions
  const blogTemplate = path.resolve("./src/templates/blog.js")
  const response = await graphql(`
    query {
      allMarkdownRemark {
        edges {
          node {
            fields {
              slug
            }
          }
        }
      }
    }
  `)

  response.data.allMarkdownRemark.edges.forEach(edge => {
    // 1. Get path to template
    // 2. Get markdown data
    // 3. Create new pages

    createPage({
      component: blogTemplate,
      path: `/blog/${edge.node.fields.slug}`,
      context: {
        slug: edge.node.fields.slug,
      },
    })
  })
}
and we can start by stripping out the whole section on creating slugs. Don’t need that anymore!
const path = require("path")

// create individual blog post pages
module.exports.createPages = async ({ graphql, actions }) => {
  const { createPage } = actions
  const blogTemplate = path.resolve("./src/templates/blog.js")
  const response = await graphql(`
    query {
      allMarkdownRemark {
        edges {
          node {
            fields {
              slug
            }
          }
        }
      }
    }
  `)

  response.data.allMarkdownRemark.edges.forEach(edge => {
    // 1. Get path to template
    // 2. Get markdown data
    // 3. Create new pages

    createPage({
      component: blogTemplate,
      path: `/blog/${edge.node.fields.slug}`,
      context: {
        slug: edge.node.fields.slug,
      },
    })
  })
}
Then we replace the old query for the slug with the new one.
const path = require("path")

// create individual blog post pages
module.exports.createPages = async ({ graphql, actions }) => {
  const { createPage } = actions
  const blogTemplate = path.resolve("./src/templates/blog.js")
  const response = await graphql(`
    query {
      allContentfulBlogPost {
        edges {
          node {
            slug
          }
        }
      }
    }
  `)

  response.data.allMarkdownRemark.edges.forEach(edge => {
    // 1. Get path to template
    // 2. Get markdown data
    // 3. Create new pages

    createPage({
      component: blogTemplate,
      path: `/blog/${edge.node.fields.slug}`,
      context: {
        slug: edge.node.fields.slug,
      },
    })
  })
}
And then lastly we update our query references down below to reflect our new graphql response.
const path = require("path")

// create individual blog post pages
module.exports.createPages = async ({ graphql, actions }) => {
  const { createPage } = actions
  const blogTemplate = path.resolve("./src/templates/blog.js")
  const response = await graphql(`
    query {
      allContentfulBlogPost {
        edges {
          node {
            slug
          }
        }
      }
    }
  `)

  response.data.allContentfulBlogPost.edges.forEach(edge => {
    createPage({
      component: blogTemplate,
      path: `/blog/${edge.node.slug}`,
      context: {
        slug: edge.node.slug,
      },
    })
  })
}
So at this point a page is being create for each Contentful blog post and it is being created with the blog.js template. The next step is to update this template so that it is pulling in our content from the new source.
Populating Pages With Content
We start by updating our query. And then we can pull our content out of our returned props data.
import React from "react"
import { graphql } from "gatsby"

import Layout from "../components/layout"

// exporting graphql query returns the individual post
// with matching slug string as a prop
export const query = graphql`
  query($slug: String!) {
    contentfulBlogPost (slug: {eq: $slug}) {
      title
      publishedDate(formatString: "MMMM Do, YYYY")
    }
  }
`
const Blog = props => {
  return (
    <Layout>
      <h1>{props.data.contentfulBlogPost.title}</h1>
      <p>{props.data.contentfulBlogPost.publishedDate}</p>
    </Layout>
  )
}

export default Blog
This only works for string based content however. To render the HTML we need to go through another step.
Rendering JSON Content
The way that Contentful returns all of our actual post content is inside of a JSON object. It does this so that it can keep track of all the content in the post that isn’t just text, it needs to track images, formatted text (like bold and italics) and anything else that we put in there. To show this let’s look at a GraphQL Playground query.

In order to parse all this information out into something that we can use we need to install another plugin made by Contentful, that will convert all of this into React Components.
npm install @contentful/rich-text-react-renderer
This plugin includes a single function that we must call to render our content.
We start by importing the single function that the library provides.
import { documentToReactComponents } from '@contentful/rich-text-react-renderer'
then we add the json object to our query.
export const query = graphql`
  query($slug: String!) {
    contentfulBlogPost (slug: {eq: $slug}) {
      title
      publishedDate(formatString: "MMMM Do, YYYY")
      body {
        json
      }
    }
  }
`
And then we can call that function and pass in the json object that we want it to parse.
{ documentToReactComponents(props.data.contentfulBlogPost.body.json) }
So all together that looks like this.
import React from "react"
import { graphql } from "gatsby"
import { documentToReactComponents } from '@contentful/rich-text-react-renderer'

import Layout from "../components/layout"

// exporting graphql query returns the individual post
// with matching slug string as a prop
export const query = graphql`
  query($slug: String!) {
    contentfulBlogPost (slug: {eq: $slug}) {
      title
      publishedDate(formatString: "MMMM Do, YYYY")
      body {
        json
      }
    }
  }
`
const Blog = props => {
  return (
    <Layout>
      <h1>{props.data.contentfulBlogPost.title}</h1>
      <p>{props.data.contentfulBlogPost.publishedDate}</p>
      { documentToReactComponents(props.data.contentfulBlogPost.body.json) }
    </Layout>
  )
}

export default Blog
And we can see that our content is rendering correctly… except for our image.

Getting Images to Load
There is a post by Artem Biyun on this that is very helpful.
Essentially you need to import two new packages. The documentToReactComponents package give you some options when you render the nodes in the JSON object, you can select a node, in this case the embedded asset (picture) and you set the alt tag based on the title and the url is the url. Why this isn’t built in out of the box escapes me but here is how it looks when it is working.
import React from "react"
import { graphql } from "gatsby"
import { documentToReactComponents } from "@contentful/rich-text-react-renderer"
import { BLOCKS, MARKS } from '@contentful/rich-text-types'

import Layout from "../components/layout"

export const query = graphql`
  query($slug: String!) {
    contentfulBlogPost(slug: { eq: $slug }) {
      title
      publishedDate(formatString: "MMMM Do, YYYY")
      body {
        json
      }
    }
  }
`

const Blog = props => {
  const options = {
    renderNode: {
      [BLOCKS.EMBEDDED_ASSET]: (node) => {
        const alt = node.data.target.fields.title['en-US']
        const url = node.data.target.fields.file['en-US'].url
        return <img alt={alt} src={url} />
      }
    }
  }

  return (
    <Layout>
      <h1>{props.data.contentfulBlogPost.title}</h1>
      <p>{props.data.contentfulBlogPost.publishedDate}</p>
      {documentToReactComponents(props.data.contentfulBlogPost.body.json, options)}
    </Layout>
  )
}

export default Blog

GitHub Repo
Automated Amazon Reports
Automatically download Amazon Seller and Advertising reports to a private database. View beautiful, on demand, exportable performance reports.