AWS Load Balancers and Security Groups
Intro
If you are hosting a React application on an AWS EC2 instance you will need to go through the process of setting up a load balancer and security groups to make the app publicly available on a domain name. This post will cover setting up this process for a React application using a Classic Load Balancer. However the fundamentals here will apply to any Node application running on an EC2 server (Express) or another type of load balancer.
Understanding the Load Balancer��
First of all, let us answer the question of why we need a load balancer at all? At the very least we need a load balancer to direct our users to the correct port on our server. For example a React application will typically be running on port 3000.
If my domain name points directly to the IP address of an EC2 instance running a node application, my users will simply get a blank page. This is because DNS records do not allow us to specify a port.
For example if we had the domain name widget.com and we used an A record in our DNS settings directing to the IP address of our Node server. If a user went to widget.com they would get a blank page. However if they went to widget.com:3000 they would then be able to see the application.
The load balancer is where we re-direct traffic to the correct port, which allows users to visit the base url and have access to our application.
Furthermore the load balancer is there to balance traffic between multiple EC2 instances (if we have them). It can send users to a different server based on the load, or user location etc etc. This will not matter until you have actually scaled your application horizontally due to higher traffic.
In addition the load balancer can send traffic to different groups of servers based on the url or subdomain of the traffic it receives. For example I could have a separate group of servers for my API, and then if the load balancer receives a request for api.widget.com it would direct the traffic to the correct port on that group of servers which is designated for our API servers.
So we can see that our load balancer is both a router and a load balancer.
Understanding Security Groups
Security Groups in AWS are like miniature little firewalls. You name each one and then define a set of rules for incoming traffic and outgoing traffic. You then apply those security groups to your Load Balancer and EC2 servers respectively.
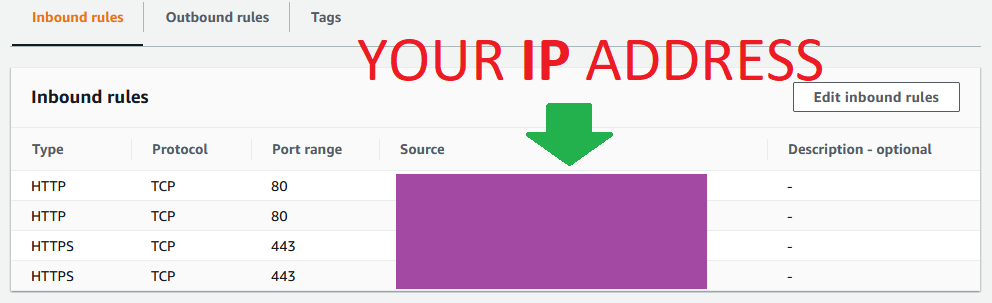
One of the useful applications of security groups is the ability to add a whitelist to your load balancer during development. Let us say that I am developing a new application which is not ready to have anything available publicly on the internet. However I still want to be able to visit the application live on the internet to test it while I develop it.
In this case I can create a security group that only allows my IP address, and the addresses of my fellow developers on incoming traffic. If I apply that security group to my load balancer, we have effectively created a "whitelist" of IP addresses who have access to the application.
Putting It Together
Let us now take this basic understanding of load balancers and security groups, and walk through the process of making a React application available on the internet using AWS services. We will assume at the start of this tutorial that you already have your node application installed and running on an EC2 instance.
Verify Application is Running
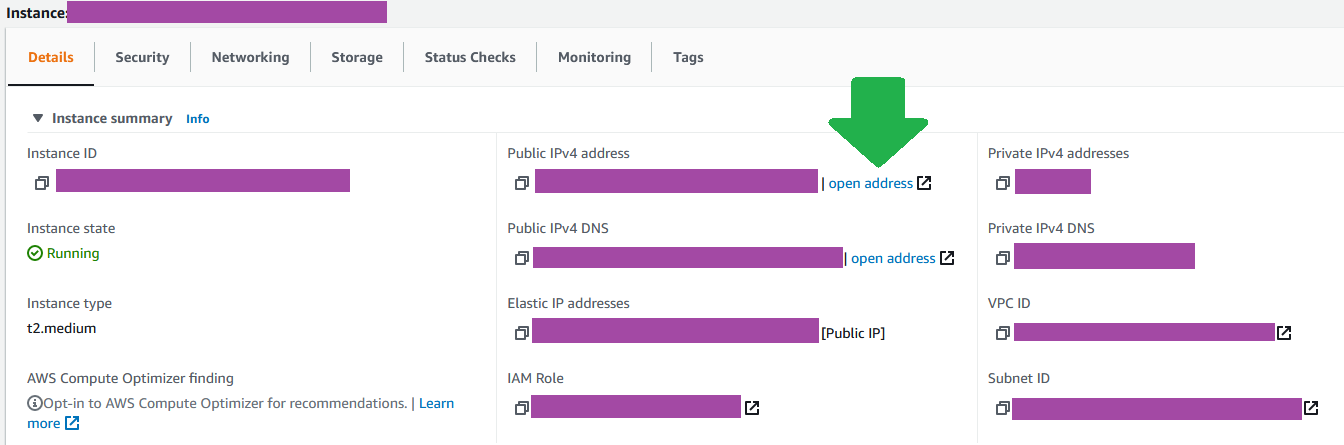
To verify your app is running, navigate to EC2 > Instances click on the instance that has your application running and you will get a details panel. Open the Public IPv4 address in another tab, add the port of your application to the end of the address and you should see the application available. For example yourAppAddress:3000 or whatever the correct port is for your application.
I would strongly recommend that you use a process manager like PM2 to ensure that your application remains running.
Create Security Groups
Next let us create our security groups before we create the load balancer. The load balancer requires that we assign it a security group, so these are a pre-requisite anyways. We are going to create 3 security groups. Security groups are created by navigating to EC2 > Network & Security > Security Groups
widget_LOADBALANCERwidget_LOADBALANCER_WHITELISTwidget_EC2_PUBLIC
You can of course choose your own naming convention.
The first security group widget_LOADBALANCER is going to be applied to the load balancer. It is going to allow all traffic going in and out. This is the security group that you will use when the application is ready for production.
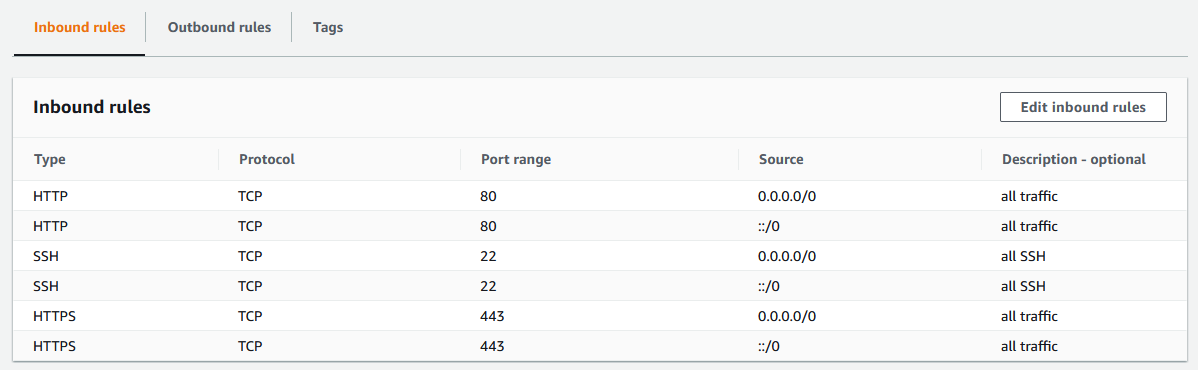
We can see in the inbound rules that we have allowed all traffic from HTTP and HTTPS requests. There is a convenient option to allow traffic from anywhere when creating the rules.

Also make sure that the outbound rules are allowing all traffic.
The second security group widget_LOADBALANCER_WHITELIST will similarly be applied to the load balancer, however this is the security group that we will use when the application is in development, and we only want to allow certain people (developers) to access it.
The third security group widget_EC2_PUBLIC (thus named because it will be applied to the EC2 servers in our public subnet) will be configured to only allow traffic from the first two security groups. This is a very important step. If you make the mistake of allowing all traffic on this security group a couple of things will go wrong. To start with users will still be able to navigate manually to the public IPV4 address for individual EC2 instances, which is not what we want. This is a way for users to get around the whitelist if we have implemented one. We want all traffic to go through the load balancer & load balancer security group.
When creating the inbound rules for this security group you will be able to select another security group as the source in the dropdown.
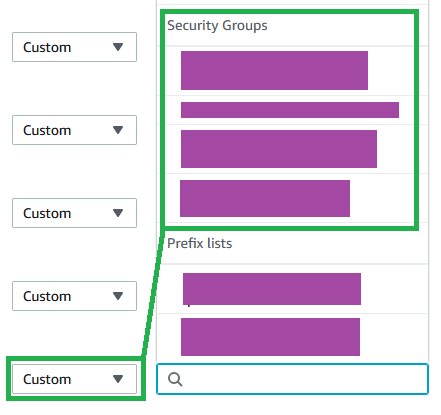
Create rules to allow all HTTP and HTTPS traffic from both of the widget_LOADBALANCER security groups. There is no reason to pick just one here. The line in the sand is drawn at the load balancer, and by allowing both groups here we can switch back and forth our policies on the load balancer without having to come back here and update the third policy. Which we will inevitably forget to do.
We have now completed the steps necessary to create our Load Balancer
Creating the Load Balancer
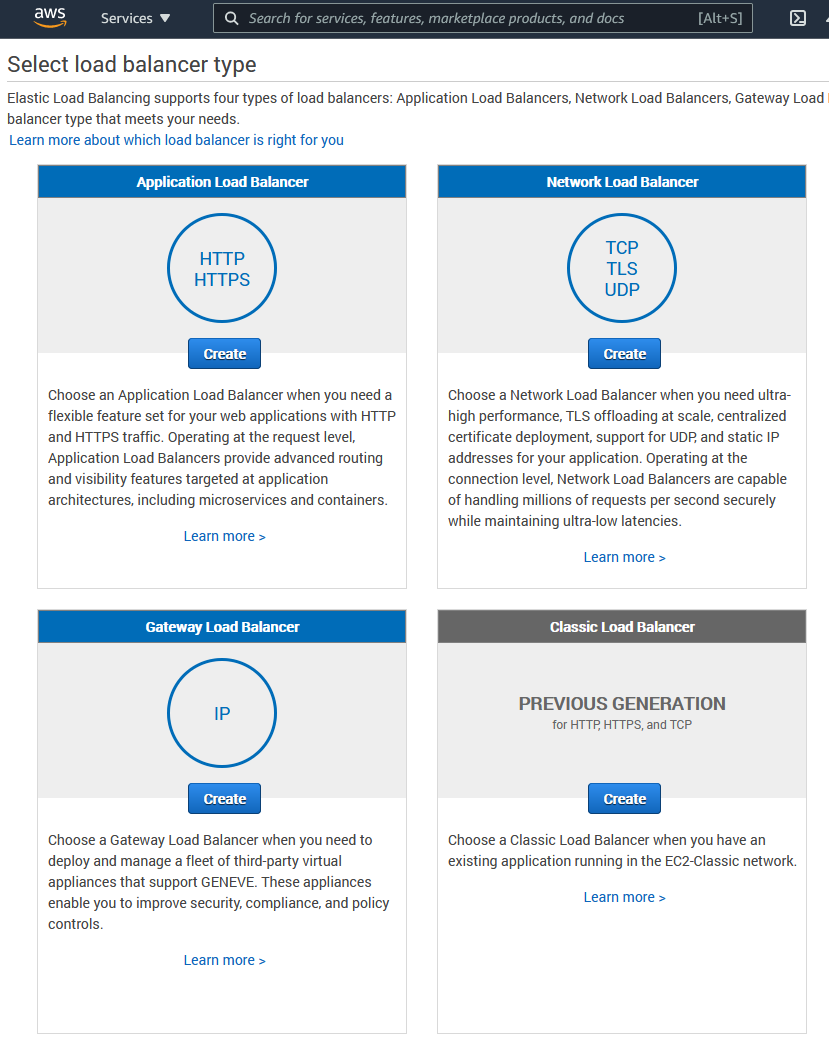
Select Type
To create the Load Balancer navigate to EC2 > Load Balancing > Load Balancers. In this case we are going to be using the Classic Load Balancer because we are assuming a very simple architecture where we only have one Node application running on one EC2 instance. However it is easy to convert the load balancer to an Application Load Balancer later, so do not fear if you are planning on adding complexity later.
Name and forward to Port
The first step is to name the load balancer, select which Virtual Private Cloud (VPC) you would like to put it in (you should have a separate VPC for each application). Make sure you put it in the same VPC that your application EC2 instance is in.
Next we get to the part where we forward all the traffic to port 3000 (or your respective app port).
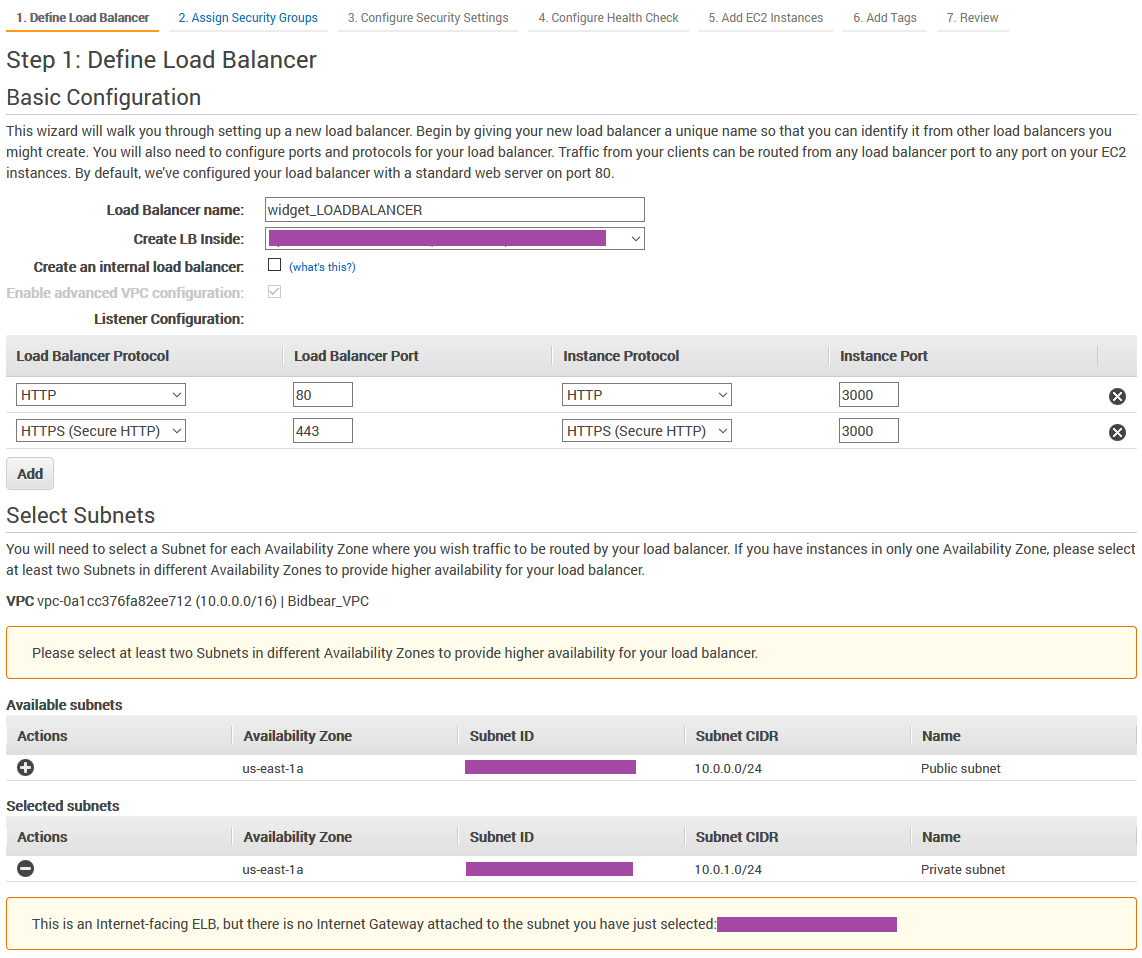
And underneath we select our public subnet, which is where our EC2 instance is located.
Assigning Security Groups
Next you will be asked to assign your security groups. Select either widget_LOADBALANCER or widget_LOADBALANCER_WHITELIST depending on whether you would like the application to be public facing or not.
A note about overlapping security group rules. A rule in a security group is by default a permission not a restriction. Therefore if I assigned both
widget_LOADBALANCER_WHITELISTsecurity group andwidget_LOADBALANCERsecurity group, all traffic would be allowed. The restriction does not over-ride the permission.
Security Settings
Security Settings you're on your own, pick your settings accordingly.
Configure Health Check
The health checks can trip you up so let's take a moment here. What is a health check? A health check is a ping that your Load Balancer will send to your EC2 instance periodically to make sure that the application is still up and running. If it does not receive a responce from the server like 200 it will assume that the server is down and route traffic to another instance. In our case we only have one instance, so if we fail the health check our site is down, period.

Make sure that the ping port is the same port that your application is running on. The ping path can be any url on the application that actually exists and will return a valid 200 response code. Therefore the index on our React application is great for this. The following settings are less important, just leave them at a default. It is just asking you how often to ping the server, and how many successful pings the health check must receive before it classifies the instance as "healthy". In the default the load balancer will ping the server every 30 seconds. If it gets 10 200 responses in a row, which will take a total of 5 minutes, it will classify the instance as healthy and make it available to traffic coming into the load balancer.
Remember that 5 minute period, because that is the initial amount of time it will take for the load balancer to work correctly, it must complete the full health check before making the server available.
Add EC2 instances
The next step is very simple, just select the EC2 instance that your application is on!
Congratulations, we have now created our load balancer. However we have a couple more cleanup tasks to take care of before we are finished.
Verify Health Check Status
As soon as the load balancer has been provisioned it will start pinging the EC2 instances that it manages with the health checks. It will take 5 minutes for the initial health check to take place if you left the settings there to default, as we discussed.
Here is where you can check the status of the EC2 instances that the load balancer is managing.

Make sure that your status here is good before you move on. If the balancer doesn't think the instance is healthy it won't direct traffic to it. If your server is failing health checks continuously there are really only a couple of things that could be going wrong here.
- You have incorrectly configured your security groups so that the load balancer is not able to send and receive traffic back from the EC2 instance.
- The route the health check is pinging on your application does not exist
- Your application is not running
Once you have passed the health check you can move on to the final step.
Re-Direct DNS Record to Load Balancer
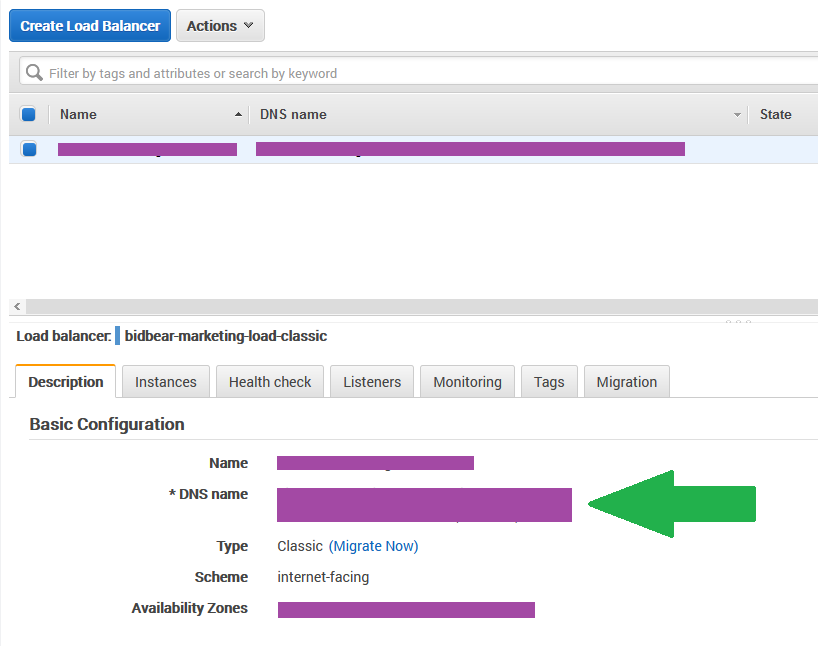
Currently your DNS records for widget.com are pointing directly to our EC2 instance (or maybe not, I don't know what you've done). The point is that we need to point our DNS A records to our newly created load balancer. Navigate to EC2 > Load Balancing > Load Balancers and select your new load balancer.
You will see a list of information under basic configuration, and there you will see the DNS name of your load balancer. Copy that and head to your DNS settings.
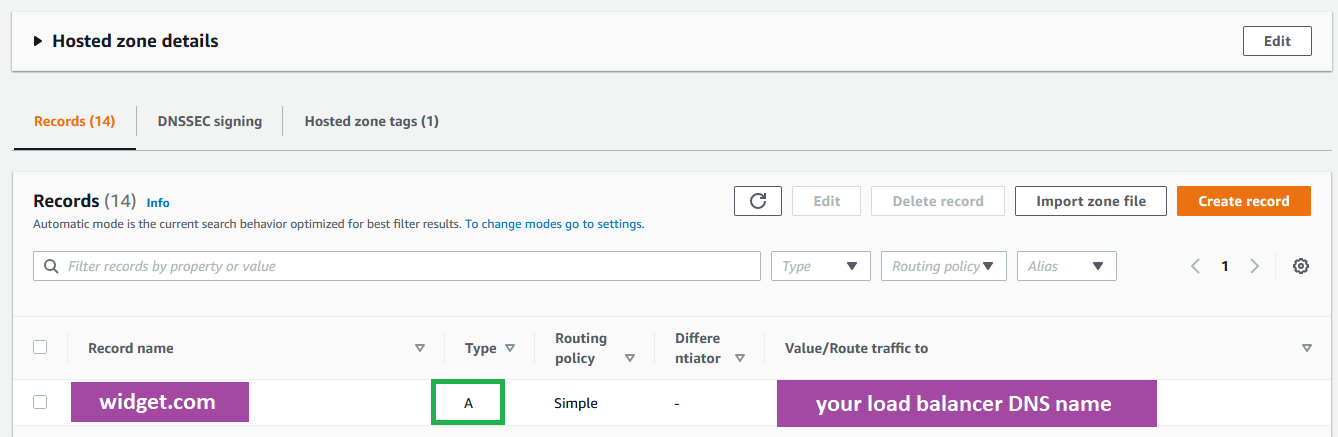
if you are using Route53 it will look like this
Conclusion
That is the complete process. At this point we have done the following.
- Our EC2 server only accepts traffic from our Load Balancer
- Our Load Balancer decides who gets through and where they are going
- Our DNS records point our domain to our Load Balancer
Navigating to your domain name should now show you the application.
Automated Amazon Reports
Automatically download Amazon Seller and Advertising reports to a private database. View beautiful, on demand, exportable performance reports.