Homelab
Finished Project
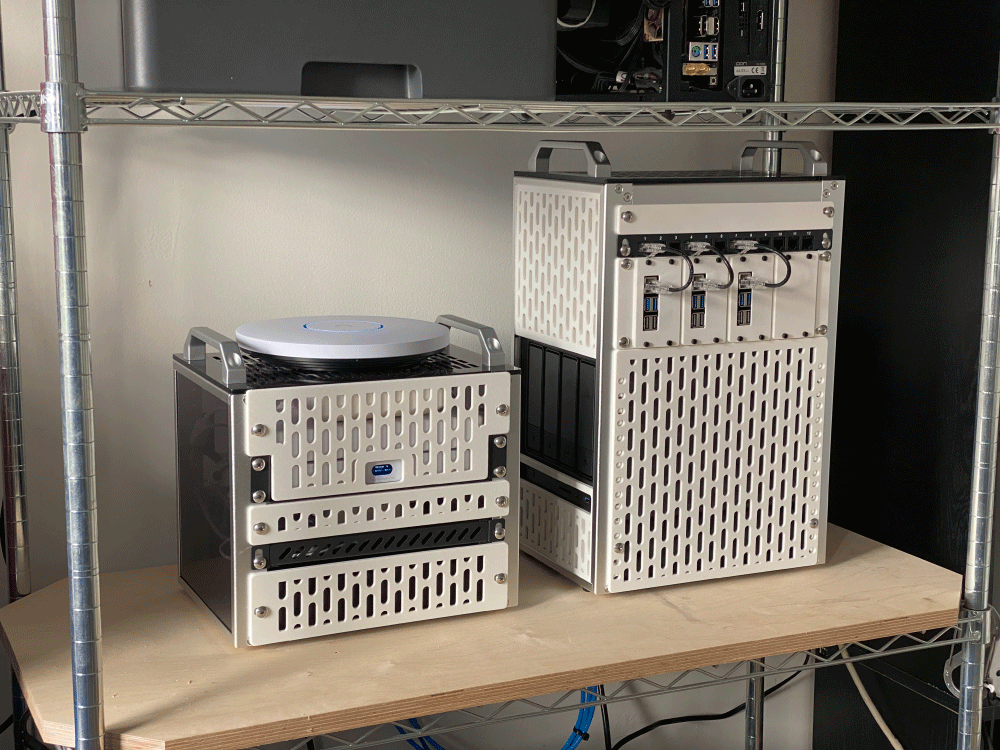
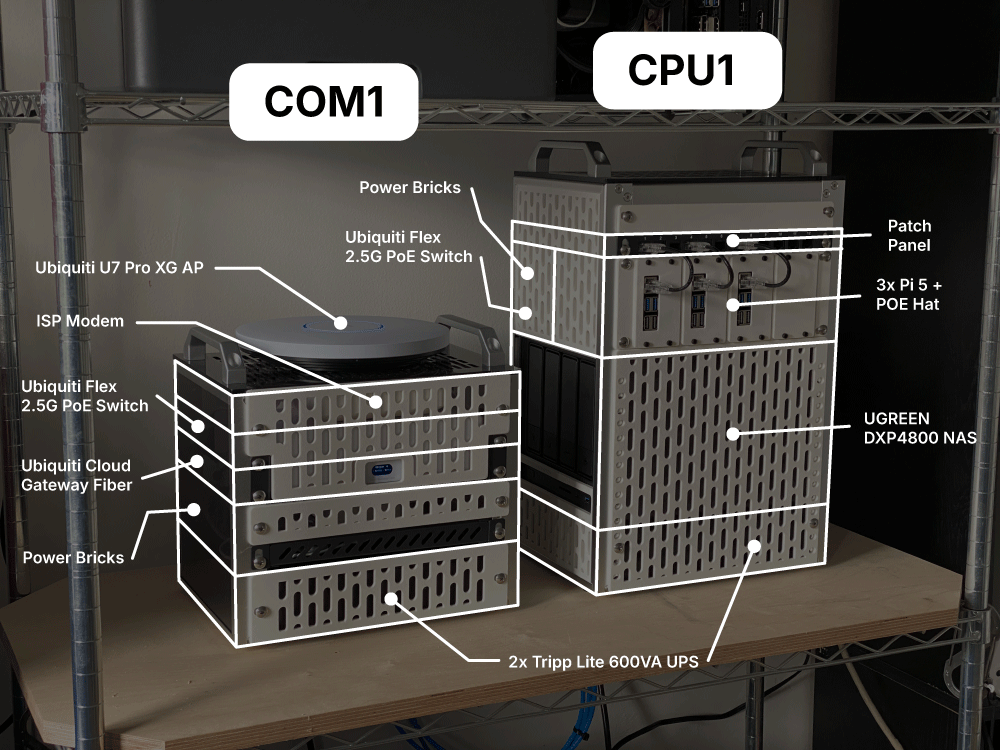
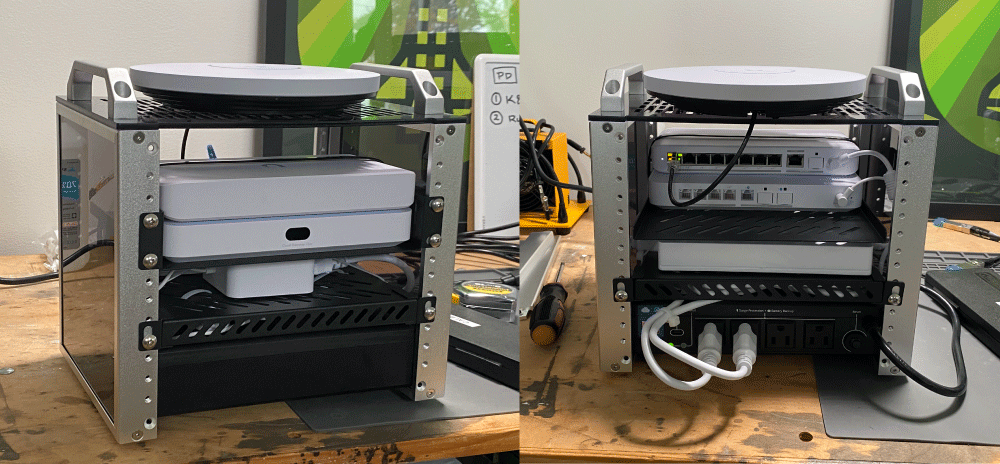
The final project is a homelab consisting of two 10" mini-lab rack modules. The first module "COM1" contains networking equipment and the second "CPU1" contains a NAS and Pi-Cluster.
What Is A Homelab?
A homelab is a personal computing environment for experimenting with hardware, software, networking, and system administration in a hands-on way. It is a private IT playground.
My primary goals for this project were to increase security by creating a fully segmented home network, and gain more experience with K8s, Docker, network security etc.
Form Factor
Homelab projects always involve hardware, and one of the first decisions you have to make is what type of form factor you want to build. This affects basically all of your decisions down the line in terms of compatible hardware, and thus the features that will be available to you.
The first obvious option is to use a full size 19" rack like they do in commercial data centers. The positives to this approach are that you will have a wide range of powerful commercial equipment available to you with powerful commercial features. There is also a thriving aftermarket for this equipment and you can buy powerful machines at a low cost. The downside is that most of those machines are designed for commercial environments where noise, heat and electrical costs are secondary considerations.
The second options is to just build inside a standard off the shelf PC case. These systems are, after all, just computers. You'll probably end up using a few of these cases and linking them together if you go this route.
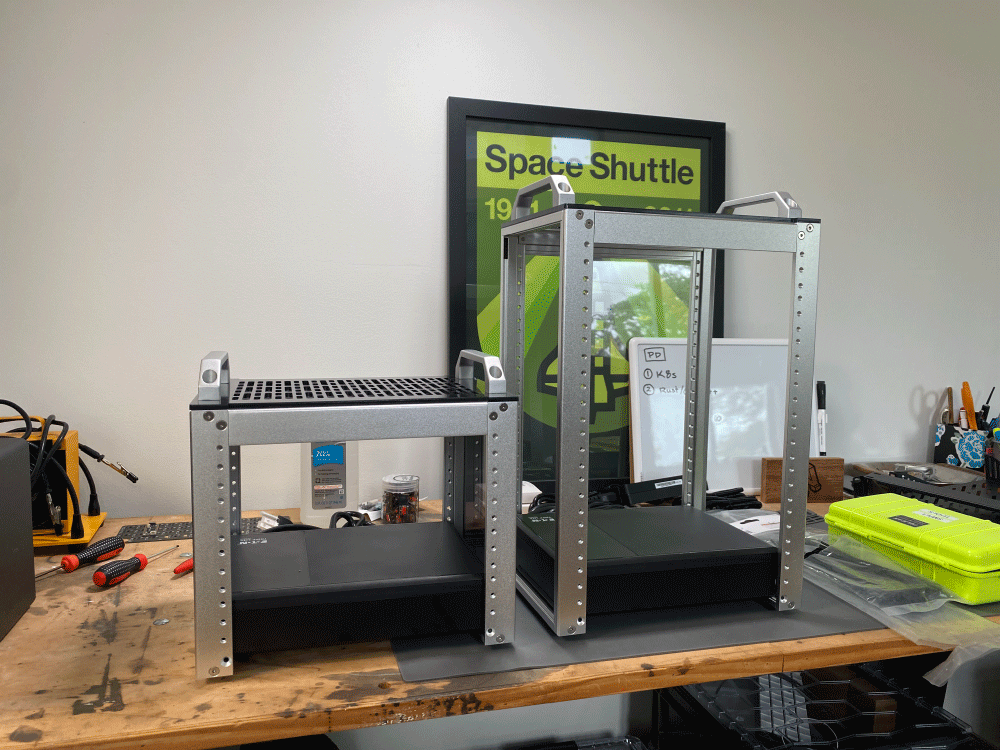
The third option, and the one I went with, is to use a 10" mini rack. This is a relatively new form-factor that has been gaining traction in just the past few years. It has a couple of strong advantages. First it takes less space than a standard 19" rack, while still providing a high degree of flexibility for mounting. The equipment that fits in these racks can still be pretty powerful, and since it is designed for home environments it tends to be quieter, cooler and more power efficient. Albeit more expensive for some things. Lastly the smaller size makes it easy to 3D print mounts, panels or even entire racks.
Why Rack Modules
I could have gone with one taller rack to hold all of the equipment in this build, but decided on multiple smaller racks for a couple reasons. My thinking is largely influenced by the world of software, where good design involves creating re-usable modules that are designed for one thing. This pattern makes projects easier to maintain in the long run. I felt like this principle was applicable here.
For example, because all my home network equipment is contained in one rack, and the servers are in another, I can literally unplug the server rack, take it off the shelf, disassemble it (or light it on fire) and this will not affect my internet for the rest of my household.
It also gives me a high degree of flexibility to expand in the future. If I want to play around with meshtastic or other radio hardware, that's another mini rack. If I want to build an AI compute farm, that's another mini rack. I can add equipment to the lab without worrying about whether it will fit inside the current rack, or buy a huge mostly empty rack at the start to accommodate future expansion.
Build Log
Let's do a quick build log showing how this all got put together, and then we'll cover what all the equipment does in the Networking and Compute sections below.
The first thing I did after I got the racks was measured and found a UPS that would fit inside. I knew that I wanted to have a UPS in each (because modules).
I wanted to do this first because I knew they would be heavy and weight distribution is better if these are on the bottom. Also I needed to know how much room I would have left in each rack with the UPS installed. These little 10" Tripp Lite UPS's ended up fitting perfectly. There is a downside to these which is that they aren't NUT compatible which is a bit of a bummer, but I can unplug either rack independently and they won't lose power which is cool.
NUT is a software that runs on UPS's which let's them communicate with the servers, letting them know if there is a power failure so they can shut down safely before the battery dies.
In retrospect I think it would have been smarter to go with one larger external NUT compatible UPS that feeds all the modules and gives more room in the racks. Live and learn.
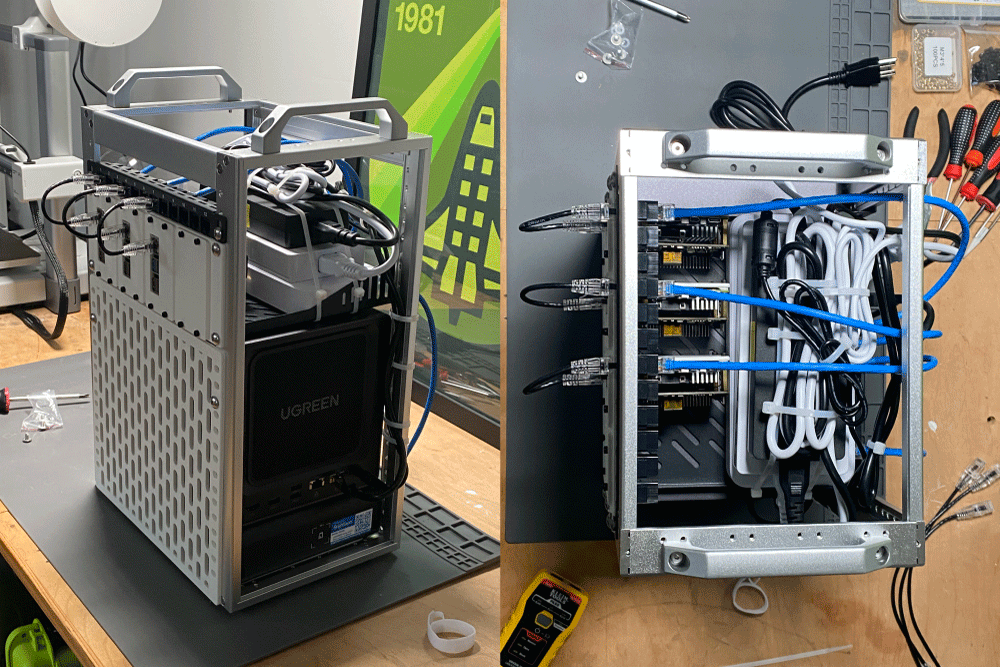
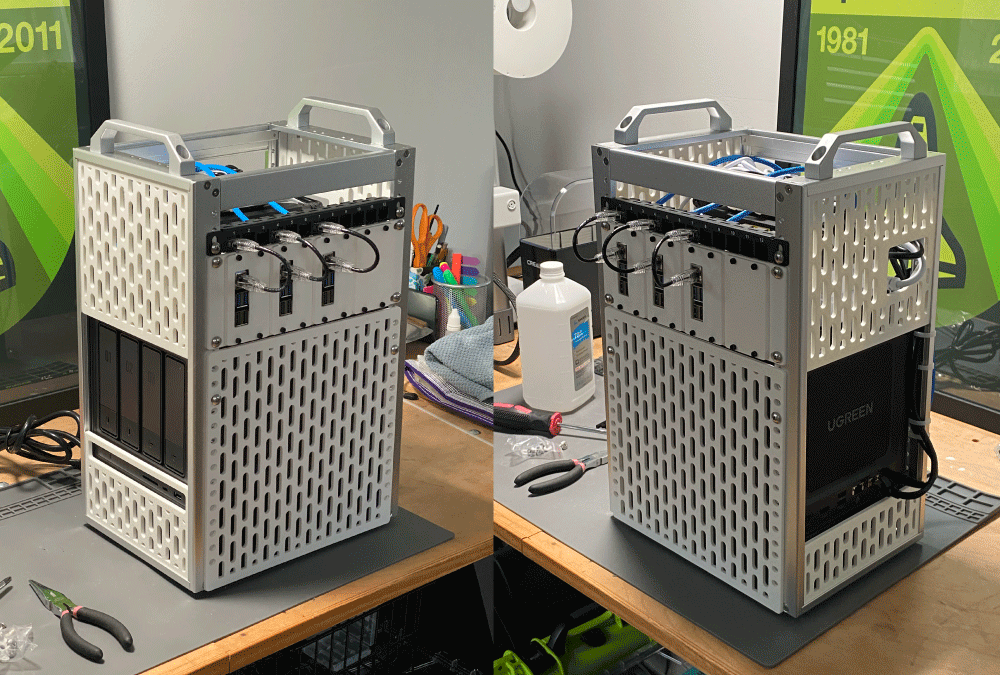
Then I got the NAS to fit. The only way it works is sideways, and you have to take the side panels off the racks to accomodate this. But as you'll see later we 3D print our own custom panels anyway.
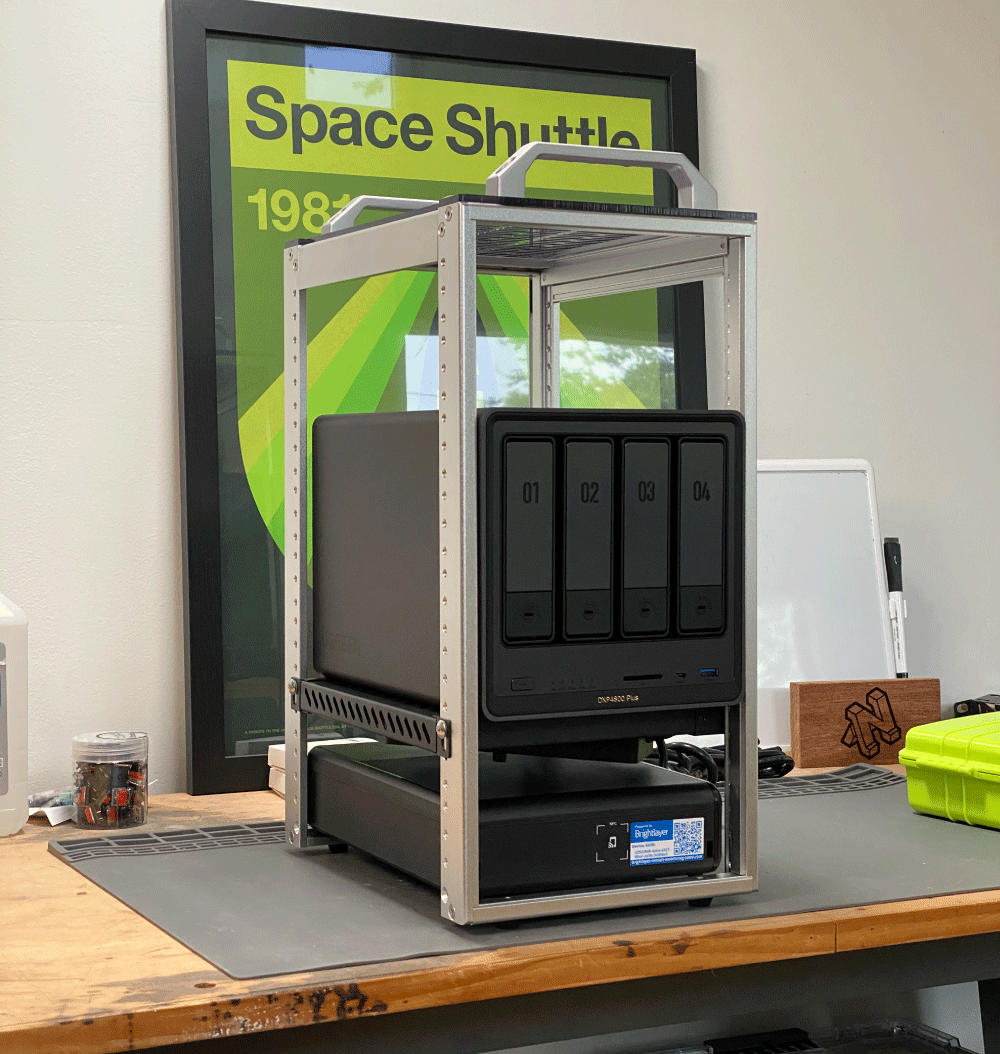
The drive bays, controls and ports are all still accessible. Additionally if you need to remove the NAS from the rack you can just slide it out the side. Originally I positioned the power brick on the underside of the shelf that the NAS is resting on here but I ended up needing the extra space this took later.
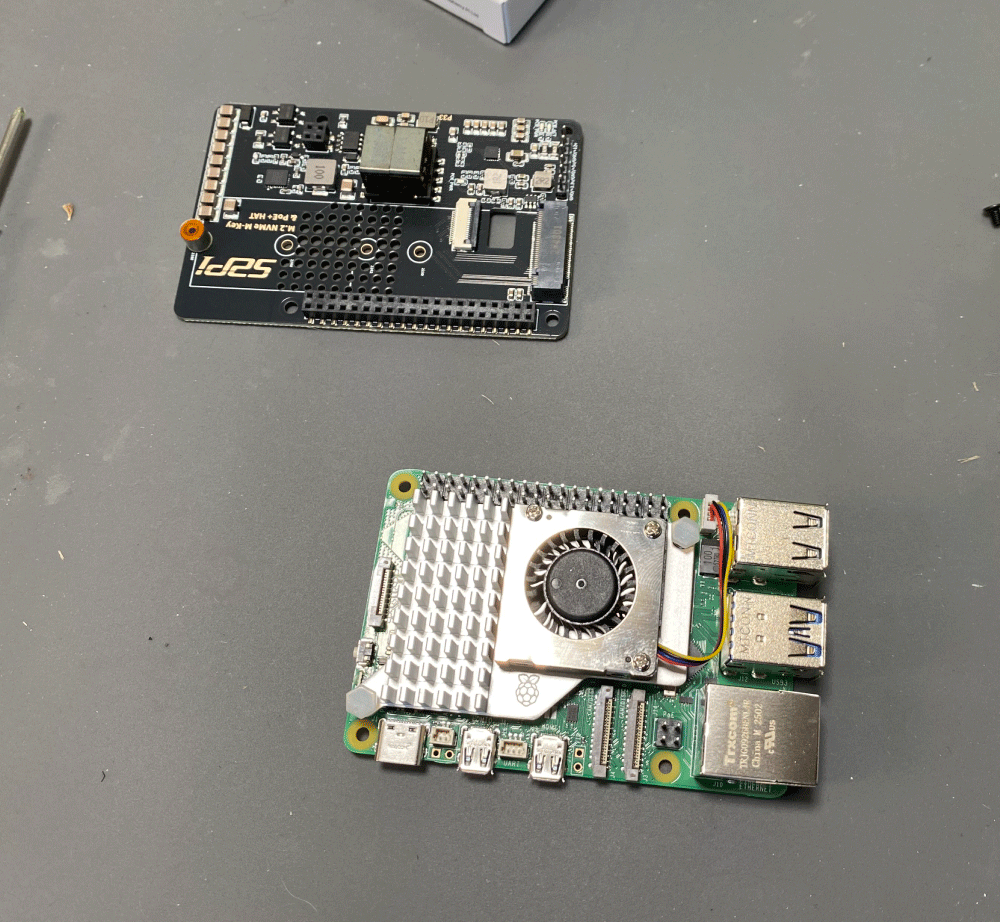
The Raspberry Pi 5's need these POE (Power Over Ethernet) hats so that they can be connected to the cluster and powered with just one cable. The hats also have M.2 NVMe drive bays so we can install the Ubuntu Server OS and application data on that drive.
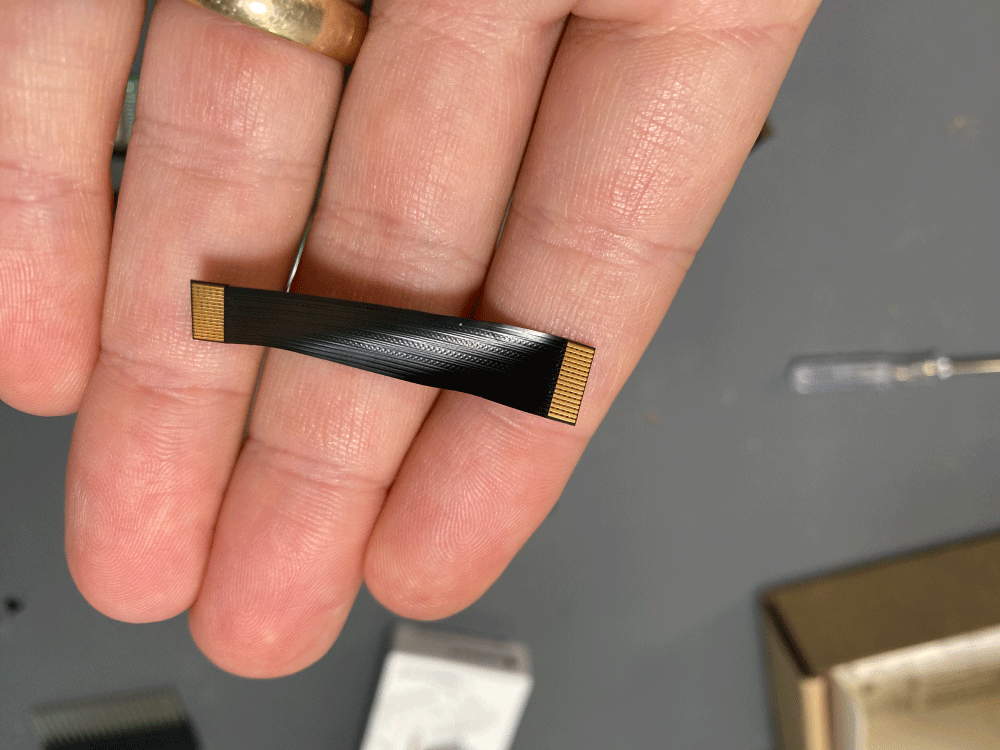
The hats connect with these cute little PCIe ribbon cables.
And here they are all assembled before mounting in the cluster rack.

At this point the Pi's were ready to get assembled into their mounting rack. Which needed to be 3D printed. I shopped around to get quotes from print farms and was kind of shocked by how much people were charging. The lowest price I was able to find was from a printer in Argentina... about $36 dollars. So I ordered that. Then while I was waiting for it to arrive I thought about how many parts I had left to print and started doing some research on how much 3D printers cost these days.
Turns out not a lot. There is a really great one by Bambu Labs called the A1 that only costs about $300. I knew that would be about comparable to what I was going to pay having them printed by other people, not to mention the time wasted waiting for the parts to arrive, so I pulled the trigger and got one.
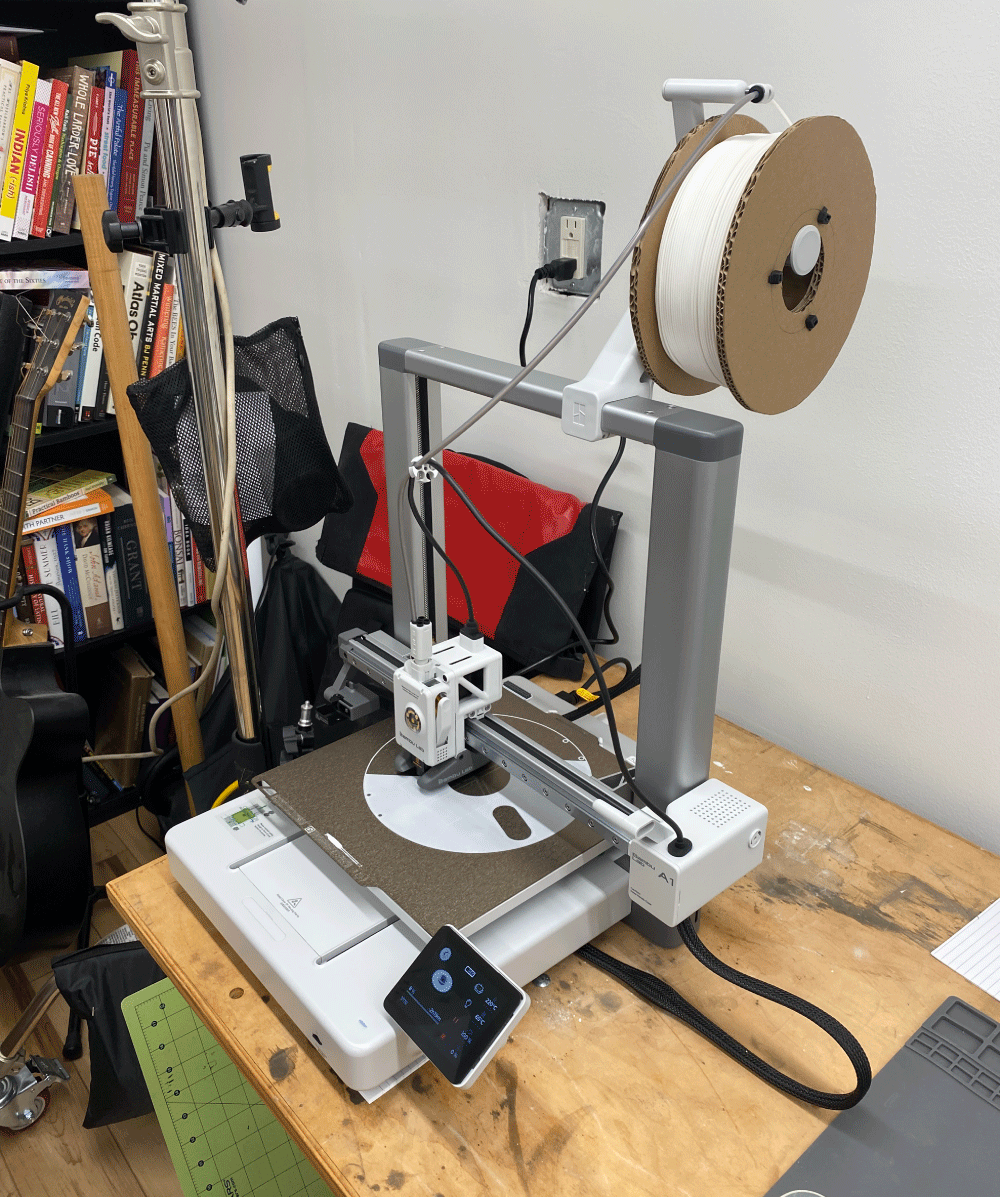
I did not realize you needed to order a spool separately so I jerry rigged one out of cardboard and the first thing I printed was a spool.
When the parts from Argentina finally arrived they were broken and of poor quality so this purchase ended up being a very good decision for the project.
From there getting the Pi Mounts printed and assembled was pretty straightforward.

At this point the CPU1 module just needs a switch and all the powerbricks to fit inside and getting everything wired up to be functional. Not pretty maybe, but functional.
Then it was on to the assembly of the COM1 module.
The gap is where the ISP modem will go, but I can't move it in place until the network wiring is complete without disrupting the internet for the household.
At this point both of these modules are technically functional. But then I got a little excited about the 3D printer.
I created a full CAD model of the rack in AutoDesk Fusion thinking this would save me time while designing the side panels. It did not save me time.
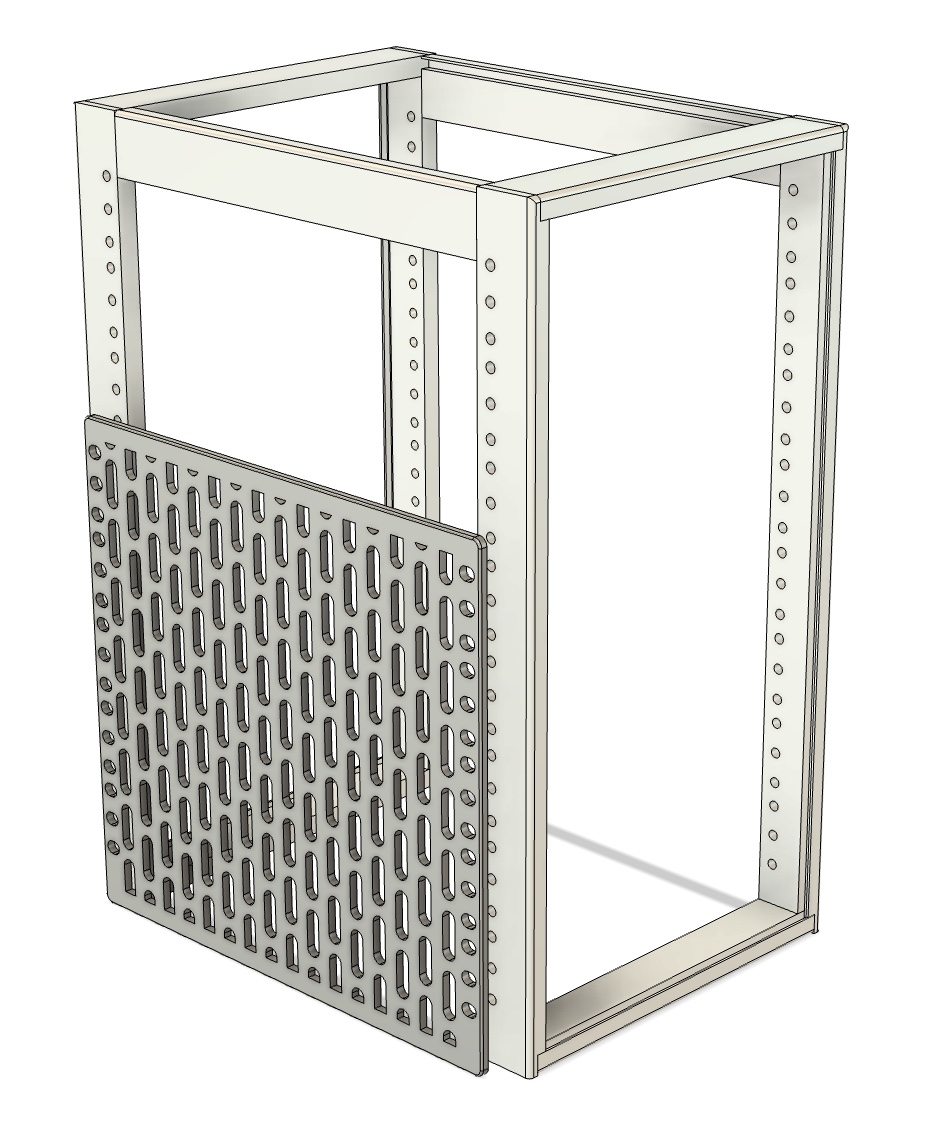
The first panel shown in the render above actually had a flaw in the measurement so that the mounting brackets didn't line up. For all the subsequent panels I ditched this model and just designed them based on the spacing between the specific mounting points that I wanted to attach them to.
The repeating pattern was saved as a sketch that I could project onto the remaining designs. The rest of the panels came together almost without error.
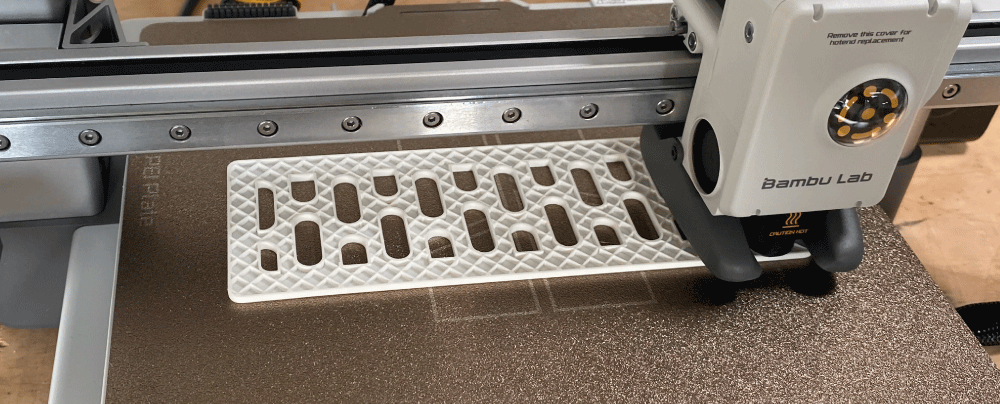
Pro tip, if you need to do an especially complicated panel, you can 3D print a very thin sheet like a template with the outline to test your measurements instead of printing the full thickness to save time and material.
I agonized over how to attach the panels to mount on the sides since there are no screw holes there. I had plans for this pretty complicated heat set insert design where you would screw in a screw to wedge it in place. Then I remembered that I have a tendency to overcomplicate things and I printed some small panels playing around with the thicknesses until I got it just right where they would pressure fit and that was the solution.
The engineered gap in the upper right side panel to accommodate the power brick wires I think is a good analogy for my entire personality.
Networking
The goals for the network in this project are to increase security by creating a fully segmented network. That means we create a set of virtual networks and put devices on those networks based on what type of device it is. Then we regulate the traffic between them (Firewall).
For example we create a TRUSTED network that only our phones and personal computers attach to, and an IOT network for all of the IOT devices like smartbulbs, nanny cams, etc. That way my smart devices don't have access to the same network that my personal computer is on, which reduces my attack surface.
Similarly I can create a WORK network with its own wifi that I attach my company laptop to, and it is completely segmented from all other networks.
There are a lot of hardware options to accomplish all this but in a nutshell it requires commercial or "pro-sumer" grade routers. Because a router is just a computer (it's all just computers) some people choose to build their own routers/firewalls using simple PC's running some kind of software like pfSense.
That is an interesting route, but since learning pfSense isn't one of my goals for this project I decided to go with the Ubiquiti Unifi ecosystem. That means i'm not only going to be replacing my router, i'm going to be investing in Ubiquiti switches, access points etc. All the networking equipment for the household is going to be replaced.
In a Unifi ecosystem the router and firewall are contained in the same device called a "Gateway". Again, this is just small computer with a bunch of ports. The magic really is their software that ties this computer together with all their switches, "Access Points" (wifi transmitters/receivers), cameras, etc etc.
The WAN (Wide Area Network IE Internet) plugs into the Gateway, and then the Gateway connects to everything else in your home network, directing all the traffic.
Once connected the Gateway hosts a web application on a local IP address that will allow you to configure everything on the network.
Once you have the Gateway you'll need to figure out what other equipment you'll need to serve your needs. In a Unifi environment pretty much all of your network devices like Access Points, Cameras etc are powered by POE, and that POE is going to come from switches. Different switches are able to push a certain amount of power, and if you need more you inject more power into the ethernet line using POE Injectors. The nice thing about this is that the power and data are both transmitted through the same line, so when you run your wires you really only need to worry about the ethernet cable.
To determine how many Access Points and Switches you'll need you can use the Unifi Design Center. It's a handy web application they offer that let's you map out your property and place different devices to simulate Wifi coverage.

That's a screenshot of my property and the outbuilding is my office. One of the tricky things about the networking in this instance is that I'm going to be moving the ISP modem from the house to the office, which means that I will have to beam the internet back to the main structure from that outbuilding.
I could dig a trench across that distance, but I already did that (by hand) once before to bring power to the outbuilding. I'm not doing that again. That means we are going wireless. Unifi does build devices specifically for that use case called Bridges, and they could give you a 10GB wireless connection across that distance for about $1000. That's actually a pretty reasonable price considering. However those are pure directional devices that won't actually transmit the wifi for other devices. Instead I went with two U7 Pro Outdoor Access Points. That device lets you change how the antenna is configured so that it can be directional, or omni-directional.
I use a directional antenna setup as a mesh parent to bridge the signal to the house, and an omni-directional antenna setup to catch and return. This lets the one on the house also provide wifi to nearby devices in addition to bridging the gap across the yard.
Then I put one more U7 Pro XG on the hallway ceiling and that covers the whole house. The Wifi is twice as fast as it was previously. About 300 Mbps. In the office it's even faster.

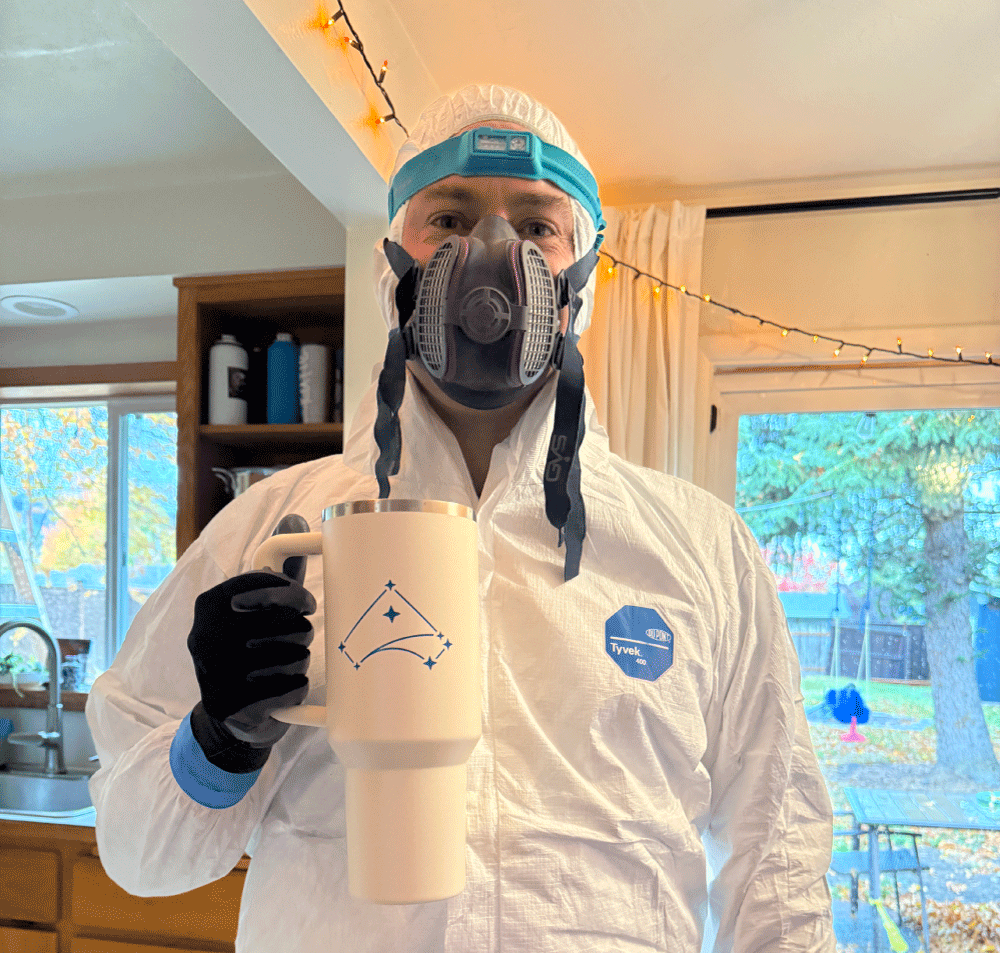
I also needed to install a switch in the house to power these two access points, and run ethernet cables through the attic to the correct locations. My attic uses blown in fiberglass insulation and I once made the mistake of crawling around up there in a tshirt. Don't ever do that. This time I went with a full Tyvek suit that I've been saving for just such an occasion.
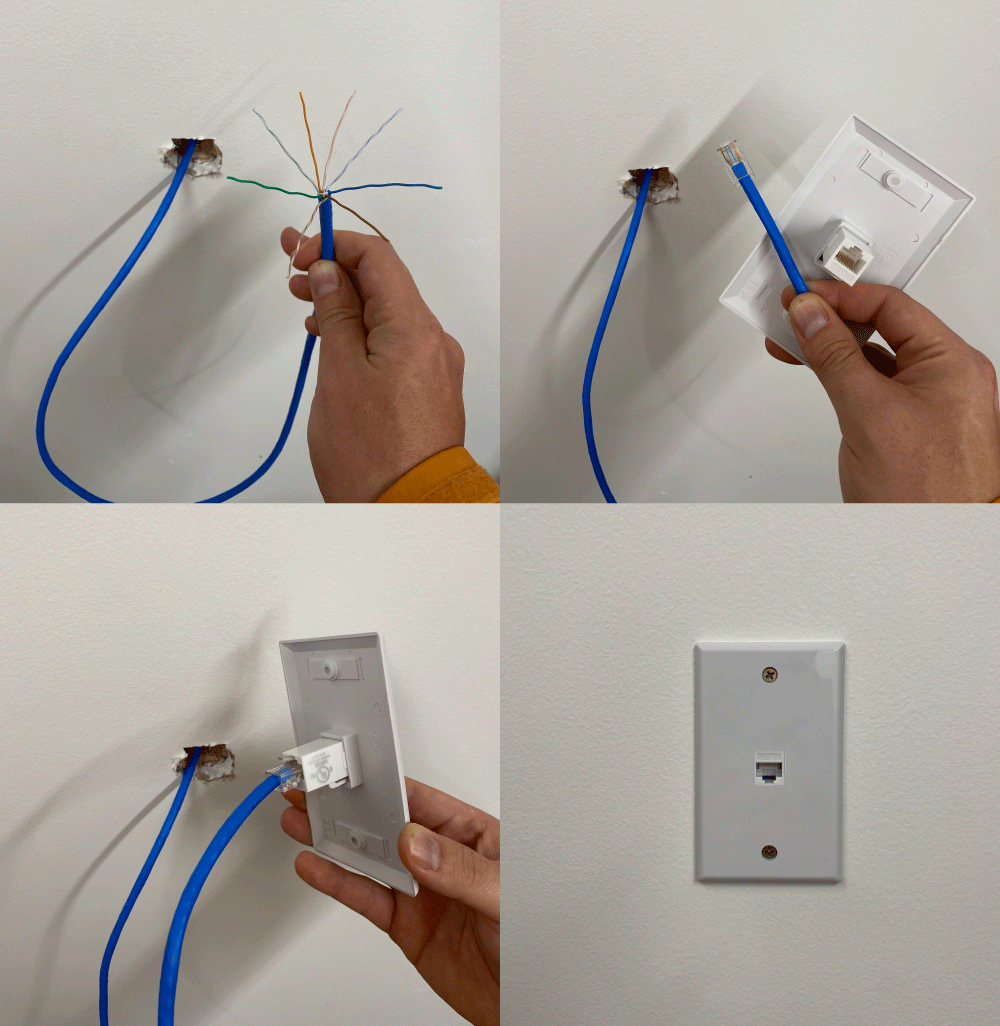
We have to wire, crimp and test Cat6 connectors to make this all work. Sidenote, you can't just buy any off the shelf Cat6 cable. You actually have to do some research and buy a reputable brand that follows the standard properly or you will get a horribly degraded signal. Additionally if you are running wires more than 100 feet you need to get the Cat6a variety or you will get degraded signal. I had no idea.
Once you have this all setup and running you will have an absolutely ridiculous level of control over the network and Wifi. You can transmit multiple wifi networks for various purposes. You can transmit specific wifi networks from specific access points. You can control which frequencies and channels each access point transmits. You can control which frequencies specific devices can connect to. You can block ads. You can control the traffic passing between your virtual networks. It just goes on and on.
This is my LAN Network configuration:
| Name | VLAN ID | Router | Subnet | DHCP | IP Leases | Pool Size | Available | Excluded | Range |
|---|---|---|---|---|---|---|---|---|---|
| MGMT | 1 | Cascadia | 10.2.0.0/24 | Server | 155 | 145 | 0 | 10.2.0.100 - 10.2.0.254 | |
| TRUSTED | 21 | Cascadia | 10.2.1.0/24 | Server | 151 | 146 | 0 | 10.2.1.50 - 10.2.1.200 | |
| SERVERS | 31 | Cascadia | 10.2.2.0/24 | Server | 151 | 151 | 0 | 10.2.2.50 - 10.2.2.200 | |
| IOT | 41 | Cascadia | 10.2.3.0/24 | Server | 205 | 195 | 0 | 10.2.3.50 - 10.2.3.254 | |
| GUEST | 51 | Cascadia | 10.2.4.0/24 | Server | 151 | 147 | 0 | 10.2.4.50 - 10.2.4.200 | |
| WORK | 61 | Cascadia | 10.2.5.0/24 | Server | 151 | 151 | 0 | 10.2.5.50 - 10.2.5.200 |
and Wifi configuration:
| Name | Network | Broadcasting APs | Wifi Band | Clients | Security |
|---|---|---|---|---|---|
| Cascadia TRUSTED | TRUSTED (21) | All APs | 2.4 GHz, 5 GHz, 6 GHz | - | WPA2/WPA3 |
| Cascadia GUEST | GUEST (51) | All APs | 2.4 GHz, 5 GHz, 6 GHz | - | WPA2/WPA3 |
| Cascadia IoT | IOT (41) | All APs | 2.4 GHz, 5 GHz | - | WPA2 |
| Cascadia WORK | WORK (61) | AP COM1 | 5 GHz, 6 GHz | - | WPA2/WPA3 |
Compute
Ok let's talk about the compute that's available to us in the CPU1 module.
NAS
The NAS seems like the first thing everyone adds to their homelab and I can see why. It gives us storage, let's us run a home media server and other low resource application. You know, things that normal people like.
I had an impression going into this project that the NAS was just a bunch of hard drives and nothing else but that's not the case. Because they are designed to serve media now, they need to have sufficient compute to transcode that media and serve it. They are, in fact, whole servers (again, just computers) in their own right.
You'll have some choices for operating systems. If you get a UGREEN brand NAS like I did they come pre-installed with a UGREEN OS. Other popular choices are TrueNAS and Unraid. Getting into the differences between these OS's is beyond the scope of this article, but I nuked the UGREEN OS right out of the box and flashed TrueNAS on it.
One of the interesting things about TrueNAS (it's a linux distro BTW) is that if you directly plug a keyboard and monitor into it you'll only get a CLI. There is no built in GUI like GNOME. The ONLY WAY to get a GUI for TrueNAS is through a web interface. Much like the Unifi Gateway, it makes itself available through the network via a web based UI. That tends to be a theme with these homelab applications.
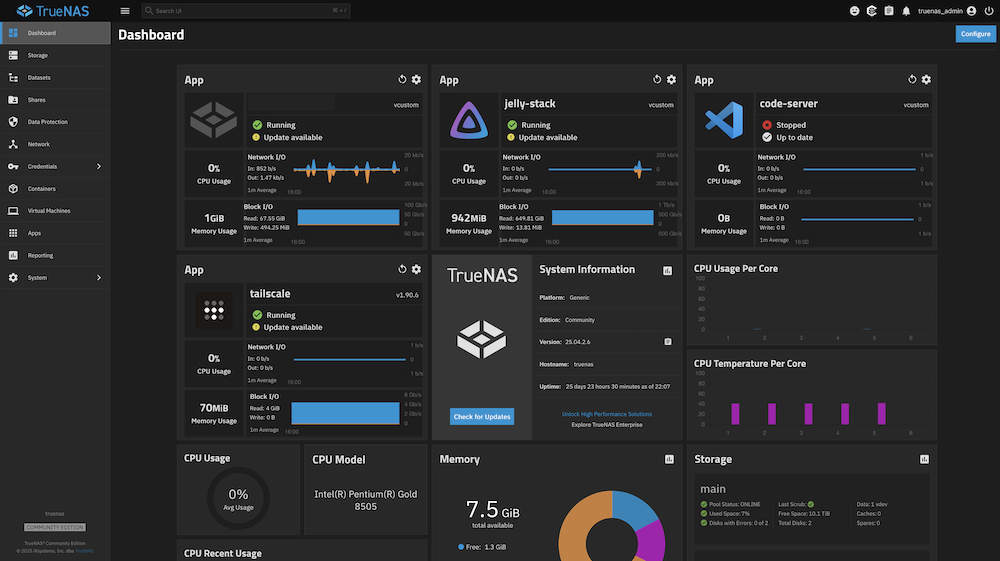
Once you are there you configure your hard drives and install applications using the UI interface, or with Docker compose files. I'm an engineer so I prefer docker compose files so that I can keep it in version control. It also lets you do fun things like create full application stacks running together in a container.
Normally this would break TrueNAS ability to integrate properly with the applications but there is a very clever method described in this article that gets around this.
Techno Tim: A better way to run docker apps on TrueNAS
For hard drives I started with two 12TB HDD's and two 2TB M.2 NVMe drives. Both are setup in a mirror configuration. I didn't know this at the time but it's more storage-efficient to get at least three drives so that you can set them up in a RAID-Z1 configuration, which isn't possible with just two drives. Oops.
TrueNAS is an expansive topic so I'm going to stop here.
Pi Cluster
A Pi Cluster is a group of Raspberry Pi mini pc's linked together. You could use them to work together on tasks like AI models, but this is definitely not cost efficient. In fact a Pi Cluster doesn't really have a good PRACTICAL purpose. The point of building one is mostly ACADEMIC. I'm going to configure this cluster to be a Kubernetes cluster to practice spinning up and managing highly redundant micro-services. If one of the Pi's gets disconnected/damaged etc the remaining two will re-distribute the work load between themselves.
We use K8s clusters at work and this will give me low stakes playground to learn more about them and experiment.
This is the software stack that I am going to use in the cluster:
| Layer | Choice | Notes |
|---|---|---|
| Operating System | Ubuntu Server 24.04 LTS (64-bit ARM) | Headless, no GUI |
| Kubernetes | K3s (latest stable) | Lightweight, HA-capable |
| Container Runtime | containerd (bundled with K3s) | Default, no action needed |
| CNI (Networking) | Flannel (bundled with K3s) | Default, works great |
| Ingress | Traefik (bundled with K3s) | Can swap for nginx later |
| Storage | local-path-provisioner (bundled) | Upgrade to Longhorn later if adding M.2s |
Relevant Links
Comments
Recent Work
Basalt
basalt.softwareFree desktop AI Chat client, designed for developers and businesses. Unlocks advanced model settings only available in the API. Includes quality of life features like custom syntax highlighting.
BidBear
bidbear.ioBidbear is a report automation tool. It downloads Amazon Seller and Advertising reports, daily, to a private database. It then merges and formats the data into beautiful, on demand, exportable performance reports.