AWS CodePipeline for Dockerized React App to S3 Bucket
Intro
Beware, this is the path of sadness. Even if you follow all these steps and get your files to be built and dumped into S3, you will still encounter another issue where the old site files are not deleted first, and new files will just stack up. So you will need to create a Lambda function in your pipeline that also triggers and removes all the old files first. You will also need to wipe your cloudflare caches for new changes to get pushed to your CDN. Just stop now and use Netlify instead. Save yourself.
I've covered the process of creating a CI/CD pipeline for a React application before in a couple different articles.
📘 ncoughlin: AWS CodePipeline for React App This version hosts the application on an EC2 instance (not recommended)
📘 ncoughlin: AWS CodePipeline for React App to S3 Bucket This version hosts the application in an S3 Bucket with static files (a superior method)
The S3 Bucket method is strongly recommended by me over the other.
What those two methods do not cover is what to do if your React application has been Dockerized. In this situation you would of course want your production "build" files to be created using your docker container, so that we can ensure that they are identical to the ones being created on your local machine during development.
I have found a lot of tutorials about how to create a CI/CD pipeline for a Dockerized application. But all of them seem to end up hosting the docker container on an EC2 instance, or an ECS/Fargate instance, or some other server that serves the files with NGINX. So we are right back to where we started, having our static site files that should be hosted from an S3 bucket, being hosted from an always-on, difficult to configure, server.
Those methods might be necessary for an application that requires a server. But as we know (although it seems like a lot of people don't), React applications do not require servers, in the traditional sense, to run.
So how can we modify the process we outlined here : 📘 ncoughlin: AWS CodePipeline for React App to S3 Bucket so that the files are built using a docker container?
Well it turns out it's actually pretty easy. I'm not going to re-write this whole tutorial: (📘 ncoughlin: AWS CodePipeline for React App to S3 Bucket), so follow the steps in that post, and then make the modification we show below.
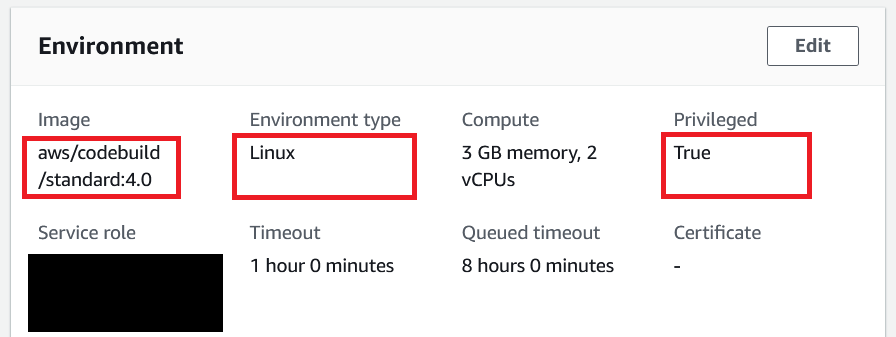
Codebuild Environment Modifications
The Source and Deploy sections of your CodePipeline pipeline will remain entirely unchanged. All the changes will be made in the CodeBuild build project.
The environment type and image will remain the same. However you will need to set privileged to true.
buildspec.yml
Here is the updated buildspec file. I'll go over what is happening below.
version: 0.2

phases:
  install:
    runtime-versions:
      docker: 19

    commands:
      # log in to docker account to prevent rate limiting
      - docker login -u $DOCKER_USERNAME -p $DOCKER_PASSWORD
      # build the Docker image for the application
      - docker build -t my-react-app:latest -f Dockerfile.prod .

  build:
    commands:
      # run container from built image (builds production files)
      - docker run my-react-app:latest
      # set container id to variable
      - CONTAINER=$(docker ps -alq)
      # copy build files from container to host
      - docker cp $CONTAINER:/app/build/ $CODEBUILD_SRC_DIR/build

artifacts:
  # include all files required to run application
  # we include only the static build files
  files:
    - "**/*"
  base-directory: "build"
Runtime
The first thing you'll notice is that we have changed the runtime from node to docker. Remember that we are still in a Linux environment however. A CodeBuild job is essentially just an automated Linux container where all the commands that will be used are specified ahead of time (in the yml file).
Docker Login
# log in to docker account to prevent rate limiting
- docker login -u $DOCKER_USERNAME -p $DOCKER_PASSWORD
While not strictly necessary, I would strongly recommend this step as otherwise you can run into a rate limiting error when trying to download official docker images (as specified in your Dockerfile). You can store your credentials as environment variables in the CodeBuild environment settings, or hardcode them if you like. It's your life.
Build the Docker Image
# build the Docker image for the application
- docker build -t my-react-app:latest -f Dockerfile.prod .
This step should be straightforward to anyone who uses docker. Here we are building the docker image, naming it "my-react-app:latest" and specifying the Dockerfile to build it from. My project has two Dockerfiles.
- Dockerfile.dev
- Dockerfile.prod
More on that below.
At this point our Codebuild Linux container will have built us a Docker image. Next we will need to run a container from that image.
Yes, we will be running a container inside a container... [insert Inception meme]
Running the Container
Next we spin up a container from the image that we just built.
# run container from built image (builds production files)
- docker run my-react-app:latest
One important thing to note here is that in my Dockerfile.prod the command line is as follows:
CMD [ "npm", "run", "build"]
So when this container gets spun up the first thing it will do is build the production files. You'll see that in the CodeBuild logs.
Copy Build Files From Container To Host
This next part is the tricky part that took me a while to figure out. At this point our production "build" files will have been created, but they are located inside the React container, and we need to get them out of there and into the Linux host container, where CodeBuild will be looking for the artifact files. To do that we can use the docker cp command.
However using that command requires us to list the container ID. We can't hardcode the container ID, because we don't know what it is until it has been randomly generated! That's a tricky one.
We can solve this by combining the docker ps command with linux shell variables.
# set container id to variable
- CONTAINER=$(docker ps -alq)
So now we can just type $CONTAINER anytime we want to reference our container ID.
Then we can run the file copy command.
# copy build files from container to host
- docker cp $CONTAINER:/app/build/ $CODEBUILD_SRC_DIR/build
The sharp eyed among you will have noticed there is one more environment variable there, $CODEBUILD_SRC_DIR. This is a default Codebuild environment variable that references the base directory where Codebuild will be looking for artifacts. If you try to copy the build files to plain /build Codebuild will be unable to find them. The root of the Linux container is not the base directory that Codebuild uses.
After that we are done. The artifacts section of the buildspec file is identical to what it was before.
Dockerfiles for Reference
Here are my two Dockerfiles for reference. I have chosen to split them up. You may choose to make a single multistage Dockerfile. Adjust your code accordingly.
FROM node:18-alpine

WORKDIR /app
EXPOSE 3001

COPY package*.json ./

# make node modules folder
RUN mkdir -p /app/node_modules

# recursive ownership for user node on all files in app
RUN chown -R node:node /app

# install node modules
RUN npm install

COPY . .

CMD [ "npm", "start"]

# run as user node
USER node
FROM node:18-alpine

WORKDIR /app
EXPOSE 3001

COPY package*.json ./

# make node modules folder
RUN mkdir -p /app/node_modules

# recursive ownership for user node on all files in app
RUN chown -R node:node /app

# install node modules
RUN npm install

COPY . .

CMD [ "npm", "run", "build"]

# run as user node
USER node
Automated Amazon Reports
Automatically download Amazon Seller and Advertising reports to a private database. View beautiful, on demand, exportable performance reports.