Gatsby: Automatically Creating A Page For Each Blog Post
Intro
To have our markdown pages automatically convert themselves into blog post pages we need to accomplish three things.
- Generate a slug (URL) for each post
- Generate the blog post page template
- Generate a new page for each post
Gatsby Node Configuration File
First we need to make a gatsby-node.js configuration file in our root. It allows us to tap in to the node API’s that Gatsby exposes. This is what we will use to generate our slugs and pages.
Gatsby Docs: Gatsby Node API’s
It’s worth noting that in this context node is not referring to our runtime environment, but to a Gatsby data structure for storing Gatsby data.
So what we are going to do here is use the Gatsby Node API to attach additional information to each node, which in this case is a post. We are going to attach a slug to each node.
The way the gatsby-node.js file works is that we export functions, and the function get run when they are supposed to. Here is a scaffold of a new function.
module.exports.onCreateNode = () => {

}
The onCreateNode function is called when a new node is created. In this case when a new post is created. If we console log all the nodes in the application with the following:
module.exports.onCreateNode = ({ node, actions }) => {
    const { createNodeField } = actions

    console.log(JSON.stringify(node, undefined, 4));
}
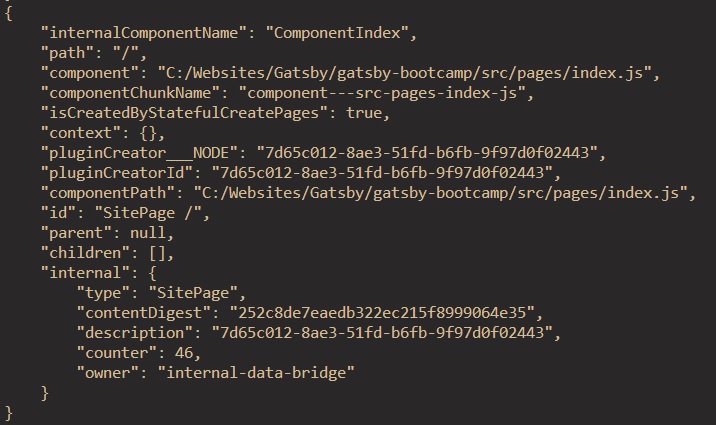
we will get a printout of all the nodes including the pages. Here is the index page.

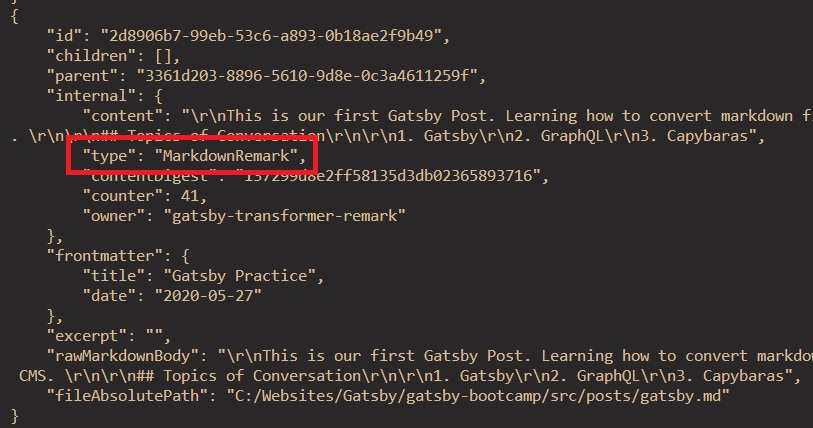
And here is one of our MD files. Note that we have a type property, which is how we are going to select just the MarkdownRemark node types. We don’t want to create a slug and a post page every time ANY node gets created, just when we receive one of these markdown files.

Manipulate Filepath
The way we are going to build the slug is by manipulating the filepath of the MD document. Node.js has a number of built in methods to manipulate filepaths.
So if we combine all of these things we can do the following:
const path = require('path')

module.exports.onCreateNode = ({ node, actions }) => {
    const { createNodeField } = actions

    if(node.internal.type === 'MarkdownRemark') {
        const slug = path.basename(node.fileAbsolutePath, '.md');
        console.log(slug);
    }
}
And that successfully gives us an acceptable string in the console.
Create New Node Field
Now that we have the slug string we want to add it onto the nodes. We can do that with createNodeField.
const path = require('path')

module.exports.onCreateNode = ({ node, actions }) => {
    const { createNodeField } = actions

    if(node.internal.type === 'MarkdownRemark') {
        const slug = path.basename(node.fileAbsolutePath, '.md');
        createNodeField({
            node,
            name: 'slug',
            value: slug
        })
    }
}
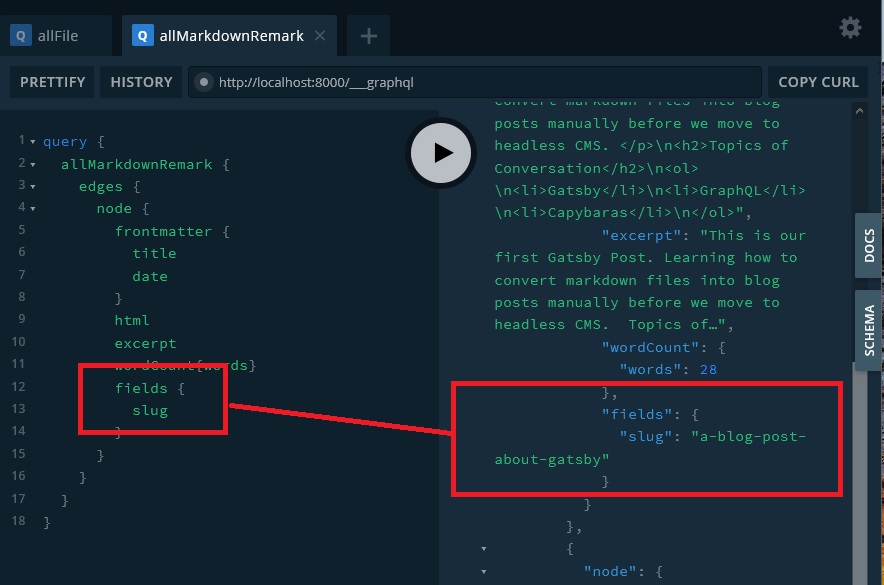
and then we can go back to GraphQL and we will have a new available information in our nodes called fields which is where we will be placing all our custom fields. And inside that is slug!

Generate Post Pages
If we are going to be automatically creating pages we of course need to make a template. Start by creating a new template directory in source and inside our blog template.
And to scaffold this out we just make a simple functional component called blog.js.
import React from 'react';

import Layout from '../components/layout';

const Blog = () => {
    return (
        <Layout>
            This is a blog template
        </Layout>
    )
}

export default Blog
and then we go back to our gatsby-node.js file and use the gatsby node api to create a page for each markdown file.
const path = require('path')

module.exports.createPages = async ({ graphql, actions }) => {
  const { createPage } = actions
  const blogTemplate = path.resolve("./src/templates/blog.js")
  const response = await graphql(`
    query {
      allMarkdownRemark {
        edges {
          node {
            fields {
              slug
            }
          }
        }
      }
    }
  `)

  response.data.allMarkdownRemark.edges.forEach(edge => {
    // 1. Get path to template
    // 2. Get markdown data
    // 3. Create new pages

    createPage({
      component: blogTemplate,
      path: `/blog/${edge.node.fields.slug}`,
      context: {
        slug: edge.node.fields.slug,
      },
    })
  })
}
Linking to Pages
We are creating the pages, now we need to figure out how to link to those pages which will be useful on the blog index page, and we need to also populate those pages with the actual content of the markdown file. Right now it is correctly bringing in the blog template, but the blog template needs to be updated to include the blog contents!
Lets start with the blog index page blog.js
import React from "react"
import { Link, graphql, useStaticQuery } from "gatsby"

import Layout from "../components/layout"

const BlogPage = () => {
  const data = useStaticQuery(graphql`
    query {
      allMarkdownRemark {
        edges {
          node {
            frontmatter {
              title
              date
            }
            fields {
              slug
            }
          }
        }
      }
    }
  `)

  return (
    <Layout>
      <h1> Blog </h1>
      <ul>
        {data.allMarkdownRemark.edges.map(edge => {
          return (
            <li>
              <Link to={`/blog/${edge.node.fields.slug}/`}>
                <h2>{edge.node.frontmatter.title}</h2>
                <p>{edge.node.frontmatter.date}</p>
              </Link>
            </li>
          )
        })}
      </ul>
    </Layout>
  )
}

export default BlogPage
We imported gatsby Link, we added the slug to graphql query, and then we make a variable link in the component.
Rendering Content In Post Page
GraphQL Query Variables
One quick aside that we need to cover here is query variables. We need to construct a query that pulls the information of a single blog post so we will be drilling down into markdownRemark, which pulls the information of a single post, but we need the request to be dynamic, which requires variables. We will be searching for posts based on their slug, so that is where we use the variable.
query (
  $slug: String!
){
  markdownRemark (
    fields: {
      slug: {
        eq: $slug
      }
    }
  ) {
    frontmatter {
      title
    }
  }
}
You can learn more about graphql query variables here:
Pulling Data Into Blog Template
import React from "react"
import { graphql } from "gatsby"

import Layout from "../components/layout"

export const query = graphql`
  query($slug: String!) {
    markdownRemark(fields: { slug: { eq: $slug } }) {
      frontmatter {
        title
        date
      }
      html
    }
  }
`

const Blog = props => {
  return (
    <Layout>
      <h1>{props.data.markdownRemark.frontmatter.title}</h1>
      <p>{props.data.markdownRemark.frontmatter.date}</p>
      <div dangerouslySetInnerHTML={{ __html: props.data.markdownRemark.html }}></div>
    </Layout>
  )
}

export default Blog

GitHub Repo
Comments
Recent Work
Basalt
basalt.softwareFree desktop AI Chat client, designed for developers and businesses. Unlocks advanced model settings only available in the API. Includes quality of life features like custom syntax highlighting.
BidBear
bidbear.ioBidbear is a report automation tool. It downloads Amazon Seller and Advertising reports, daily, to a private database. It then merges and formats the data into beautiful, on demand, exportable performance reports.